node-red-contrib-tasmota 1.0.0
Node-RED integration for Tasmota flashed devices
node-red-contrib-tasmota
Tasmota devices integration for building automation inside Node-RED.
The goal of the project is to support a wide set of features exposed by the Tasmota firmware over MQTT.
Getting Started
This assumes you have Node-RED already installed and working, if you need to install Node-RED see here.
Install via Node-RED Manage Palette interface
node-red-contrib-tasmota
Install via npm
$ cd ~/.node-red
$ npm install node-red-contrib-tasmota
# then restart node-red
Nodes configuration
Basic config:
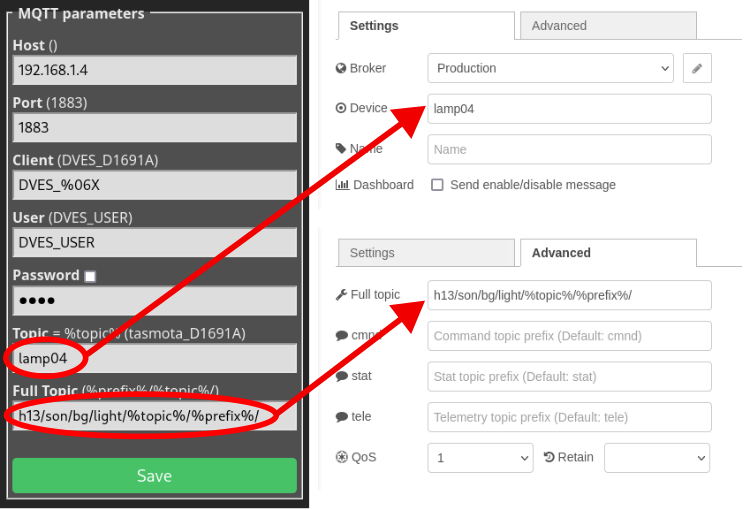
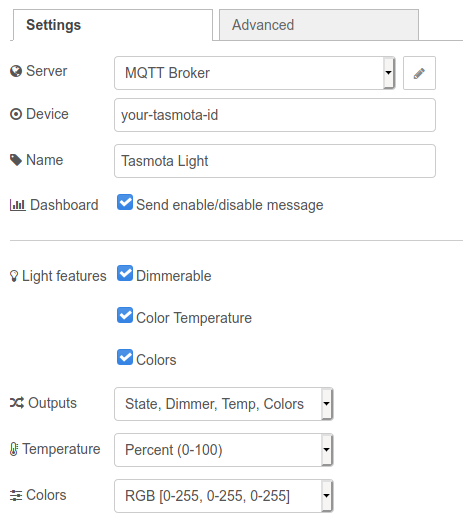
Brokerset here your MQTT broker connection params, you should use a single broker configuration for all your Tasmota nodes, so that a single connection is shared for all nodes.Deviceis the name of the Tasmota device, it must match the Topic field in your tasmota MQTT configuration.Nameit's just a label that is shown on the node itself, you can choose any name you like or leave it blank.Send enable/disable messagesif you connect the Tasmota nodes to a Node-Red dashboard node then you can use this flag to automatically disable the dashbord widget when the device goes offline.
Advanced config:
Full topicmust match the Full Topic field in the Tasmota MQTT configuration, you can leave blank if you did not changed the default Tasmota value.cmnd, stat, teleif you changed this parametes in your Tasmota config then you also need to set them here.
Example:

Available Nodes
Tasmota Switch node
Lets you control your tasmota switch, and of course give you messagges on state changes. The value is also requested on startup, so the state should always be accurate.
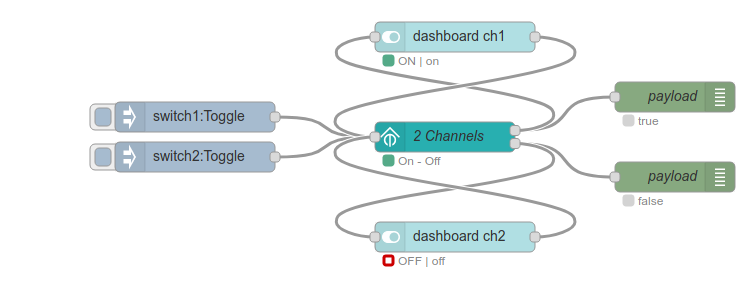
Support up to 8 channals devices, the node can be configured to send all the status changes to a single output (in this case the topic is used to distinguish channels) or can be configured to have N outputs (one for each channel).


Tasmota Sensor node
This node listen for telemetry from the tasmota device and fire a messagge with the JSON data received. On any input messagge fresh data is requested.
Outputs can be freely configured to extract only the data you are intrested in, you can configure as many output as you like, giving a JSONata expression for each output channel.


Tasmota Button node
This node receive button presses from a tasmota button device, it support all the tasmota button actions (TOGGLE, HOLD, SINGLE, DOUBLE, TRIPLE, etc...) and also multi buttons devices. The action is sent as a simple string on the node output. The node can be configured to send all press actions to a single output (in this case the topic is used to distinguish channels) or can be configured to have multiple outputs (one for each channel).
NOTE: Tasmota changed the Buttons/Switch functionality in firmware 9.1.0! This node support both formats, but it's raccomended to update to a recent Tasmota firmware.
See the detailed Tasmota documentation page for an in deep explanation. Also look at: SwitchMode, SetOption73, SetOption114, SetOption1, SetOption13, SetOption32 and setup the tasmota device to suite your needs.

Tasmota Light node
Lets you control your tasmota light bulb/controller, and of course give you messagges on state changes. The value is also requested on startup, so the output state is always accurate and full of all the available light info.


Turn on/off (simple mode)
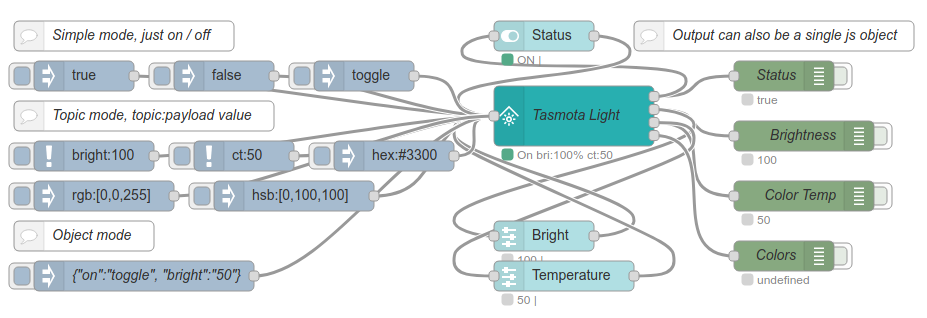
To simply changes the light on / off state just send a msg.payload (without any topic) using one of the following values:
| Topic | Payload | Values |
|---|---|---|
| boolean | true / false | |
| int | 1 / 0 | |
| string | 1 / 0 / on / off / true / false / toggle |
Input (topic mode)
To change a single light property send a msg.payload with a specific topic:
| Topic | Payload | Information |
|---|---|---|
| on | same as simple mode | Turn on / off / toggle the light |
| bright | int | Change the light brightness, range 0 to 100 |
| ct | int | Color temperature, values (from warm to cold) can be expressed in Mired (500-153), Kelvin(2000-6500) or percent(0-100) |
| rgb | int array or string | Change the RGB colors, can be a string: "255,0,0" (for red) or an array of int: [255, 0, 0] |
| hsb | int array or string | Change the HSB values, like rgb can be a string or an array. Ranges are: 0-360, 0-100, 0-100 |
| hex | string | Hexadecimal color notation: #CWWW, #RRGGBB, #RRGGBBWW or #RRGGBBCWWW (with or without the starting #) |
| color | string | Can be red, green, blue, orange, lightgreen, lightblue, amber, cyan, purple, yellow, pink, white, or +/- to switch to next/previous color |
Input (object mode)
The same values of the topic-mode can be used all togheter in a single js object.
To issue multiple commands at the same time just send a msg.payload without any topic like:
{'on': true, 'bright': 25, 'color': 'red'} and so on, the same rules of the topic mode apply.
Input aliases
To provide a bit of compatibility with other famous nodes (like node-red-contrib-huemagic) a set of aliases is provided for the commands. Aliases can be used in both topic-mode and object-mode:
| Command | Aliases |
|---|---|
| on | state, power |
| bright | brightness, dimmer |
| ct | colorTemp |
| hsb | hsbColor |
| rgb | rgbColor |
| hex | hexColor |
Node output(s)
The light node output can be configured to suite your need, there are two main modes:
- Single output mode. In this mode the node will have a single output and will send a js object with the following msg.paylod properties:
| Property | Type | information |
|---|---|---|
| on | boolean | true or false |
| bright | int | Brightness, range from 0 to 100 |
| ct | int | Color temperature, can be configured to send values in Kelvin, Mired or percent |
| color | Any | Light colors, can be configured to be RGB [0-255,0-255,0-255], HSB [0-360,0-100,0-100], or Channels [0-100, 0-100, 0-100] |
- Otherwise you can configure the node to have from 2 to 4 outputs, providing a single value of the table above on each separate output.
First output for
on, second forbright, third forctand fourth forcolor.
Tasmota Generic node
This is a generic Tasmota node, can send and receive any command/message to/from any Tasmota device.
With this node you can issue any command as you can do in the Tasmota console. Any received messages will be forwarded to the node output, with the topic and the payload untouched.
To issue a command just send a msg to the node using one of following syntaxes:
- string payload:
CMD <param> - JSON list payload:
["CMD <param>", "CMD <param>", ...] - JSON object payload:
{"CMD": "param", "CMD": "param", ...}
CMD can be any valid tasmota command and param is specific for each command. Refer to the official
Tasmota documentation for the full commands reference.
Note that the object format does not guarantee the order of delivered messagges, thus if commands order is important you must use the list format.
Send custom Tasmota commands
All the nodes support an additional mode where you can send any Tasmota command or a list of commands to the device. This can be used for example to change device configuration or to send specific commands not supported by the node itself.
The payload format is the same as explained in the Generic node above, the only difference
is that the message topic must be set to command and the commands result is not catched
(If you need the command results you must use the Generic node).
Example:
To send the command BlinkCount 12 to a tasmota switch device, create a tasmota-swich node and set the
device id(topic) to the correct value for your device. Then add an inject node and connect it. In the Inject node
settings, set the topic to command. Set the payload type to string and the payload to BlinkCount 3.
To send a list of commands set the payload type to JSON. An example of a command list syntax is:
["BlinkCount 12", "BlinkTime 3", "Power blink"]
Authors
Initially forked from contrib-sonoff-tasmota


