node-red-node-swagger-ddm 0.1.10
A set of tools for generating Swagger API documentation based on the HTTP nodes deployed in a flow
Node-RED Swagger Documentation Generator
This package provides a set of tools for generating Swagger api documentation based on the HTTP nodes deployed in a flow.
Usage
Install the node module
npm install node-red-node-swagger
Note: until this is published to npm, you will need to install from git:
npm install node-red/node-red-node-swagger
Provide a template swagger file in
settings.js:swagger: { "template": { "swagger": "2.0", "info": { "title": "My Node-RED API", "version": "0.0.1" } } }This template will remain unchanged and serve as the basis for the swagger doc.
Note: You may additionally add parameters to the swagger file in 'settings.js' to have those parameters automatically added to each path in the generated swagger doc.
    "swagger": {
      "template": {
        "swagger": "2.0",
        "info": {
          "title": "My Node-RED API",
          "version": "0.0.1"
        }
      },
      "parameters": [
        {
          "name": "parameterA",
          "type": "string",
          "in": "header",
          "required": false,
          "description": "This is a test parameter to show how parameters are automatically added to each path in the generated swagger doc."
        }
      ]
    }
After installing the package, you have the option to identify metadata for each HTTP-In node that will be used in the swagger doc generation.
The generated swagger is then available at http://localhost:1880/http-api/swagger.json.
Path Swagger Generation
Via the editor, you can define metadata for each particular HTTP-In node to be used in swagger generation.
To do so,
Select an HTTP-In node in the editor.
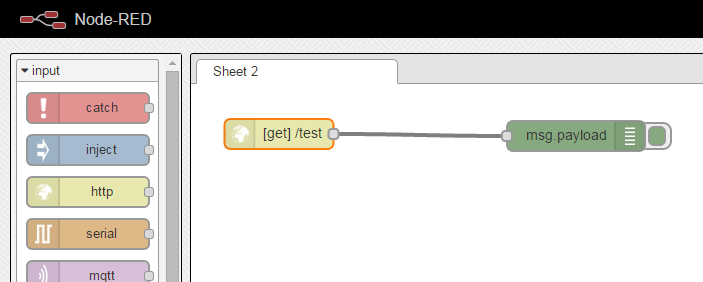
From the config panel, you can select a user-defined swagger doc from the dropdown. You may create a new metadata definition by selecting "Add new swagger-doc..." and clicking the edit button.
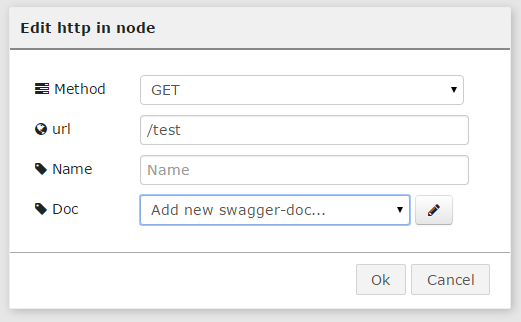
This will launch the swagger config panel, where you have three distinct tabs that make up the swagger documentation.
Info

This tab allows you to provide the basic information about the attached paths.
- Summary - A short summary of what the operation does. For maximum readability in the swagger-ui, this field SHOULD be less than 120 characters.
- Description - A verbose explanation of the operation behavior. GFM syntax can be used for rich text representation.
- Tags - A list of tags for API documentation control. Tags can be used for logical grouping of operations by resources or any other qualifier. These should be provided as a comma-separated list.
- Consumes - A list of MIME types the operation can consume. These should be provided as a comma-separated list
- Produces - A list of MIME types the operation can produce. These should be provided as a comma-separated list.
- Deprecated - Declares this operation to be deprecated. Usage of the declared operation should be refrained.
Parameters
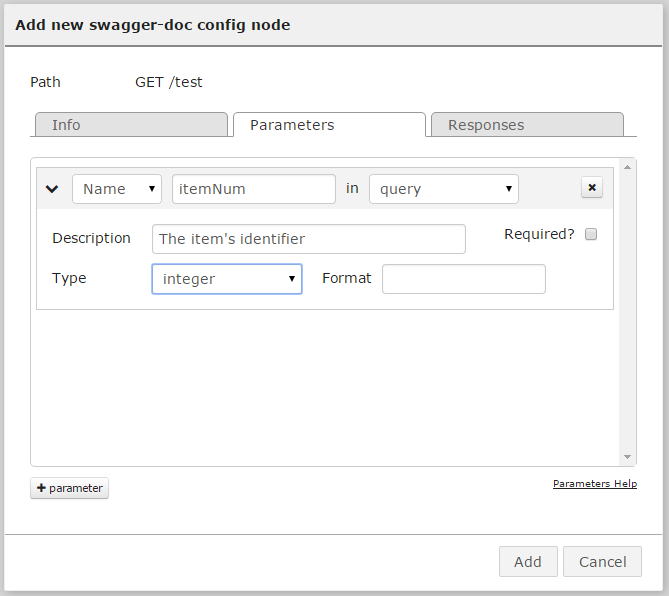
This tab allows you to configure the parameters that can be used with the particular operation.
- Name - The name of the parameter. Parameter names are case sensitive.
- In - The location of the parameter. There are four supported locations of the parameter
- Query - Parameters that are appended to the URL. For example, in
/items?id=###, the query parameter isid. - Header - Custom headers that are expected as part of the request.
- Form - Used to describe the payload of an HTTP request when either
application/x-www-form-urlencodedormultipart/form-dataare used as the content type of the request. This is the only parameter type that can be used to send files, thus supporting thefiletype. Since form parameters are sent in the payload, they cannot be declared together with a body parameter for the same operation. Form parameters have a different format based on the content-type used (for further details, consult http://www.w3.org/TR/html401/interact/forms.html#h-17.13.4): - Body - The payload that's appended to the HTTP request. Since there can only be one payload, there can only be one body parameter. The name of the body parameter has no effect on the parameter itself and is used for documentation purposes only. Since Form parameters are also in the payload, body and form parameters cannot exist together for the same operation.
- Query - Parameters that are appended to the URL. For example, in
- Description - A brief description of the parameter. This could contain examples of use. GFM syntax can be used for rich text representation.
- Required - Determines whether this parameter is mandatory.
- Type - The type of the parameter. Since the parameter is not located at the request body, it is limited to simple types (that is, not an object).
- Format - The extending format for the previously mentioned type.
If a body parameter is selected, the user will provide properties included in the body object, rather than specifying a type.
Responses
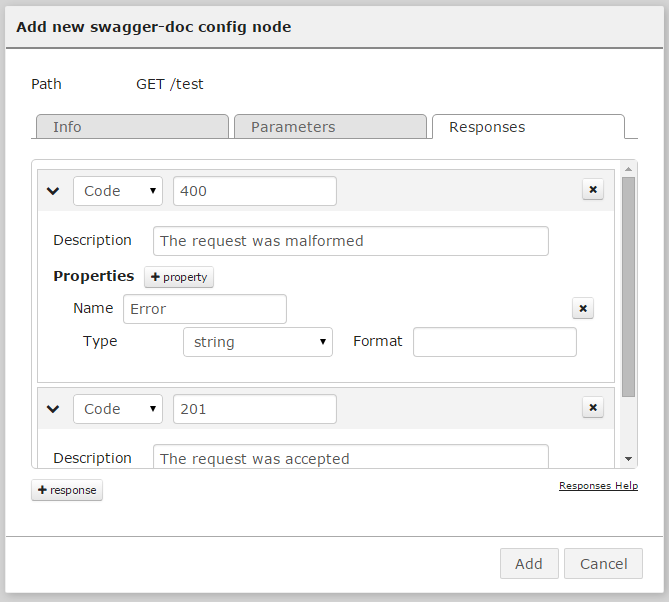
This tab allows you to define the applicable responses that a user may receive back from the operation.
- Code - You can either select to define the default response, or to provide a specific HTTP status code that the response will be applicable for. A default response is used to cover other undeclared responses
- Description - A short description of the parameter. This could contain examples of use. GFM syntax can be used for rich text representation.
- Properties - The properties are the components that build up the schema of the response.
- Name - The key name for the particular property.
- Type - The type of the property.
- Format - The extending format for the previously mentioned type.
If no responses are provided, a default response with the reply "success" will be used.
##Swagger-UI
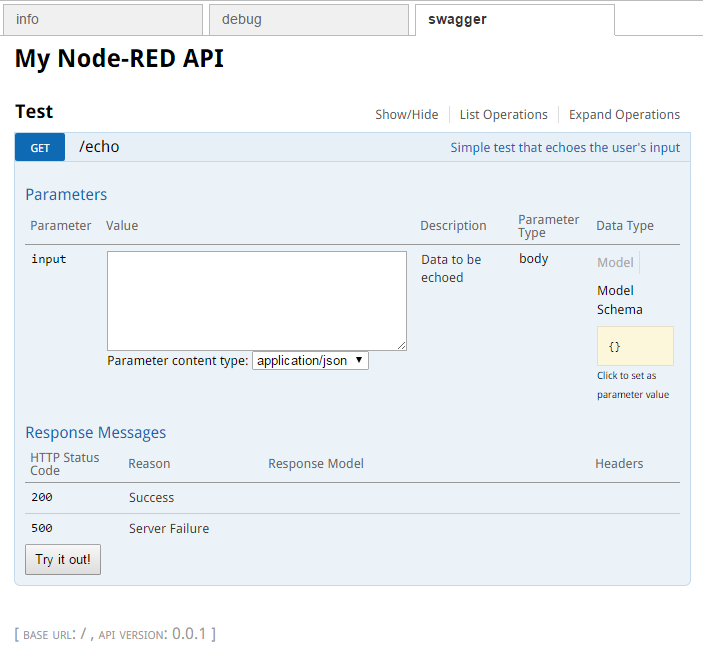
Swagger-UI is including in the plugin. Once loaded, the plugin will show a swagger tab in the node-red sidebar. From here, you can see the dynamically generated swagger for the current flow. Additionally, you can use the test function to try out your API directly from the editor, providing any parameters you have defined in the docs for the HTTP-In nodes. The Swagger-UI will automatically refresh any time the flow is redeployed.
Notes
- the
pathsentry of the swagger is generated based on theHTTP Innodes present in the flow. - if a swagger template is not provided, the example above is used as the default.
- if
basePathis not set in the template, it is set to the value ofhttpNodeRootif that value is something other than/.