node-red-contrib-xstate-machine 1.3.4
Xstate-based state machine implementation using state-machine-cat visualization for node red.
Node Red XState-Machine
![]()
Computing machines are like the wizards in fairy tales. They give you what you wish for, but do not tell you what that wish should be.
- Norbert Wiener, founder of cybernetics
The goal of this package is to provide an easy yet flexible and customizable way to define state-machines within node-red and effortlessly observe their state.

Changelog
See the separate changelog file for an overview over the available versions and changes.
Introduction
The idea for this package is based on node-red-contrib-finite-statemachine which was a very good starting point for me, but lacked some functionality that I wanted. If you only need to model simple state machines without guards, actions, time-based transitions, compund or parallel states this is the library you should go to!
This package provides state-machine functionality for node-red by utilizing the excellent xstate library as basis. It allows for very complex systems, e.g. nested machines, nested states, parallel states, history, deep history etc. For visualiztaion the library state-machine-cat comes into play.
The rest of the implementation is based on node-red's function and debug nodes.
Installation
- Via node-red: Search for "node-red-contrib-xstate-machine" in the palette manager
- Via terminal: Run
npm install node-red-contrib-xstate-machinein your node-red user folder (typically~/.node-redor%HOMEPATH%\.node-red)
Usage
Once this package is installed in node-red you will find two new items:
- A new node named
smxstate(shorthand for state-machine xstate) - A new sidebar (use the drop-down arrow) called
State-machinesfor state-machine visualization
In the following the usage of both will be explained to get you started.
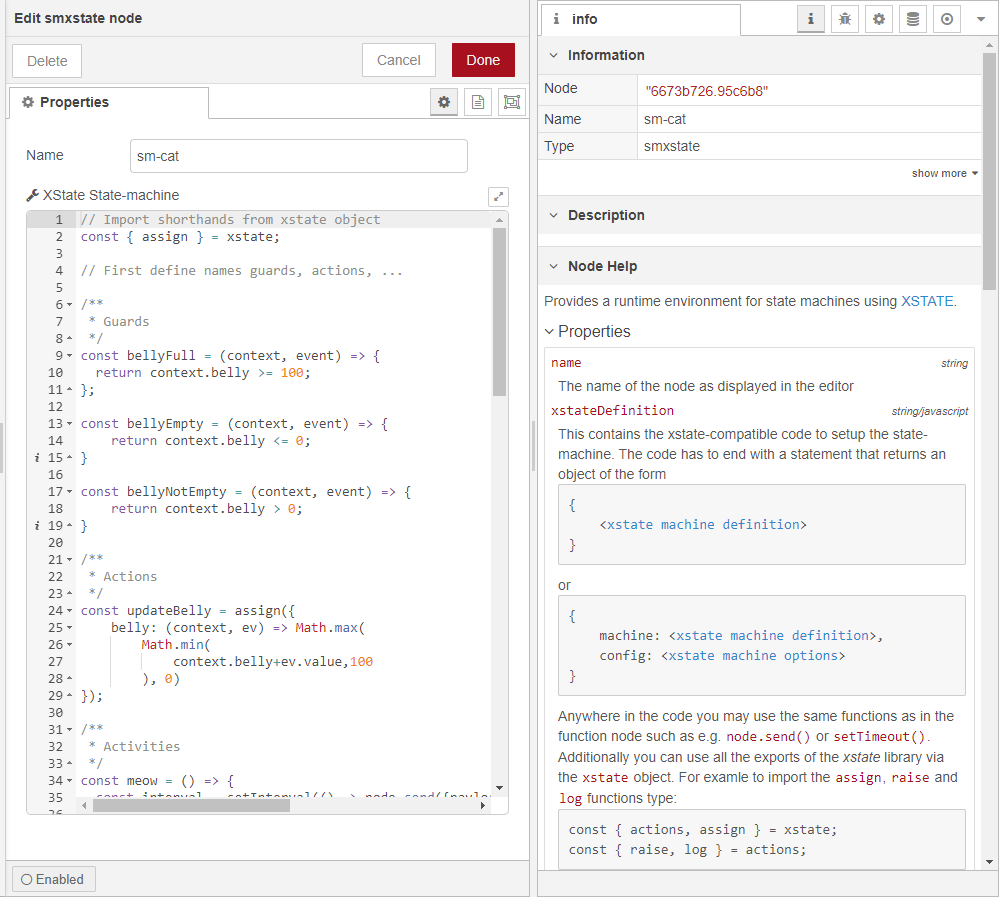
The smxstate node
Within this node you will find a javascript editor similar to the function-node. Here you can define your state-machine in a xstate-fashion. The javascript code must end with a return that returns an object of the following form:
return {
  machine: {
    ...
  },
  config: {
    ...
  }
}
The machine object is an xstate machine. For details on how to model or formulate your machine see the excellent xstate docs.
The config object contains all the named actions, activities, guards and services used in the machine object, see here.
See the node's help within node-red for further details:
State-machines sidebar
The side bar allows for visualizing a machine instance's current data context and its state.
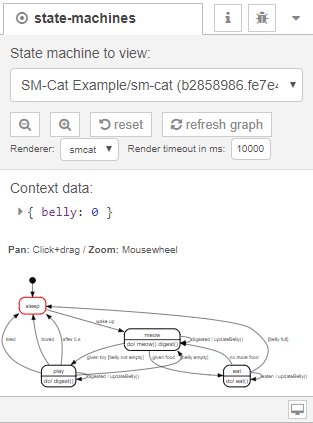
There are a number of buttons available to control the editor view/control the machine:
- Reveal button (the zoom out icon) for the current machine instance: This shows and highlights the currently chosen machine in a flow. If it is within a subflow it highlights the subflow's instance.
- Reveal button (the zoom in icon) for prototype machines: If the machine instance runs within a subflow then the subflow is openend and the prototype node is highlighted.
- Reset button: This resets the current machine instance to its initial state and data context.
- Refresh graph button: This redraws the visualization manually (useful e.g. if the instance was changed on the server by another user or in a separate editor).
Also there are some settings that affect how the state graph is rendered.
- With the
Renderer:dropdown you can select the defaultsmcatrenderer. For more performance you can also use the native graphvizdotrenderer if it is available on your system. In order to be able to select it thedotcommand must be available in the environment node-red is running in. - The
Render timeout in ms:sets the maximum time a rendering may take to render. If you run on slow hardware you can crank up the value. Don't worry: The renderings are cached and only need to be redrawn if something changes. Else they are taken from the cache.
Example flows
Simple statemachine with data object
The follwing example is based on the example machine from state-machine-cat 😺
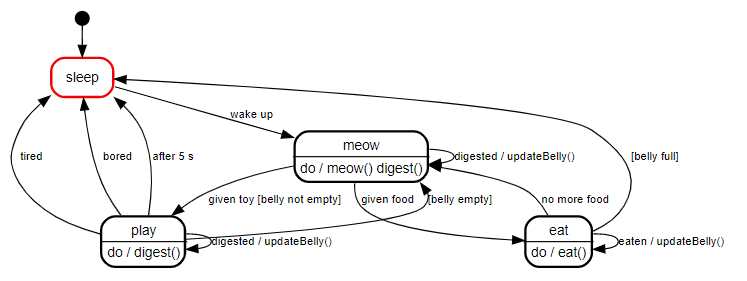
In the image below you can see the node-red setup for the example.
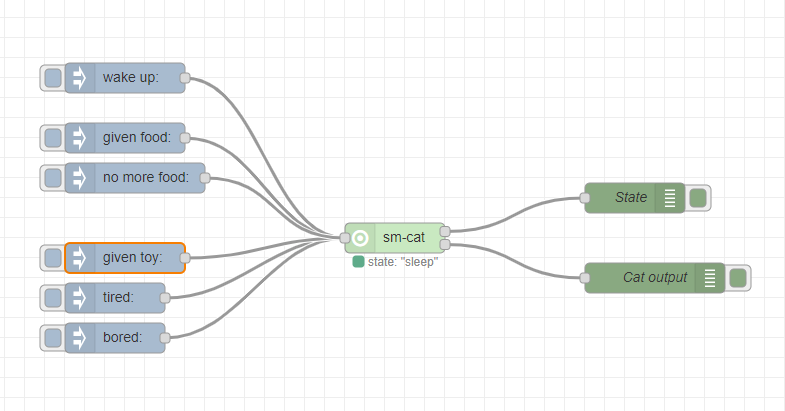
It tries to model a cat with 4 states
- sleep
- eat
- play
- meow
Events from the cat's point of view are
- given food
- no more food available
- given toy
- wake up
- tired
- bored
The cat has an internal value-context containing the belly filling level.
There are several state-transitions with guards, e.g. [belly empty] or [belly full] as well as timed transitions (see the image below).
Enter the following code snippet into a smxstate node or load the example flow from here into node-red to get the example started:
// Import shorthands from xstate object
const { assign } = xstate;

// First define names guards, actions, ...

/**
 * Guards
 */
const bellyFull = (context, event) => {
  return context.belly >= 100;
};

const bellyEmpty = (context, event) => {
    return context.belly <= 0;
}

const bellyNotEmpty = (context, event) => {
    return context.belly > 0;
}

/**
 * Actions
 */
const updateBelly = assign({
    belly: (context, ev) => Math.max(
        Math.min(
            context.belly+ev.value,100
        ), 0)
});

/**
 * Activities
 */
const meow = () => {
  const interval = setInterval(() => node.send({payload: "MEOW!"}), 2000);
  return () => clearInterval(interval);
};

/**
 * Services
 * see https://xstate.js.org/docs/guides/communication.html#invoking-callbacks
 */
const eat = (ctx, ev) => (cb) => {
    const id = setInterval(() => cb({
      type: 'eaten',
      value: 5
    }),500);
    return () => clearInterval(id);
};

const digest = (ctx, ev) => (cb) => {
    const id = setInterval(() => cb({
      type: 'digested',
      value: -5
    }),500);
    return () => clearInterval(id);
}

/***************************
 * Main machine definition *
 ***************************/
 return {
  machine: {
    context: {
        belly: 0    // Belly state, 100 means full, 0 means empty
    },
    initial: 'sleep',
    states: {
      sleep: {
          on: {
              'wake up': 'meow',
          }
      },
      meow: {
          invoke: { src: 'digest' },
          on: {
              'given toy': { target: 'play', cond: 'belly not empty' },
              'given food': 'eat',
              'digested': { actions: 'updateBelly' }
          },
          activities: ['meow']
      },
      play: {
          invoke: { src: 'digest' },
          on: {
              tired: 'sleep',
              bored: 'sleep',
              'digested': { actions: 'updateBelly' },
              '': { target: 'meow', cond: 'belly empty' }
          },
          after: {
              5000: 'sleep',
          }
      },
      eat: {
          invoke: { src: 'eat' },
          on: {
              '': { target: 'sleep', cond: 'belly full' },
              'no more food': { target: 'meow' },
              'eaten': { actions: 'updateBelly' }
          }
      }
    }
  },
  // Configuration containing guards, actions, activities, ...
  // see above
  config: {
      guards: { "belly full": bellyFull, "belly not empty": bellyNotEmpty, "belly empty": bellyEmpty },
      activities: { meow },
      actions: { updateBelly },
      services: { eat, digest }
  }
}
This will give you a state machine to play with. It incorporates actions, delayed events, services, guards and internal data context. Observe the state-machine's state in the visualization panel while you inject events.
Development
- Install dependencies using
npm install - Trigger the build tool-chain using
npm run devbuildto create a development build version that is easy to debug. If you use Visual Studio Code for development you can use the provided launch.json to run a node-red environment where you can quickly test the node. To use it first create a dir called./tmpin this packages root dir and then change to it. Then runnpm install ..to create a link to your working copy of the package for the node-red environment. - Running
npm run buildwill create deployable production output in the./distdirectory. - To run tests, execute
npx mocha ./tests. To add tests, create a files<description>_spec.jswith a mocha test specification. - Using changesets: Before committing a change that should be visible on the changelog run
npx changesetand input the corresponding information into the wizard. Then add the created file in the.changesetfolder to the commit. - Publishing: If not done yet, login to npm using
npm login. Then runnpx changeset versionto create a new version number, update package.json and the CHANGELOG.md files. Commit these changes with messageRelease VX.Y.Z. Then runnpx changeset publishto publish to npm. Now rungit push --follow-tagsto push the version tag created by changeset. - Updating dependencies: run
npm outdatedto get a list of upgradeable packages. Then runnpm updateto update accordingly.
Acknowledgements
- To "Access Denied" for code snippet on SVG zooming & panning
Caveats
- If you use multiple nested state-machines using services, only the returned machine object will get rendered in the state-machines panel and the nested machines won't be drawn.
- It is not possible to update the context from within an activity. Activities are per definition only fire-and-forget effects without communication back to the machine (see the post here). Instead you have to use services. See the sm-cat example's eat and digest services. In xstate V5 activities will be replaced by services completely.
- 🚨 Beware of copy-pasting flows that incorporate
smxstatenodes from the internet. Although the javascript code provided within a node is evaluated in a node.js vm environment it is easy to paste malicious code. See this blog post for more information. To make sure nothing malicious is pasted, take a look at the javascript code within the node before deploying it in node-red.