node-red-contrib-wav 1.0.1
A Node Red node to handle WAV audio
node-red-contrib-wav-headers
A Node Red node to handle WAV audio.
Install
Run the following npm command in your Node-RED user directory (typically ~/.node-red):
npm install node-red-contrib-wav
Support my Node-RED developments
Please buy my wife a coffee to keep her happy, while I am busy developing Node-RED stuff for you ...

Usage
Depending on the input, this node can perform 3 different type of actions. All input and output data will be available in msg.payload.
Get WAV headers
When the input is a WAV audio fragment, this option can be used to get the WAV headers (on the second output). On the first output, the untouched input message will be passed through.
This option is useful to get information about the audio samples:

Note that the duration field is a calculated field (based on the WAV header information), to supply the duration of the WAV chunk in seconds.
Remove WAV headers
When the input is a WAV audio fragment, this option can be used to remove the WAV headers. On the first output, the audio chunk with raw audio samples will appear (i.e. without the WAV headers). On the second output, the removed WAV headers will be send.
Add WAV headers
When the input is a chunk of raw audio samples (PCM), this option can be used to add WAV headers. On the first output, the WAV audio fragment will appear (i.e. the WAV headers followed by the raw audio samples). On the second output, the added WAV headers will be send.
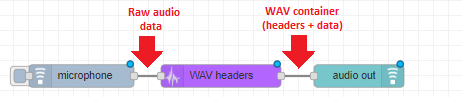
Some Node-RED nodes (e.g. node-red-contrib-micropi) inject chunks of raw audio samples into the Node-RED flow. However such a raw audio chunk doesn't contain any information about the content of the bytes! This means that other nodes (e.g. the Dashboard audio-out node) don't know how to process these audio samples, since they don't know what the data represents.
In that case this node can add all required information to the raw audio samples, by adding WAV headers to the audio chunk. All the required information can be specified in the node's config screen:
- The number of channels: is it a single channel recording or multiple channels (left microphone and right microphone).
- The sample rate: i.e. the number of audio samples per second.
- The bit width: i.e. the number of bits of each audio sample. Are we dealing with 8-bit samples (1 byte), or 16-bit samples (2 bytes) ...
The conversion from PCM to WAV is explained in the following figure:
Example flow
The following example downloads a WAV file, removes the WAV headers and afterwards adds the WAV headers again:

[{"id":"fca71b54.9c2998","type":"wav-headers","z":"95744d6c.fa339","name":"","action":"del","channels":"1","samplerate":"22050","bitwidth":"16","x":1020,"y":160,"wires":[["283a2469.04320c"],["1bae03de.11688c"]]},{"id":"70c2683f.97bfa8","type":"http request","z":"95744d6c.fa339","name":"Download WAV file","method":"GET","ret":"bin","paytoqs":false,"url":"https://www.pacdv.com/sounds/voices/open-the-goddamn-door.wav","tls":"","proxy":"","authType":"basic","x":790,"y":160,"wires":[["fca71b54.9c2998"]]},{"id":"c76a87e2.776f18","type":"inject","z":"95744d6c.fa339","name":"Start test","topic":"","payload":"","payloadType":"date","repeat":"","crontab":"","once":false,"onceDelay":0.1,"x":600,"y":160,"wires":[["70c2683f.97bfa8"]]},{"id":"220e4392.43238c","type":"play audio","z":"95744d6c.fa339","name":"","voice":"0","x":1510,"y":160,"wires":[]},{"id":"283a2469.04320c","type":"wav-headers","z":"95744d6c.fa339","name":"","action":"add","channels":"2","samplerate":"44100","bitwidth":"16","x":1270,"y":160,"wires":[["220e4392.43238c"],["7de3311e.2d433"]]},{"id":"7de3311e.2d433","type":"debug","z":"95744d6c.fa339","name":"Added headers","active":true,"tosidebar":true,"console":false,"tostatus":false,"complete":"true","x":1520,"y":200,"wires":[]},{"id":"1bae03de.11688c","type":"debug","z":"95744d6c.fa339","name":"Removed headers","active":true,"tosidebar":true,"console":false,"tostatus":false,"complete":"true","x":1270,"y":200,"wires":[]}]
Remark: this flow makes use of the node-red-contrib-play-audio, so you will need to install that to test the flow.
This example is purely theoretical, to demonstrate both actions. But the main idea is that e.g. the node-red-contrib-play-audio node requires the WAV headers, since the browser (where the flow editor is displayed) can only play the audio samples when he has all the required information about the samples ...
More detailed
This section is only required if you want to learn more details of what this node is doing behind the scenes. That might be interesting if you are running in troubles, and you have to do some troubleshooting ...
Introduction to PCM
This is how digital audio works in a nutshell:

When you speak, sound waves travel through air.
The microphone's membrane starts vibrating (from it's center position at rest backwards and forwards).
- The number of times per second it vibrates is called the frequency (note, tone, pitch), and is expressed in Hertz (Hz). Humans can hear sounds between 20 Hz and 20 kHz.
- The distance it travels from it's resting point is the gain (volume, loudness), and is expressed in decibels (dB).
This vibration results in an electrical wave. When the membrane goes forwards (from it's center position), the electrical wave is going up too. When the membrane goes backwards, the electrical wave is going down too.
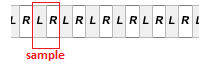
The height (amplitude) of the wave is measured at regular time intervals, which is called sampling. The sample rate is the number of samples per second, e.g. for CDs a sample rate of 44100 Hz is used. How higher the sample rate, how better our sound quality will become (but the more cpu and memory will be needed). In case of e.g. 2 channels (left and right), a sample contains the bytes of both channels:
During quantization each of those analog voltage values is converted to the nearest byte value. The more bits (8, 16, 24 , 32) are used, the better our digital audio signal will approximate the original analog signal (but the more cpu and memory will be needed).
The result will be an endless byte stream, containing digital sample values. This audio format is called PCM (Pulse Code Modulation), which is most of the time uncompressed.
Those PCM samples are grouped together in chunks of N bytes, to avoid having to process the samples one by one (and using too much system resources).
Such a PCM (i.e. raw audio) signal is required, whenever you need to manipulate the audio signal (e.g. amplify it, filter out noise, ...). However PCM uses a lot of cpu and storage, e.g. a 16 bit signal at 44100 Hz produces every second 88,2 Kbyte which you need to process. Therefore the pcm signal will be compressed (e.g. mp3 format) as soon as the data doesn't need to be manipulated anymore (e.g. when stored on disc, or send over the network ...). But inside our flow (where we want to manipulate the audio) we need to pass uncompressed PCM chunks, otherwise each node (e.g. amplifier, noise filter ...) would have to do a lot of unnecessary processing:
- Decompress the samples (e.g. MP3) to PCM
- Process the uncompressed PCM audio samples
- Compress the PCM samples again (e.g. to MP3)
Introduction to WAV
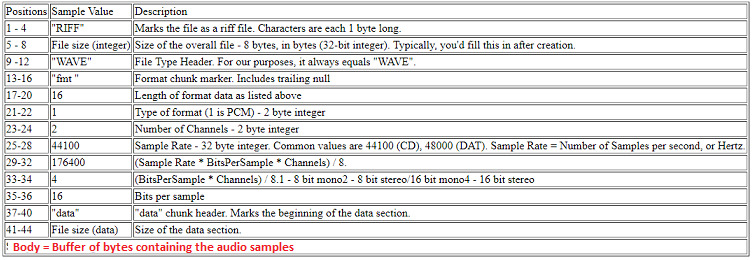
WAV (Waveform Audio File Format) is a file format for storing audio. A WAV chunk contains both a header and audio sample data. The data can be any kind of audio (PCM, MP3 ...), but most of the time it will contain raw audio (PCM) samples. The headers contain information about the data bytes, to make sure the audio can be interpreted correctly afterwards.
This node receives a the data as a Buffer of bytes, containing PCM audio samples. Then a new Buffer will be created containing all the WAV headers, and both buffers will be merged resulting in one large Buffer: