node-red-contrib-onkyo-ri 1.0.1
Wrapper for onkyo-rpi which is inspired on ahaack/onkyo-rpi and lets you control almost any Onkyo Ri capable device, that's connected through a custom build cable (2.5mm mono jack plug, terminated by 10k resistor, tip=data, shield=gnd) connected to the Ra
Objective
Control Onkyo Hardware with RI Jack using NodeRed & Raspberry Pi
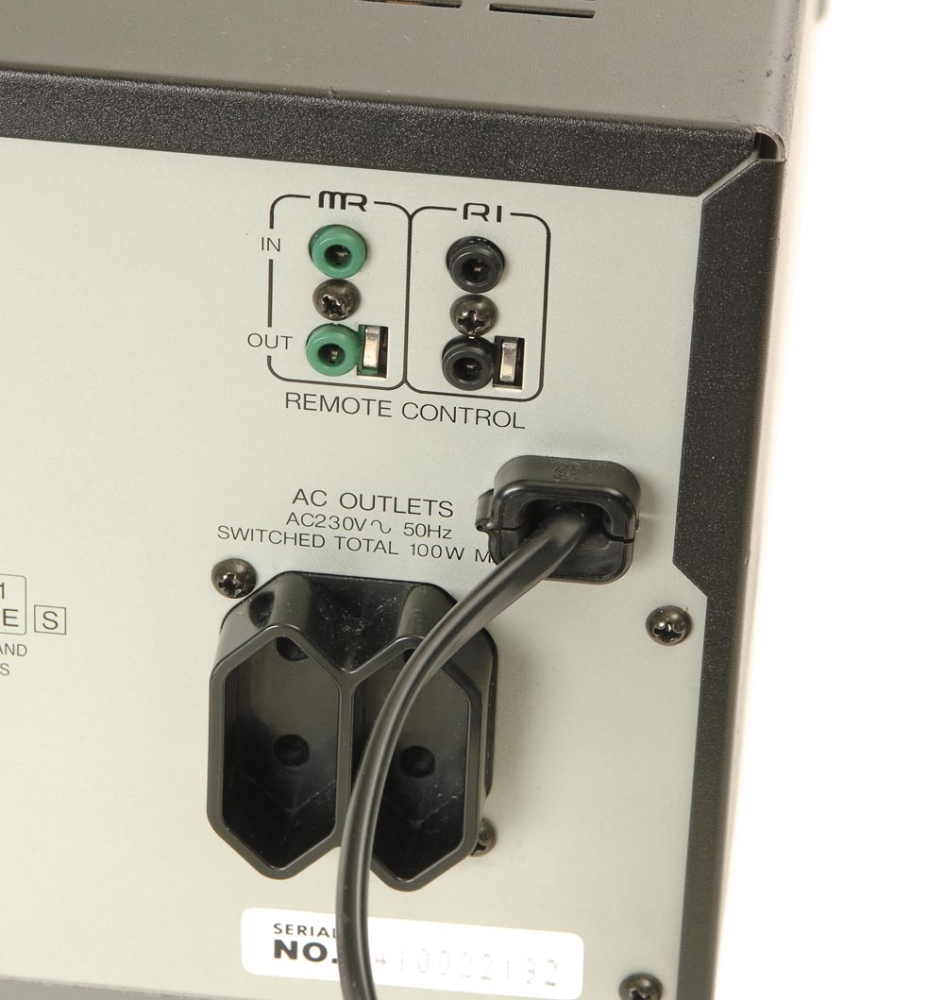
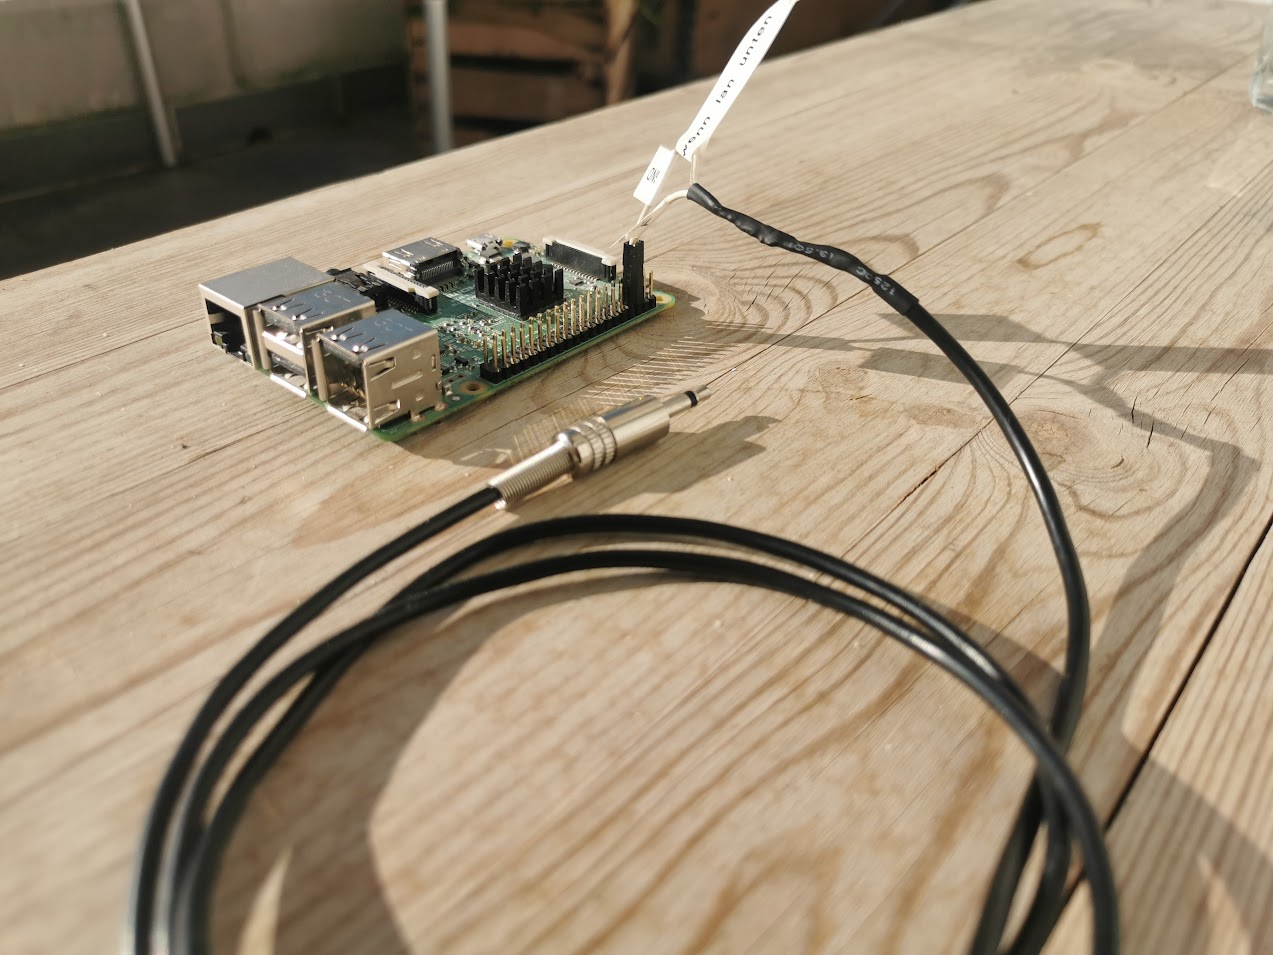 U need to bulild a cable yourself with a 3.5mm mono jack, that has a 10kOhms resistor in parallel, and connect the other end to a Raspberry Pi's GPIOS
TLDR
- You need to make yourself a cable with a 3.5mm Mono jack, that has a 10kOhms resistor in parallel.
- Then connect the other end to a Rasperry Pi's GPIOS (There's a klicki bunti guide for that)
- Executing ./onkyoricli (e.g.
./Onkyo-RI-Rasperrypi/onkyoricli -p 24 -c 0x20,0x20,0x20) sends commands to your Onkyo Hardware (multiple commands are separated by commas) - This Repo is a Node-Red wrapper for dajuly0x23/onkyo-rpi written in C++ which by itself ported code docbender/Onkyo-RI originally for the Arduino platform to run on a Raspberry Pi - which is kind of the hardware layer that will execute the binary and put the electrons on the wire.
- Please note Onkyo specific pitfall => can only control volume when source on DOCK / GAM input.
- There is not yet a return channel to receive commands sent on the bus - seemingly some HW do send something - didn't yet have a oszi, would be cool feature though!
To buy:
- 3.5 mm mono jack cord cut off end, solder
- 10k Ohm resisor. in parallel & connect to GPIO's of Pi. 3.5mm stereo should work too (short L + R then) - didn't thest that though.
- solder jump wires to the end and connect to your Rasperry Pi's GPIOS. On my Rasperry Pi 4 I have the tip on GPIO.27 which is the third on the right when you look from the USB sockets, while the shield is on the neighboring 4th pin that happens to be GND
Getting started
node-red-contrib-onkyo-ri wrapps dajuly0x23/onkyo-rpi (written in C++ using Wiring Pi) for Node-Red on a Rasperry Pi
The node calls the script and passes msg.payload to it. So (according to the table below) msg.payload could be 0x20 to switch a connected Onkyo Ri device to CD Input.
You can also send multiple commands, seperated by commas like 0x20,0x20,0x20.
Before you start
Codes don't seem to be super-similar between different models. There are codes documented, but if you don't have a model, that's in the list, you need to use a scan script like in ahaack/onkyo-RPI *scan script, and determine the (missing) commands to your hardware yourself Please consider adding your device to the list here then. Pull request welcome! Creating a C++ implementation and adding a NodeRed wrapper for it is planned for the near future.
Installation
This Repository includes a executable compiled for Rasperry Pi 4 on a 32 Bit Raspian intallation.... which shouuuuuld run just fine on "any" pi. If it doesn't run or when you are running 64 Bit you could consider running rm onkyoricli && ./build to recompile. Even though I daubt that there would be any benefits by going to 64 Bit. (If you think there are benefits - let me know ;-)
The dependency comes pre compiled and should just run fine out of the box.
Test by executing. ./Onkyo-RI-Rasperrypi/onkyoricli
If it fails, maybe you have to recompile it. See docs for dajuly0x23/onkyo-rpi for instructions.
To test if all works execute
cd Onkyo-RI-Rasperrypi
./onkyoricli -p <wiringPi port> -c 0x20
The graphic below shows the port numbers for a rasperry pi 3.
If you connected the cable as suggested below use 25
If you have another model then look for WiringPi pin numbers rasperry pi xxx.
If the cabe is connected, and you got a right code, you should see / hear some reacrion from your Hardware now!
Connection
To connect to the RI port a 3.5mm mono jack is used. Tip is for data signal and sleeve is ground (GND). In case of stereo jack, connect tip to DATA, sleeve and ring to GND. That means for a Rasperry Pi 3 to put the tip to Pin 22 (GPIO_GEN6) GPIO25 (tx) (which is set as standard for this node) and the shield to Pin 20 or another ground (Gnd). Please note, the pins can't be connected to UART ( Pin 8 / 9 ). (I didn't try it, so correct me if im worng).
If you want to use another GPIO, you can specify that later in node red. The connection schema shown below is for a Rasperry Pi 3.
Output of gpio readall (make sure wiring pi is installed for that)
Use ⚠️WiringPi⚠️ (wPi) pin numbers !!!
 +-----+-----+---------+------+---+---Pi 3B+-+---+------+---------+-----+-----+
 | BCM | wPi |   Name  | Mode | V | Physical | V | Mode | Name    | wPi⚠ | BCM |
 +-----+-----+---------+------+---+----++----+---+------+---------+-----+-----+
 |     |     |    3.3v |      |   |  1 || 2  |   |      | 5v      |     |     |
 |   2 |   8 |   SDA.1 |   IN | 1 |  3 || 4  |   |      | 5v      |     |     |
 |   3 |   9 |   SCL.1 |   IN | 1 |  5 || 6  |   |      | 0v      |     |     |
 |   4 |   7 | GPIO. 7 |   IN | 1 |  7 || 8  | 0 | IN   | TxD     | 15  | 14  |
 |     |     |      0v |      |   |  9 || 10 | 1 | IN   | RxD     | 16  | 15  |
 |  17 |   0 | GPIO. 0 |   IN | 0 | 11 || 12 | 0 | IN   | GPIO. 1 | 1   | 18  |
 |  27 |   2 | GPIO. 2 |   IN | 0 | 13 || 14 |   |      | 0v      |     |     |
 |  22 |   3 | GPIO. 3 |   IN | 0 | 15 || 16 | 0 | IN   | GPIO. 4 | 4   | 23  |
 |     |     |    3.3v |      |   | 17 || 18 | 0 | IN   | GPIO. 5 | 5   | 24  |
 |  10 |  12 |    MOSI | ALT0 | 0 | 19 || 20 |   |      | 0v      |     |     |
 |   9 |  13 |    MISO | ALT0 | 0 | 21 || 22 | 0 | OUT  | GPIO. 6 | 6   | 25  |
 |  11 |  14 |    SCLK | ALT0 | 0 | 23 || 24 | 1 | OUT  | CE0     | 10  | 8   |
 |     |     |      0v |      |   | 25 || 26 | 1 | OUT  | CE1     | 11  | 7   |
 |   0 |  30 |   SDA.0 |   IN | 1 | 27 || 28 | 1 | IN   | SCL.0   | 31  | 1   |
 |   5 |  21 | GPIO.21 |   IN | 1 | 29 || 30 |   |      | 0v      |     |     |
 |   6 |  22 | GPIO.22 |   IN | 1 | 31 || 32 | 0 | OUT  | GPIO.26 | 26  | 12  |
 |  13 |  23 | GPIO.23 |   IN | 0 | 33 || 34 |   |      | 0v      |     |     |
 |  19 |  24 | GPIO.24 |  OUT | 0 | 35 || 36 | 0 | OUT  | GPIO.27 | 27  | 16  |
 |  26 |  25 | GPIO.25 |   IN | 0 | 37 || 38 | 0 | IN   | GPIO.28 | 28  | 20  |
 |     |     |      0v |      |   | 39 || 40 | 0 | IN   | GPIO.29 | 29  | 21  |
 +-----+-----+---------+------+---+----++----+---+------+---------+-----+-----+
 | BCM | wPi |   Name  | Mode | V | Physical | V | Mode | Name    | wPi | BCM |
 +-----+-----+---------+------+---+---Pi 3B+-+---+------+---------+-----+-----+

RI codes.
RI Codes on seperate page
Further reading
Protocol
Protocol description could be found at:
or with grafical representation at:
Notes on volume (as per ahaack/onkyo-rpi)
Volume control codes shown in the table are sent by the receiver out of its RI ports when adjusting the volume using a remote control (they can be found using an oscilloscope). However, the receiver will not react to these codes when they are sent from an external device, effectively making impossible to control its volume through RI signals.
Comment to that by Julian Wiche:
That doesn't seem to be true on every device. I could contol the volume on my TX SR 605 when input is set to Game/TV. The scan program (see further up) can be used to obtain the codes - it only requires a "bit" of parience. I think that receivers, that have a motor to turn the knob won't work.
Test program
If none of the abouve codes works for you. You can walk through any possible code with the test program. See: ahaack/onkyo-RPI It serves for check all codes (0x000 - 0xFFF) on the target device in a 500ms interval.
NOTE: As per my personal experience: For me testing went thought a testing mode, that made a loud sinus tone.. also it could increase the volume before.. so be careful not to wake anyone when you try this at nights :D
Feel free to Contribute
If it's just Ri Codes for your Hardware by sending a merge request or write me an email. if you fork the whole thing and make it your own project. Please share your findings! Before you fork though, you can send me a message - I 've seen it often enough to have the same project in 100 different forks / versions on npm / Node Red. Think of DAUs. They won't know which version to install.
Known Issues
- WiringPi is kind of outdated... sould go to other lib asap