node-red-contrib-nrf24 0.0.2
NODE-Red fredom for nrf24l01(+)! Control nrf24l01(+) radios , RF24Mesh & RF24Gateway networks from Node-Red
Node-Red freedom for nRF24l01 / nRF24l01+ radios.
This package implement Node-RED nodes for using nRF24L01 / nRF24l01+ radios easy, fast and with typical NODE-Red flow semantics. This will enable NODE-RED flows to receive and send data to sensors and controllers (such arduinos or other mcus based appliances) and integrate them with complex logic and outstanding presentation and charting capabilities of Node-Red.
This module is based on nodejs package nrf24. Please check here the full documentation about how to wire and configure SPI interfaces of your Raspberry Pi or other Single Board computers (SBCs) such Orange Pis, NanoPi , BeagleBone,...
The package provide the following functionality:
- Basic nRF24L01 / nRF24l01+ communication via input and output nodes.
- Create or join a RF24Mesh network with a simple node. (In testing)
- Deploy directly a RF24Ethernet gateway to enable to provide TCP/IP conectivity to arduinos an sensors via nRF24L01 radios. (In development)
Installation
Run the follwing commands under $HOME/.node-red.
npm install node-red-contrib-nrf24
If you experience any problems try to install nrf24 first:
npm install nrf24
npm install node-red-contrib-nrf24
Installation via palette is not recommended. Base library require root access and compilation of binaries.
After installation node-red need to be restarted to load the new installed nodes. The new nodes will be available under nRF24l01 category in the palette.
Prerequisites
The package is written in pure javascript following coding standards of Node-RED. It depends, however, on nrf24 module that is and C++ add-on that require custom build.
Please check the the prerequisites of nrf24 here to validate your installation. It should cover:
- Wiring and GPIO mapping.
- Base nrf24 libray installation.
- nrf24 package installation.
Usage
The usage of nodes is similar to standard Node-RED nodes:
- Place de node on your flow
- Click on the created node to configure it.
- Connect inputs/outputs to your flow logic.
- Deploy the nodes/flow.
Vanilla RF24 radio communication
Check out this simple example of an echo/relay service:

Only Two nodes are required to implement the radio communication. The first node listen to radio frames and emits them over it's sole output. The payloads received are wired to the output node that delivers back to the radio. Simple as pie. This to nodes are equivalent to dozens of lines of code without any programing and Node-RED freedom.
The radio configuration node (rf24radio)
The radio harware is represented in Node-RED using a "configuration node" where all the information wiring and physical interface is defined.
Configuration nodes can be created directly from input or output nodes or via Node-Red "Configuration nodes" menu and then associate the radio node to Input or outputs nodes.
The radio configuration node has the following fields to be filled:
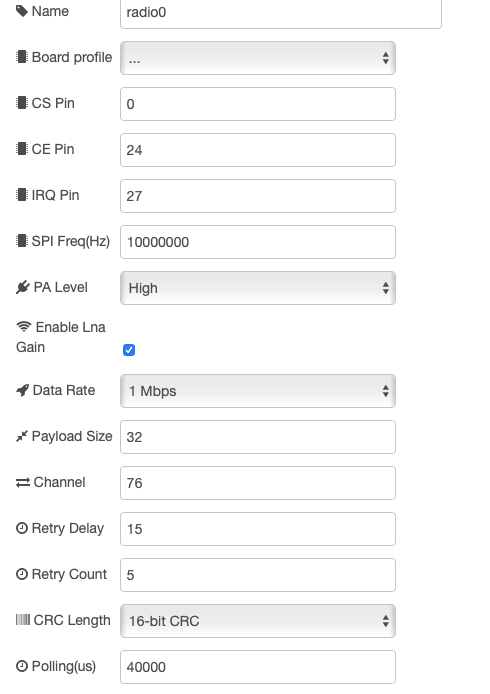
| Field | Description | Default | Notes |
|---|---|---|---|
| Name | optional Name of the node | empty | |
| CS | GPIO number SPI CS | 0 | 1 |
| CE | GPIO number of CE line to | 25 | 1 |
| PA Level | Power Signal Min,Low,High,Max | Max | |
| Data Rate | Speed of radio communications | 1Mbps | Valid 1Mpbs,2Mbps,250Kbps 2 |
| Payload size | Size in bytes of the data frame | 32 | 1-32 bytes |
| Channel | Radio channel to use (1-127) | 76 | Valid 1-127 2 |
| Retry Delay | uSeconds between hardware retries | 15 | valid 5-15 |
| Retry Count | Number of retry attempts | 15 | valid 5-15 |
All parameters are mandatory if optional not stated.
[1]: Check nrf24 here documentation about CS/CE wiring.
[2]: Two devices are able to communicate via radio if they use the same channel and the same data rate.
Reading frames/packets (rf24input)
To read frames sent over the radio an rf24input node need to placed in your flow. This node represent a reading pipe in nRF24L01 terminology. A pipe is a virtual one-way channel of communication between radios. If a device write to a pipe, all radios listening in that pipe will receive the packet.
Caveat: In this implementation only 40-bit (5-bytes) pipe numbers are supported as recommended by nRF24L01 manufacturer.
Configuring an input node require only few parameters:
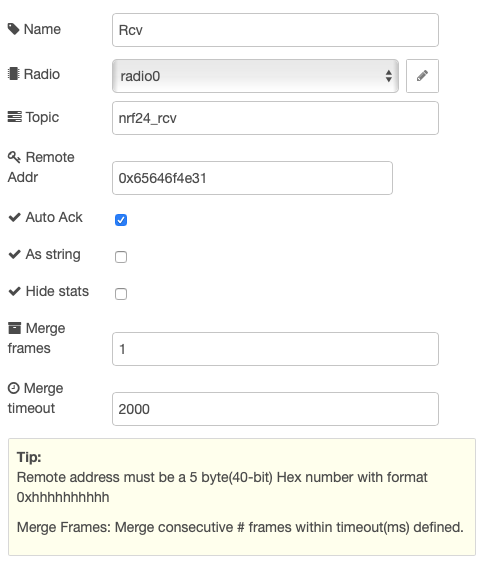
| Field | Description | Default | Notes |
|---|---|---|---|
| Name | optional Name of the node | empty | |
| RF24 Radio | Radio to use (reference) | refers to config node | |
| Topic | Node-RED topic name | nrf24 | |
| Remote Addr | Pipe ID for reading | 0x65646f4e31 | Remote address must be a 5 byte(40-bit) Hex number with format 0xhhhhhhhhhh |
| Auto-Ack | Enable hardware Ack upon frame receive |
true | |
| Output to string | Enable conversion of radio frame to string | false |
Caveat: Up to 5 Input nodes can be used with one radio. This is a hardware limit. On the other hand one more that one input is used only the First byte can be change.
When the node is deployed the status flags will show if the input node is properly configured. Indicating the address and the number of received frames.
When the radio receive a frame the input node will emit a Node-RED message on it's output with the following structure:
{ _msgid: "...." ,
  topic: "<configured topic",
  pipeID: <id number>,
  pipeAddress: "00xhhhhhhhhhh with the pipe Address",
  payload: <Buffer with the data> or "<string with the data>" if 'output as string is selected'
}
Writing frames/packets (rf24ouput)
In a similar way as the input node. The output node enable to send information over the radio in a writing pipe.
Configuring the node require a minimal parametrization:
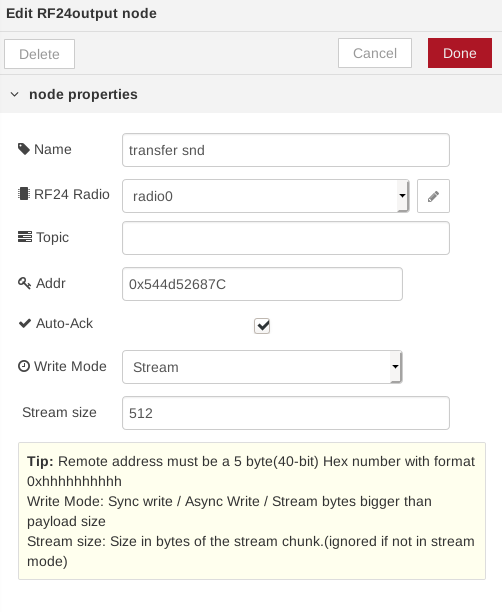
| Field | Description | Default | Notes |
|---|---|---|---|
| Name | optional Name of the node | empty | |
| RF24 Radio | Radio to use (reference) | refers to config node | |
| Topic | Node-RED topic name | nrf24 | |
| Remote Addr | Pipe ID for reading | 0x65646f4e31 | Remote address must be a 5 byte(40-bit) Hex number with format 0xhhhhhhhhhh |
| Auto-Ack | Enable hardware Ack upon frame receive |
true |
Caveat: Radio hardware only enable one writing pipe enabled. You can however use several output nodes with different pipe addresses. The nodes will manage to switch writing pipes autonomously. If you need to control the priority or order in writing to different use the 'pipeAddressW' property described below.
In order to send message over the radio you need to inject a Node-RED message into the sole input of the node using the following format:
{
  payload: <Buffer or string>
  ...
  <other properties will be ignored>
}
This will deliver the data to the pipe defined on the node. The payload can be nodejs buffer or a string and it will be croped to the maximum payload size defined in the radio configuration.
A single node can deliver radio payloads to any pipe dynamically. To do that the input message need to have a valid pipe address string included in the message. With the follwing format:
{
  payload: <Buffer or string>,
  pipeAddressW: "000xhhhhhhhhhh"
  ...
  <other properties will be ignored>
}
nRF24L01 Mesh Networking
TODO Documentation ...
nRF24L01 TCP/IP Networking Gateway
TODO Documentation ...
Examples
In the folder examples there some example flows. You can access them via Node-RED editor menu Import>Examples>nrf24.
TODO
- Implement board profiles.
- Implement TCP/IP Gateway node.
- Further test on Mesh node.
- Implement IRQ in radio.
- Improve documentation.
- Add additional flow examples.
- Document nodes for node red editor (HTML view).
Change Log
- V0.0.2 First release (Alpha version)
- Radio config node with base logic to manage radios.
- Input & output nodes
- Mesh node