node-red-contrib-multi-sensor 2.0.3
A Node-RED multiple binary-sensor linker
node-red-contrib-multi-sensor
Binary motion sensor and activation state machine node for Node-red.
This node is a companion for any binary sensor (physical or virtual), storing all recieved sensors and their state and merge them into a single node.

Fig. 1: Node appearance
Installation
In Node-RED (preferred)
- Via Manage Palette -> Search for "node-red-contrib-multi-sensor"
In a shell
- go to the Node-RED installation folder, e.g.:
~/.node-red - run
npm install node-red-contrib-multi-sensor
Usage
 Fig. 2: Node explaination
To give an understanding on how the node works, we can take a look at this where you have three sensors that will enter a registration object that will store data about all sensors. Then it continues to check if any changes has been made to the state, if so, we check if we're active or inactive. We need to ensure that the opposite timer is reset (if we use one). This flow is merged down into a single node to ease and speed up the view.

Fig. 3: Node appearance
The node has two or three output channels (by default, it uses two).
The last output channel here is the "status" channel, this one informs about the current state.
These states matches the structure:
{"id":x, "name":name}
The different id's are:
- 0: Inactive
- 1: Active
- 2: Activating
- 3: Deactivating
- 32: Sensor change
- 65: Timeout
- 66: Reset
- 130: Abort activation
- 131: Abort deactivation
Node Configuration
The node configuration sets up how the sensor should react.

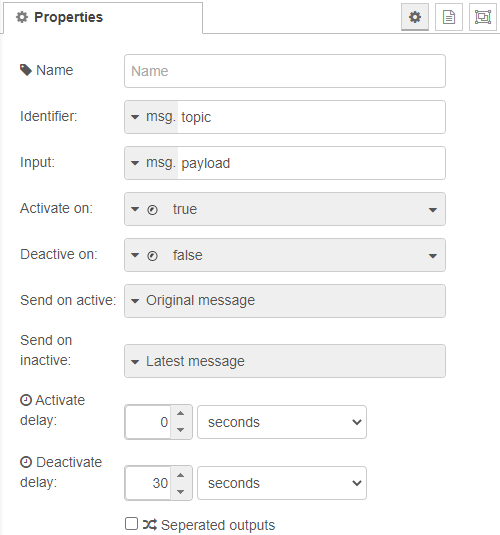
Fig. 4: Node properties
Name (optional)
(Optional) The name of this node. (Will change the content of the node to the name)
Identifier
The data field that should be used to uniquely identify a sensor. Each sensor should have their own unique identifier that this node can use as an id to differentiate it from each other.
Input
The value to read and validate against the Activate on and Deactivate on values.
- If the input value doesn't match any of the two values, it will be ignored.
- If matches the Activate on value, it will use the Identifier to create a record with an active flag.
- If matches the Deactivate on value, it will try to find an already created record with the current Identifier to deactivate the flag.
Activate on / Deactivate on
The input value needs to match one of these fieds to trigger an action. As explained for the input field, the activation and deactivion will only take place if matching one of these fields.
Send on active
As soon as a message where the input matches the Activate on value, will trigger the activation of the node. The data specified in this field will then be sent, either directly or when Activate delay time has passed (If not being deactivated before, then the activation will be canceled out).
Send on inactive
When the last active sensor record is received and its input value matches the Deactivate on value, the deactivation of the node will be executed. The data specified in this field will then be sent, either directly or when Deactivate delay time has passed (If not a sensor is being activated again, then the deactivation will be canceled out).
Activate delay / Deactivate delay
The delays are there to enable a latency between the actual event and the message being sent. You can here choose if to directly send the message when activated/deactivated (set to zero), or wait a specified amount.
Sensor timeout
The time to wait when a sensor getting active before automatically deactivate it. (Zero, means no timeout.)
Active timeout
The time to wait when the node getting active before automatically deactivate it and all its active sensors. (Zero, means no timeout.)
Send sensor count state
If checked, the status channel will include the number of sensors currently active (this will include counting the active sensors and also include the 32 value (6th bit) sent out, causing some extra traffic).
Seperated outputs
If checked, there will be a different channel for the deactivation messages. Otherwise, if unchecked, the activation and deactivation messages will be sent through the same output channel.
Node reset
There's two different reset models implemented:
- soft: Will deactivate any active sensor and return to idle state with or without delays as configured.
- hard: Will force a direct deactivation of all active sensors and return to idle state without any delays.
To use this, you can send the *msg.reset='soft' (or actually anything other than false or 'hard') to make a soft reset. or emsg.reset='hard' to make a hard reset.
Node status
The node has a default status behavior that will explain the number of found sensors as well as current state (active, inactive or pending by delay).
The status can be overridden by usage of the msg.status field.
Examples
Remark: Example flows are present in the examples subdirectory. In Node-RED they can be imported via the import function and then selecting Examples in the vertical tab menu.
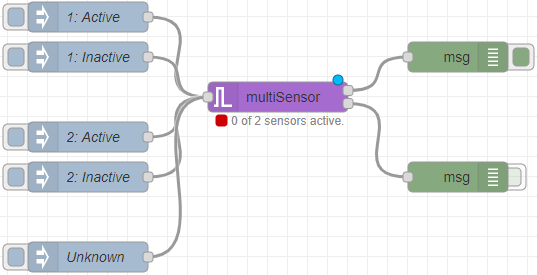
Example 1: Basic usage
This example shows the basic usage.
The configuration simulates two different sensors and gives you the option to manually activate and deactive the sensors to try out the functionality.

example-1.json
Fig. 5: Basic usage example
Version history
- v2.0.2 Fixed bug with object sub staged after refactorization.
- v2.0.0 Breaking change when output native values (booleans, numbers, strings). Now they're contained in {payload:[value]} previously the value was sent direclty.
- v1.0.0 Completed documentation and translations
- v0.1.0 Initial release
