node-red-contrib-mopidy 2.0.2
A Node-RED node to communicate with Mopidy
node-red-contrib-mopidy
Control your Mopidy Servers from Node-RED
What is this?

This module enables you to control your Mopidy servers from Node-RED. This means that you - from Node-RED - can play all kinds of music, be it files on disk or streamed from Spotify, SoundCloud, Google Play Music or others.
Possible use cases:
- Play a podcast when you press a button on a remote control (with the help of node-red-contrib-tellstick).
- Alarm clock. Wire it to a inject node and set it to start playing music when you're to wake up.
- Control your music from a web browser or mobile
Mopidy is a "headless" music server, easy installed on a Raspberry Pi/Mac/Linux machine.
Install
cd $HOME/.node-red
npm install node-red-contrib-mopidy
Version 2
With version 2.0.0, this module was completely rebuilt, based on the idea of the v0.9.0 proof of concept. Laurence gracefully transfered the npm namespace node-red-contrib-mopidy to this new module. See the CHANGELOG for access to older versions.
Nodes
There are 2 nodes included in this package; mopidy-out and mopidy-in. The out node allows you to send a message to a Mopidy server (like "Run playlist: Afternoon tea"). The in node allows you to listen to changes on a Mopidy server (like "Stream Title Changed").
Mopidy-out
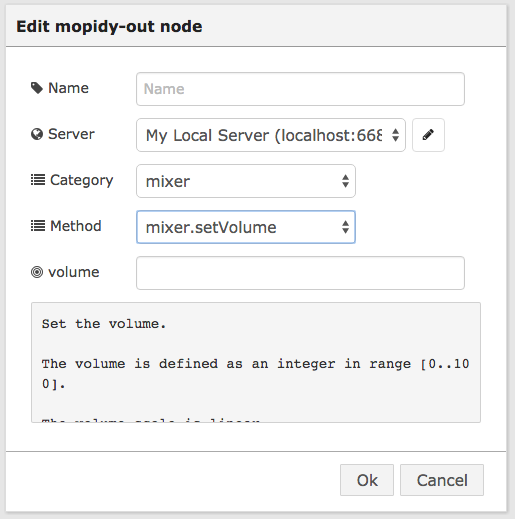
The Mopidy-out node is your way of sending commands ("play this", "add that", "mute", "create a new playlist", etc) to a Mopidy server. When configuring a Mopidy-out node you can browse all possible actions:

A Mopidy-out node will run on any input. As the Mopidy-out node always send an output, this means that you can chain nodes. The example below will first clear all tracks in the tracklist, then add a track (in this case a URL to a Swedish web radio), and finally press play.

[{"id":"891849ea.76e7b8","type":"mopidy-config","name":"My Local Server","host":"localhost","port":"6680"},{"id":"b7a1752c.485e88","type":"mopidy-out","name":"","server":"891849ea.76e7b8","params":"{}","method":"tracklist.clear","x":581,"y":253,"z":"6e174afa.91e8b4","wires":[["69fdd828.960228"]]},{"id":"205ce862.dfa318","type":"inject","name":"Play","topic":"","payload":"","payloadType":"date","repeat":"","crontab":"","once":false,"x":431,"y":253,"z":"6e174afa.91e8b4","wires":[["b7a1752c.485e88"]]},{"id":"69fdd828.960228","type":"mopidy-out","name":"","server":"891849ea.76e7b8","params":"{\"tracks\":\"\",\"at_position\":\"\",\"uri\":\"http://http-live.sr.se/p1-mp3-128\",\"uris\":\"\"}","method":"tracklist.add","x":744,"y":253,"z":"6e174afa.91e8b4","wires":[["1f1c6aa0.e0e395"]]},{"id":"1f1c6aa0.e0e395","type":"mopidy-out","name":"","server":"891849ea.76e7b8","params":"{\"tl_track\":\"\",\"tlid\":\"\"}","method":"playback.play","x":905,"y":253,"z":"6e174afa.91e8b4","wires":[[]]}]
Mopidy-out - advanced
Sending data into Mopidy-out node.
Typically you will set the server host/port, the method (e.g. setVolume) and possible parameters (e.g. volume: 100) when configuring the node. However, you may also send this data in to the node. Any data you send in to the node will be merged (and override if duplicate) with the configuration on the node.
Object
host, port, method and params properties are valid input to a Mopidy-out node. Can best be described with the example below:
{
	host: '192.168.0.200',
	port: 6680,
	method: 'mixer.setVolume',
	params: {
		volume: 100
	}
}
Example:
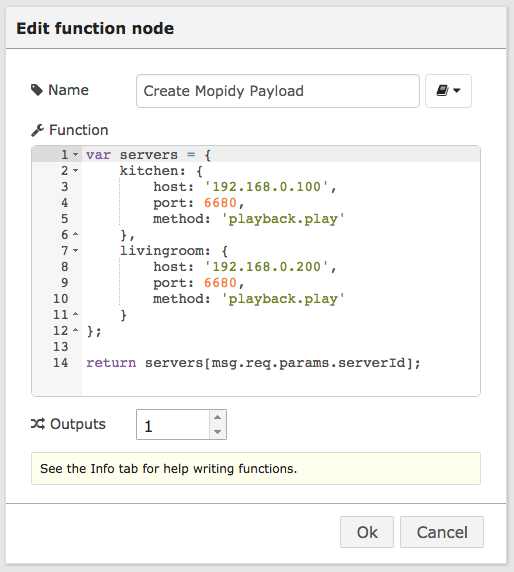
Here's a flow which will listen to a http request on /<serverId>/play and when that URL is requested it will translate the serverId to data sent into the Mopidy-out node which will play the music.

The (orange) function looks like this:

Flow:
[{"id":"f9cf36ea.0630c8","type":"http in","name":"","url":"/:serverId/play","method":"get","swaggerDoc":"","x":399,"y":387,"z":"6e174afa.91e8b4","wires":[["8cc2806f.733d8","c5057513.3afa88"]]},{"id":"8cc2806f.733d8","type":"function","name":"Create Mopidy Payload","func":"var servers = {\n kitchen: {\n host: 'localhost',\n port: 6680,\n method: 'playback.play'\n },\n livingroom: {\n host: '192.168.0.200',\n port: 6680,\n method: 'playback.play'\n } \n};\n\nreturn servers[msg.req.params.serverId];","outputs":1,"noerr":0,"x":615,"y":387,"z":"6e174afa.91e8b4","wires":[["890a33a0.76f5d"]]},{"id":"890a33a0.76f5d","type":"mopidy-out","name":"Play","server":"","params":"{}","method":"","x":791,"y":387,"z":"6e174afa.91e8b4","wires":[[]]},{"id":"c5057513.3afa88","type":"http response","name":"","x":565,"y":425,"z":"6e174afa.91e8b4","wires":[]}]
Output from Mopidy-out node
When invoked, a Mopidy-out node will output whatever message Mopidy returns.
Example output when invoked with tracklist.add, adding a streaming URL - The Mopidy server returns a bit of data:
{
	"payload": [{
		"__model__": "TlTrack",
		"tlid": 18,
		"track": {
			"__model__": "Track",
			"bitrate": 128000,
			"comment": "p1-mp3-128",
			"name": "Sveriges Radio P1",
			"uri": "http://http-live.sr.se/p1-mp3-128"
		}
	}],
	"serverName": "My Local Server"
}
If a host and/or port is sent in to a Mopidy-out node, the same host/port is sent out from that node. This means that you can set the host/port once and then chain Mopidy-out nodes together. Example (invoked with playback.getState):
{
	"payload": "playing",
	"serverName": "temporaryServerConnection",
	"host": "localhost",
	"port": 6680
}
Mopidy-in

The Mopidy-in node will listen to event sent by a Mopidy server and relay them to Node-RED. This way you can do stuff like update a LED screen when the track changes.
You can configure the Mopidy-in node to listen to different types of events:
- Mopidy: (Default) Everything which has to do with the music. E.g. play started, ended, stream title changed, volume changed, etc.
- Websocket: Peek into the WebSocket traffic between Node-RED and the Mopidy server.
- State: The state of a Mopidy server changes, e.g. a server goes offline/online.
- Reconnect: Events sent when Node-RED is trying to connect to a Mopidy server.
- All: All of the above.
Message
The message outputed from the mopidy-in node will differ depending on the event. However, they'll all have the property event which is identifying what kind of event it is.
Example message when playback has been stopped:
{
	"event": "event:playbackStateChanged"
	"old_state": "stopped",
	"new_state": "playing",
}
Example message when the playback of a stream has been started:
{
    "event": "event:trackPlaybackStarted",
    "tl_track": {
        "__model__": "TlTrack",
        "tlid": 1,
        "track": {
            "__model__": "Track",
            "bitrate": 128000,
            "comment": "p1-mp3-128",
            "name": "Sveriges Radio P1",
            "uri": "http://http-live.sr.se/p1-mp3-128"
        }
    }
}
Advanced configuration
By default, the Mopidy-out node tries to connect to a Mopidy server for 5 seconds before returning a "could not connect" message. If you want to change this, add the following to your Node-RED configuraiton file (easiest found by looking at the console when starting Node-RED):
functionGlobalContext: {
	mopidyConnectTimeout: 5
}
Development
This is coded in ES2015/ESNext. To make older node able to understand it, it has to be transpiled to ES5. This is done automagically on installation. To rebuild it yourself, please see the tasks below. The source lives in the ./src folder and gets transpiled and copied to the ./mopidy folder.
Pre commit
There's a pre-commit hook in place which will run tests and lint check (npm test and npm runt lint) on commit. Failed tests or lints will prevent commit. Nota bene: The commit hook runs the integration tests which require an Mopidy server to connect to.
Development tasks
Run tests which do not require a connected Mopidy server by running:
npm test
Run integration tests which do require a connected Mopidy server. By default it looks for a Mopidy Server running on localhost:6680. This can be changed by setting the envionment variables MOPIDY_TEST_HOST and MOPIDY_TEST_PORT.
npm run test-all
For linting with eslint, run
npm run lint
To auto-run babel and transpile ES2015 to ES5 when files are changed (and copy all non-js files from /src to /mopidy if they're changed), run:
npm run watch
To do a complete clean & rebuild, run:
npm run clean-build
