node-red-contrib-hikvision-ultimate 1.4.3
A native set of nodes for Hikvision (and compatible) Cameras, Alarms, Radars, NVR, Doorbells, etc.
Nodes for Hikvision (and compatible) Camera, Alarm, Radar, NVR, Doorbell, Speaker etc.
This is a set of nodes to handle ISAPI Hikvision messages. It works exclusively with HIKVISION and Hikvision based compatible devices.
Works with cameras, NVR, Security Systems, Doorbells and also with specialized devices, like Radar (for example DS-PR1-60, DS-PR1-100 and DS-PR1-120).
Digest authentication: it should work with all devices.
All nodes are capable of auto reconnect if the connection is lost and are able to actively monitor the connection.
Be sure to have installed Node.js v20.18.1 or newer (issue a node -v command in a console, to check it out).





WARNING
Due to the many models and firmware versions out there, not all cams/NVR/Door Intercoms does work. For example, many intercoms does not really support all APIs, that the official ISAPI documentation says it supports, thus, they don't work, not only with this node, but also with any software using the public ISAPI documentation. Please don't blame the developer, as it can do nothing to workaround such problems.
ENABLE NOFITICATIONS
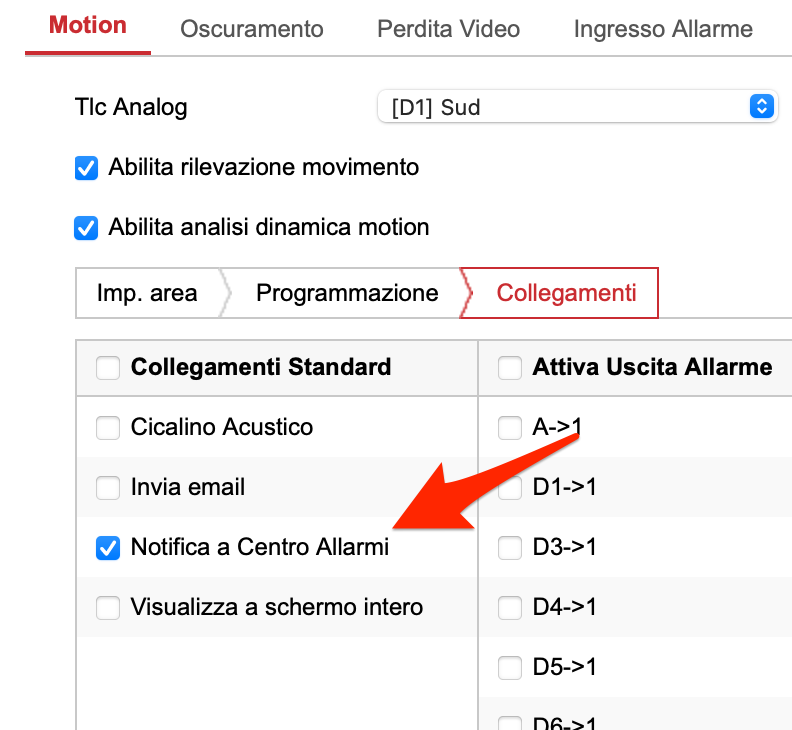
For NVR/DVR, pleas remember to select "Notify Alarm Center" in the event window, otherwise the NVR won't emit any alarm event.
CHANGELOG
DEVICE STATUS NODE
Device Status monitors a selection of existing Hikvision Ultimate device configurations. It reads GET /ISAPI/System/deviceInfo using each device's address, port, protocol and credentials. A check succeeds only after reading the complete response and validating its XML/JSON DeviceInfo content. Empty responses, login pages, HTTP errors and incomplete transfers fail the check.
- Select up to 64 devices: Camera/NVR, AX Pro, Doorbell, ANPR, Speaker or Access Control. Global configurations and configurations scoped to the current flow/subflow are available. The Devices list shows each device on one line with its checkbox, name and connection details; hover over shortened text to read the full details.
- Default settings: a check one second after deploy, then 30 seconds after each completed cycle; 5 seconds total timeout per device; offline after 2 consecutive failed checks. A successful check restores availability immediately.
- An input message starts a check. Set the interval to 0 for input-only operation. Concurrent triggers are coalesced, with at most four requests in progress. Devices have a minimum five-second gap between checks; HTTP 401/403/429/503 applies a 30-second pause, including manual triggers.
- Output 1 — All devices available (AND) emits one summary for the whole group after each cycle, with a
devicesarray andtotal,available,unavailable,unknowncounts. Each array entry also has top-levelnameandipfields, for examplename: "Network Speaker", ip: "192.168.1.17".ipcontains the configured address without its port or IPv6 brackets; hostnames are retained when configured.msg.payloadis true if all devices are confirmed available, false if any is confirmed unavailable, or null while initial checks are still inconclusive and none is confirmed unavailable. - Output 2 — Per-device status emits separate messages for individual devices on their initial confirmed status and subsequent changes.
msg.payloaddescribes only the device identified bymsg.device.id, with its name inmsg.device.name: true when available, false when unavailable. Other devices whose states remain unchanged emit nothing. Use this output for individual disconnection/recovery notifications, routing bymsg.device.id. Disable only initial status and changes for each device to emit every fresh check once the initial state has been confirmed. Messages for different devices can arrive in any order.
For example, if camera A is confirmed offline and speaker B recovers, Output 1 emits payload: false because A is still offline. Output 2 emits payload: true with B's identity in msg.device. Use Output 1 when the flow needs a single boolean representing the whole group.
Each device result includes device (configuration ID, name, host and type), reachable (the latest check), available (the confirmed state), httpStatus, responseTime in milliseconds, checkedAt, lastSuccess, consecutiveFailures, changed and error (code and message, or null). During the failure threshold grace period, available can remain true while reachable is false. Rate-limited cycles retain the actual last checkedAt for each device.
// Output 1: one device is offline (individual check details omitted)
msg = {
  topic: "devices",
  payload: false,
  total: 2,
  available: 1,
  unavailable: 1,
  unknown: 0,
  devices: [
    { name: "North camera", ip: "192.168.1.60", available: false, reachable: false /* ... */ },
    { name: "Network Speaker", ip: "192.168.1.17", available: true, reachable: true /* ... */ }
  ],
  checkedAt: "2026-09-15T09:24:02.887Z"
};
// Output 2: a device has recovered
msg = {
  topic: "devices",
  payload: true,
  device: { id: "camera-config-id", name: "North camera", host: "192.168.1.60", type: "Hikvision-config" },
  reachable: true,
  available: true,
  httpStatus: 200,
  responseTime: 42,
  consecutiveFailures: 0,
  changed: true,
  error: null
  // checkedAt and lastSuccess contain ISO timestamps
};
The node measures access to the device information API. Event-stream health is monitored separately by the alarm nodes. AX Pro salted authentication reuses the config node's active session cookie; a missing or rejected session fails the check. HTTPS follows the existing self-signed certificate policy. The node uses separate HTTP requests, limits responses to 1 MiB and cancels outstanding checks on close/redeploy. Credentials, session cookies and raw device responses are never included in its output.
CAMERA EVENT NODE
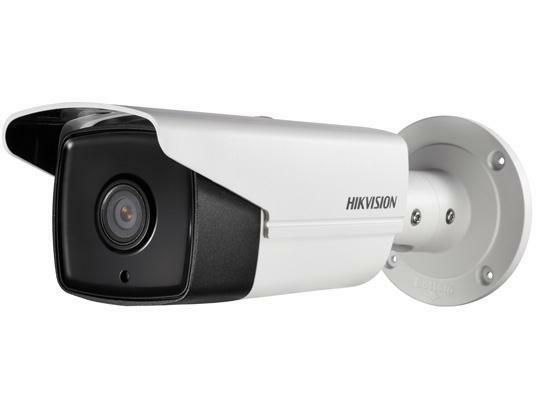
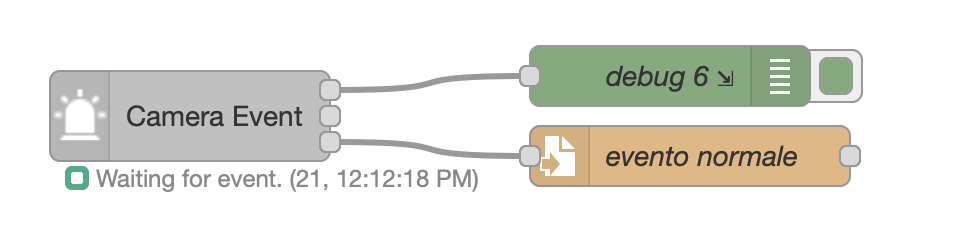
The Camera Event node connects to NVR, Camera, Radars, etc.. and outputs true/false in case of an alarm.
The node can be configured as Camera/NVR (including motion, intrusion, line crossing and thermal alarms) or as Old Security System and Radar (with specific CID events, designed for these type of security devices). Use Intelligent Event for recognition of people, vehicles, faces and animals.
You can optionally filter the alarms by CHANNEL, EVENT and ZONE.
For NVR/DVR, the Channel property is the CAMERA number, while for Cameras, is the image sensor number (normally 1).
The Zone property is the alarm zone (RADARS), or the alert region number (CAMERAS AND NVR/DVR).
For RADAR device types, you can filter improper/false alams as well.
You can choose from many different alarms, including:
- Video Motion Alarm (When motion is detected)
- Local alarm input (it's the device's IO pigtail connector)
- Line crossing (when someone crosses a line)
- CID alarms
- Many more.....
Discover events from your camera
For Camera/NVR, opening the Camera Event editor reads capabilities from the selected, deployed server. The event selector groups Supported by the device and Observed in the event stream. Event, channel and zone selectors show discovered values, plus the current selection if it was not reported. Channels and zones offer All; events offer CUSTOM EVENT ID. Select an NVR channel to query its capabilities separately.
- Refresh from device updates the discovery. Opening the editor normally reuses a shared five-minute cache; failed discovery is retried after 30 seconds. Authentication or busy-device errors pause discovery for 30 seconds, including manual refreshes.
- New event names are learned from the existing alarm stream. Reopen the editor or refresh to see them. Select CUSTOM EVENT ID to reveal the custom field, enter an ID or comma-separated aliases, then click Use event.
- Recognitions of people, vehicles, faces and animals are omitted from this node's discovered event choices; use Intelligent Event for those. Intrusion, line crossing, region entrance/exit, thermal alarms and ordinary camera alarms remain available. A target classified as human, vehicle or animal does not change the underlying alarm type. Existing recognition selections are preserved under Current / custom event, and manual custom IDs keep their existing behavior.
- Supported is not enabled. Detection rules and notification linkage still need to be enabled on the camera. Discovery only reads information; it does not change camera settings.
- Documented ISAPI aliases share one event choice: for example Video motion (
VMD/motionDetection), Video blind (shelteralarm/tamperDetection), audio exception and temperature difference. Existing selections keep their exact saved value, and the alarm filter accepts either name, including for duration events. Compatibility with all 13 groups listed in the ISAPI guide, §16.2.95 is retained for existing flows, including saved recognition events. Distinct IDs such ashide,blockandtmpakeep separate choices when reported by the device. - Five older traffic-event catalog IDs contained an invisible character. Their corrected choices also recognize the old values, preserving existing flows. Case-only variations of discovered custom IDs share one choice too.
- Channel names are read from the camera/NVR configuration. Select a channel and event to see its configured region/rule names in React to Zone, where available. Saved values remain numeric IDs, including IDs outside the original catalog. Changing the event updates its zone names without rescanning capabilities; Refresh from device also refreshes names.
- Named rules from the Intelligent and thermal APIs are currently read from scene 1, shown in the label. This is not an active-scene selector: the alarm filter continues to match the numeric region ID across scenes. Legacy Smart APIs may expose only region numbers; discovered rules without names use numeric labels. With All channels, choose a specific channel to discover its zones, unless the device has only one channel. Names explicitly included in alarm region metadata are also learned from the existing stream. Existing zone/channel selections are preserved when discovery is unavailable, including for Security/Radar.
- Partial responses, older firmware, or an offline camera keep the current selection available. Event, channel and zone lists do not populate unsupported choices. Existing flows, event aliases and CID event choices for Security/Radar remain supported. Discovery requires the server configuration to have been deployed; pending changes in its editor are not used until deploy.
- Observed events and discovery caches are held in memory for each server configuration and are rebuilt after redeploy/restart. An observed event without a valid
active/inactivestate can be inspected with Raw Alarm; Camera Event does not invent a boolean state for it.
Discovery uses separate requests from the alarm connection. Stream reconnection uses bounded backoff and a heartbeat watchdog; a connection error is cleared after valid event/heartbeat data returns. Events are not discarded because the camera clock differs from the Node-RED clock. Camera retransmissions are forwarded, so consumers requiring deduplication should use the original event data from Raw Alarm. See testing and connection details.
Flow Messages
The node outputs a payload on PIN 1 (TRUE on alarm start, FALSE on alarm end). Some alarm types only support the alarm start event.
The node outputs a payload on PIN 2, representing a connection error. TRUE if error, otherwise FALSE
The node outputs a payload on PIN 3, with the captured image (as byte array), that you can directly save to disk or attach on an email or so. This pin emits a message only if the camera sends the captured image. This usually happens with "smart" events (but many firmwares out there, allow you to do it even with the basic events). You can check that by attaching a debug node on the third pin, then set a rule in the smart event and set the camera to send pictures in case of events (usually, you'll find this option in the "Archive management" menu of your camera).
This below is an example of msg output:
Output PIN 1
// Example of an event from NVR/Camera
msg = {
  payload: true,
  topic: "",
  channelid: "13", // This is the camera number for NVR, or the channel ID for cameras
  zone: 0, // Zone or Region, see above, the explained difference
  description: "Motion alarm",
  _msgid: "386a613.89f259e",
};
// Example of an event from Radar
msg = {
{
    "zone": 1, // This is the zone number that fired the alarm
    "payload": true, // true if alarm, otherwise false if alarm ended.
    "alarm": {
        "ipAddress": "192.168.1.25",
        "ipv6Address": "",
        "portNo": 80,
        "protocol": "HTTP",
        "macAddress": "BananaRama",
        "channelID": 1,
        "dateTime": "2012-01-13T03:58:19+01:00",
        "activePostCount": 1,
        "eventType": "cidEvent",
        "eventState": "active",
        "eventDescription": "CID event",
        "CIDEvent": {
            "code": 3103,
            "standardCIDcode": 3130,
            "type": "zoneAlarm",
            "trigger": "2012-01-13T03:58:19+01:00",
            "upload": "2012-01-13T03:58:19+01:00",
            "CameraList": [],
            "NVRList": [
                {
                    "id": 1,
                    "ip": "192.168.1.32",
                    "port": 8000,
                    "channel": 1
                }
            ],
            "zone": 1
        }
    }
    "_msgid": "b07e50f6.86a72"
}
Output PIN 2 (connection error)
msg = {
  topic: "",
  errorDescription: "", // This will contain the error rescription, in case of errors.
  payload: false, // Or TRUE if error
  _msgid: "dd5b3622.884a78",
};
Output PIN 3 (Image)
msg = {
  topic: "",
  payload: image(Bytes),
  extension: "jpg", // Can be "jpg" or "png"
};
INTELLIGENT EVENT NODE
Receives "Intelligent" / "Smart" events from a Hikvision camera or NVR.
This node is similar to the Camera Event node, but it focuses on smart / intelligent analytics, such as:
- Intrusion / field detection
- Human / vehicle detection
- Line crossing, face detection, etc. (depending on your device firmware)
Events must be configured in the camera/NVR web interface (Smart/Intelligent events menu) and set to Notify alarm center / Send to center, otherwise they will not be sent to this node.
You can:
- Filter by channel (camera number on NVR / sensor ID on camera).
- Filter by object type: All / Human / Vehicle / Animal (if the camera provides this information).
- Optionally filter false alarms using:
- Alarm duration: how many seconds the alarm must stay active (or repeatedly active)
- Evaluation period: time window in which the total active time is evaluated
If Alarm duration is 0, every event is forwarded immediately.
If Alarm duration is > 0, the node only outputs an alarm when the cumulative active time inside the evaluation period reaches the selected duration.
Flow Messages
The node has 3 outputs:
- PIN 1: Intelligent event (true/false, plus details)
- PIN 2: Connection status / error
- PIN 3: Image (if provided by the device)
Output PIN 1
// Example of a smart event
msg = {
  payload: true, // true on alarm start, false on alarm end
  topic: "MyCamera/IntelligentEvent",
  channelid: "1", // camera/NVR channel ID
  zone: 0, // region/zone ID, if provided by the event
  description: "Intrusion Detection",

  // Full parsed event object (SmartEvent or EventNotificationAlert)
  event: {
    /* ... full event ... */
  },

  // Optional fields populated when the camera includes image info in the event
  imageName: "202011301142008600", // picture name (picName, etc.) if available
  imageUrl: "/ISAPI/ContentMgmt/StreamingProxy/channels/101/picture", // picture URL/path

  _msgid: "abcd1234.5678efgh",
};
If the smart event payload contains fields such as picName, picUrl (or similar variants, possibly inside customData), the node exposes them as:
msg.imageNamemsg.imageUrl
You can then perform a separate HTTP GET (for example with the HTTP Request node) or use the Picture node to retrieve the related JPEG image.
Output PIN 2 (connection error)
msg = {
  topic: "MyCamera/IntelligentEvent",
  errorDescription: "", // non-empty string in case of error
  payload: false, // true = error, false = connection OK
};
Output PIN 3 (Image)
msg = {
  topic: "MyCamera/IntelligentEvent",
  payload: imageBuffer, // image bytes
  extension: "jpg", // "jpg" or "png"
};
This third pin emits messages only if the camera/NVR actually sends a picture on the alert stream for that event type (smart event snapshots enabled in the device configuration).
Example: Intelligent event + snapshot flow
A typical flow is:
- Use the Intelligent Event node (PIN 1) to detect human/vehicle/intrusion events.
- When
msg.payload === true, trigger the Picture node to grab a fresh snapshot from the same camera and channel. - Optionally use
msg.imageName/msg.imageUrlfrom the Intelligent node to:- build filenames,
- store references in a database,
- or fetch archived images from the NVR.
ANPR (License Plate) NODE
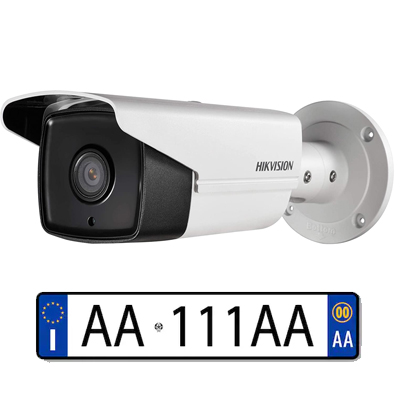
This node works with Hikvision ANPR cameras.
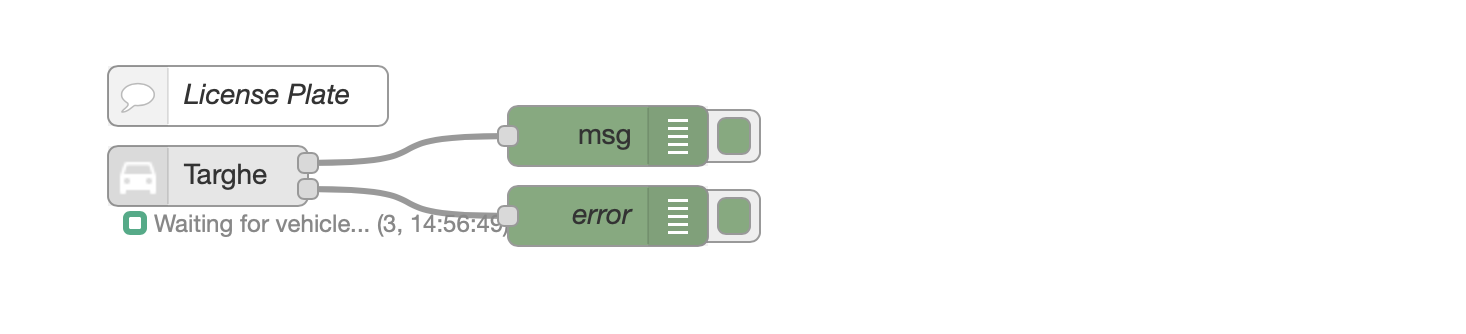
Flow Messages
The payload contains the license plate number and the property plate contains other useful informations.
Output PIN 1
msg = {
  topic: "",
  payload: "AB123CD", // This is the license plate
  plate: {
    captureTime: "20201130T114200+0100",
    plateNumber: "AB123CD",
    picName: "202011301142008600", // This is the picture's name of the license plate.
    country: "ITA",
    laneNo: "1",
    direction: "forward",
    matchingResult: "otherlist",
  },
};
Output PIN 2 (connection error)
msg = {
  topic: "",
  errorDescription: "", // This will contain the error rescription, in case of errors.
  payload: false, // Or TRUE if error
  _msgid: "dd5b3622.884a78",
};
PTZ NODE
Recalls a PTZ pre-recorded preset.
Just select the preset in the configuration window and recall it by passing true as payload.
You can also set the Camera Number and PTZ preset number by msg.payload.channelID (optional) and msg.payload.PTZPreset. See below.

Flow Messages
There are now 2 modes:
- Default mode: the node outputs true on PIN 1 when the camera accepts the PTZ goto request (HTTP 2xx response). It does not verify that the camera has already physically reached the preset position.
- Wait for camera position reached: after the PTZ goto request is accepted, the node polls the camera PTZ absolute position and outputs true on PIN 1 only after the position settles. This mode is slower by design and requires camera support for
/ISAPI/PTZCtrl/channels/<ID>/absoluteEx.
In both modes, request/connection errors are sent on PIN 2.
Input
// Recall the preset set in the configuration window
msg.payload = true; // Recalls the preset
return msg;
// Pass the Camera Number and PTZ preset by message
msg.payload.channelID = 1; // OPTIONAL, pass the Camera number
msg.payload.PTZPreset = 2; // OPTIONAL, pass the PTZ preset number
return msg;
Output PIN 1
msg = {
{
    "payload": true, // default mode: camera accepted the PTZ goto command
    "_msgid": "b07e50f6.86a72"
}
msg = {
{
    "payload": true, // wait mode: camera position confirmed as reached
    "channelID": "1",
    "PTZPreset": "2",
    "waitForCameraPositionReached": true,
    "cameraPositionReached": true,
    "cameraPosition": {
        "azimuth": 180,
        "elevation": 25.4,
        "absoluteZoom": 120
    }
}
Output PIN 2 (connection error)
msg = {
  topic: "",
  errorDescription: "", // This will contain the error rescription, in case of errors.
  payload: false, // Or TRUE if error
  _msgid: "dd5b3622.884a78",
};
PICTURE NODE
This node gets a picture from the camera/NVR, ready to be shown in the dashboard UI.
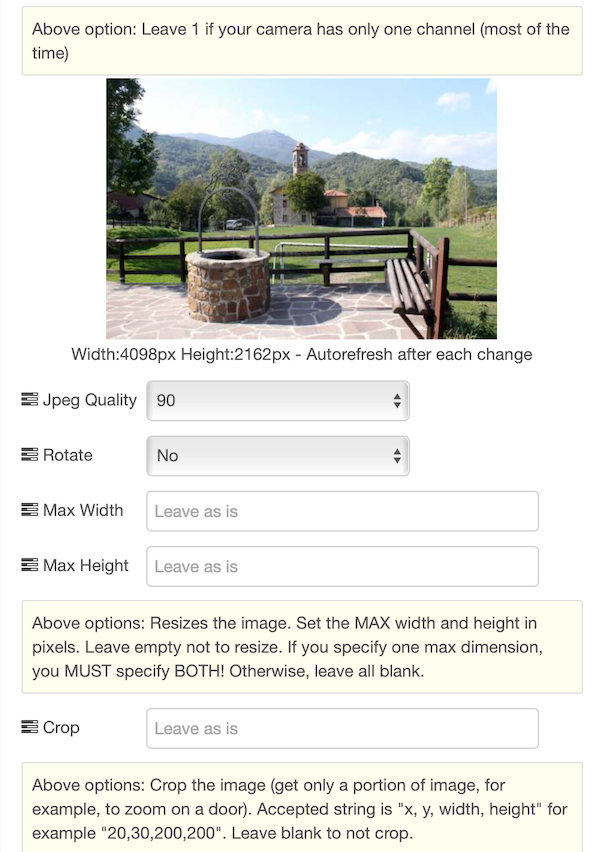
You can rotate, resize, crop, overlay with text, zoom the image.
The overlay text is applied directly after the picture's manipulation. This behaves differently than the text overlay node (that uses the overlay functionality onboard the camera).
Pass true as payload to obtain the image.
You can, for example, link the Camera Event node to the Picture node to get an image whenever an alarm occurs.
CAUTION: image handling is a very CPU/GPU consuming job. Use only if you have enough computational resources.

For the picture to show up directly into the flow, you can use this node developed by @riku
Copy this code and paste it into your flow
View code
Adjust the nodes according to your setup
[
  {
    id: "bd6acbb81c4f9eaf",
    type: "change",
    z: "48095c5671f0ab16",
    name: "Setup msg",
    rules: [
      { t: "set", p: "cid", pt: "msg", to: "", tot: "date" },
      {
        t: "set",
        p: "attachments",
        pt: "msg",
        to: '[{\t "filename": \'image_\' & $replace($now(),":","_") & \'.jpg\', \t "content": $$.forEmail,\t "cid": "" & cid & ""\t}]',
        tot: "jsonata",
      },
      { t: "set", p: "topic", pt: "msg", to: "See attached image", tot: "str" },
      { t: "set", p: "payload", pt: "msg", to: "''", tot: "jsonata" },
      {
        t: "set",
        p: "from",
        pt: "msg",
        to: "[email protected]",
        tot: "str",
      },
    ],
    action: "",
    property: "",
    from: "",
    to: "",
    reg: false,
    x: 410,
    y: 200,
    wires: [["3e0ca3cc7c0d2e22"]],
  },
  {
    id: "0b82f010bd682a0d",
    type: "hikvisionUltimatePicture",
    z: "48095c5671f0ab16",
    name: "Ovest",
    topic: "",
    server: "eb73371b.af5208",
    channelID: "7",
    rotateimage: "0",
    heightimage: "",
    widthimage: "",
    qualityimage: "100",
    cropimage: "",
    textoverlay: "",
    textoverlayXY: "",
    textoverlayWH: "",
    textoverlayFont: "FONT_SANS_64_WHITE",
    x: 230,
    y: 200,
    wires: [["bd6acbb81c4f9eaf", "7ff4f0c75ef4d486"], []],
  },
  {
    id: "478fee35ffd435b5",
    type: "inject",
    z: "48095c5671f0ab16",
    name: "",
    props: [{ p: "payload" }, { p: "topic", vt: "str" }],
    repeat: "",
    crontab: "",
    once: false,
    onceDelay: 0.1,
    topic: "",
    payload: "true",
    payloadType: "bool",
    x: 110,
    y: 200,
    wires: [["0b82f010bd682a0d"]],
  },
  {
    id: "facefd92c70af183",
    type: "comment",
    z: "48095c5671f0ab16",
    name: "Send an Email with image attachment and show it in the web UI",
    info: "",
    x: 290,
    y: 160,
    wires: [],
  },
  {
    id: "7ff4f0c75ef4d486",
    type: "template",
    z: "48095c5671f0ab16",
    name: "",
    field: "payload",
    fieldType: "msg",
    format: "handlebars",
    syntax: "mustache",
    template: '<img width="320px" height="240px" src="{{{payload}}}">',
    output: "str",
    x: 400,
    y: 260,
    wires: [["121759fa66219f53"]],
  },
  {
    id: "121759fa66219f53",
    type: "ui_template",
    z: "48095c5671f0ab16",
    group: "e2be830cd2d143a0",
    name: "",
    order: 0,
    width: "6",
    height: "4",
    format: '<div ng-bind-html="msg.payload"></div>',
    storeOutMessages: true,
    fwdInMessages: true,
    resendOnRefresh: true,
    templateScope: "local",
    x: 560,
    y: 260,
    wires: [[]],
  },
  {
    id: "3e0ca3cc7c0d2e22",
    type: "function",
    z: "48095c5671f0ab16",
    name: "Email",
    func: "// Replace this function node with an email node",
    outputs: 1,
    noerr: 0,
    initialize: "",
    finalize: "",
    libs: [],
    x: 550,
    y: 200,
    wires: [[]],
  },
  {
    id: "eb73371b.af5208",
    type: "Hikvision-config",
    host: "192.168.1.32",
    port: "80",
    name: "NVR",
    authentication: "digest",
    protocol: "http",
    heartbeattimerdisconnectionlimit: "1",
    deviceinfo: "[object Object]",
  },
  {
    id: "e2be830cd2d143a0",
    type: "ui_group",
    name: "Default",
    tab: "e0f42233.22428",
    order: 2,
    disp: true,
    width: "6",
    collapse: false,
  },
  {
    id: "e0f42233.22428",
    type: "ui_tab",
    name: "NVR",
    icon: "dashboard",
    order: 13,
  },
];
PROPERTY WINDOW
Flow Messages
The node outputs the image in in mamy formats on PIN 1, otherwise an error on PIN 2. On PIN 1 you'll have:
base64 JPG string format, ready for the UI Dashboard.
JPG Buffer, ready to be sent as email attachment.
pure base64 format, for many other uses.
The Picture Node now passes through the input message, in the property msg.previousInputMessage
Input
// To get the image
msg.payload = true;
return msg;
// Dinamically set the overlay text
node.textoverlay = "Hello new overlay";
msg.payload = true;
return msg;
Output PIN 1
msg = {
{
    "previousInputMessage" : {topic : "banana"}, // this is the original passedthrough message
    "payload": "data:image/jpg;base64,/9j/4AAQSk...", // FOR THE DASHBOARD UI: Image as string in base64 format with JPG DATA header already there.
    "forEmail": "<buffer>", // FOR EMAIL: Image as buffer format, ready to be attached to an email as JPG attachment.
    "base64": "/9j/4AAQSk...", // FOR FURTHER MANIPULATION: Image as pure base64 string.
    "_msgid": "b07e50f6.86a72"
}
return msg;
Output PIN 2 (connection error)
msg = {
  topic: "",
  errorDescription: "", // This will contain the error rescription, in case of errors.
  payload: false, // Or TRUE if error
  _msgid: "dd5b3622.884a78",
};
return msg;
TEXT OVERLAY NODE
You can set the camera's text overlay. This node uses the camera's onboard text overlaying capabilities.
There are 4 rows avaiable, to be set from the configuration window or dinamically via msg input from flow.
Please note that not all cameras nor NVR/DVR (especially with old firmware) suppor setting the overlay text.
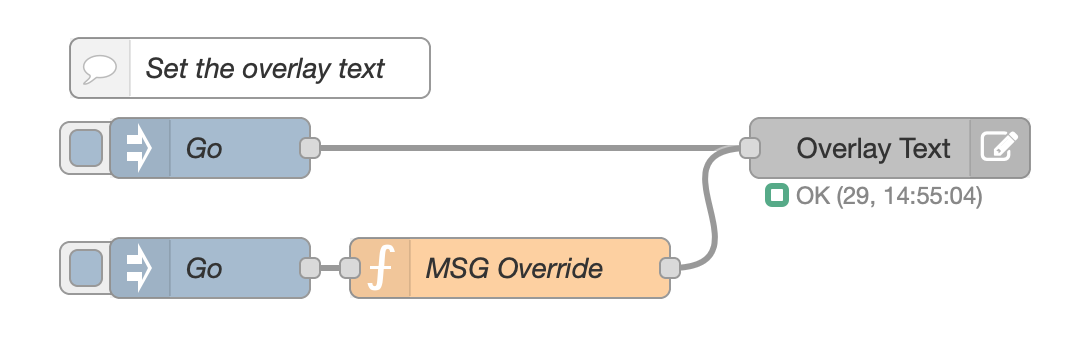
Copy this code and paste it into your flow
View code
Adjust the nodes according to your setup
[
  {
    id: "7e79800b.afb8a8",
    type: "hikvisionUltimateText",
    z: "3f22f0c6.ff1328",
    name: "Overlay Text",
    server: "eb73371b.af5208",
    row1: "",
    row1XY: "",
    row2: "",
    row2XY: "",
    row3: "",
    row3XY: "",
    row4: "",
    row5XY: "",
    channelID: "1",
    x: 510,
    y: 120,
    wires: [],
  },
  {
    id: "3aa8a40f.9a0964",
    type: "inject",
    z: "3f22f0c6.ff1328",
    name: "Go",
    props: [{ p: "payload" }, { p: "topic", vt: "str" }],
    repeat: "",
    crontab: "",
    once: false,
    onceDelay: 0.1,
    topic: "",
    payload: "",
    payloadType: "date",
    x: 170,
    y: 120,
    wires: [["7e79800b.afb8a8"]],
  },
  {
    id: "2b4d9297.75ee46",
    type: "comment",
    z: "3f22f0c6.ff1328",
    name: "Set the overlay text",
    info: "",
    x: 190,
    y: 80,
    wires: [],
  },
  {
    id: "22dc37f9.b3b86",
    type: "function",
    z: "3f22f0c6.ff1328",
    name: "MSG Override",
    func: '// Override one or more rows\n// You can use from row1 to row4 to set the text\n// and from row1XY to row4XY to set the position in the format x,y (for example: 100,200)\n\n// Optionally set the channel. On NVR, this indicates the camera number\nmsg.channelid = 1;\n\n// Row 1\nmsg.row1 = "Temperature: " + msg.payload;\nmsg.row1XY = "100,200"; // Optionallly set the position\n\n// Row 2 (here we leave the position previosly set via the camera menu)\nmsg.row2 = "Sun";\n\nreturn msg;',
    outputs: 1,
    noerr: 0,
    initialize: "",
    finalize: "",
    x: 320,
    y: 180,
    wires: [["7e79800b.afb8a8"]],
  },
  {
    id: "a91e43a0.ccbb2",
    type: "inject",
    z: "3f22f0c6.ff1328",
    name: "Go",
    props: [{ p: "payload" }, { p: "topic", vt: "str" }],
    repeat: "",
    crontab: "",
    once: false,
    onceDelay: 0.1,
    topic: "",
    payload: "22°c",
    payloadType: "str",
    x: 170,
    y: 180,
    wires: [["22dc37f9.b3b86"]],
  },
  {
    id: "eb73371b.af5208",
    type: "Hikvision-config",
    host: "192.168.1.32",
    port: "80",
    name: "Server",
    authentication: "digest",
    protocol: "http",
    heartbeattimerdisconnectionlimit: "1",
    deviceinfo: "[object Object]",
  },
];
Flow Messages
Pass anything you like as input msg, to set the text overlay.
You can override texts by passing some msg inputs. See samples below
Input
// Simply overlay the text set in the config window
msg.payload = true;
return msg;
// Override one or more rows
// You can use from row1 to row4 to set the text
// and from row1XY to row4XY to set the position in the format x,y (for example: 100,200)

// Optionally set the channel. On NVR, this indicates the camera number
msg.channelid = 1;

// Row 1
msg.row1 = "Temperature: " + msg.payload;
msg.row1XY = "100,200"; // Optionallly set the position

// Row 2 (here we leave the position previosly set via the camera menu)
msg.row2 = "Sun";

return msg;
// Delete all 4 rows
msg.row1 = "";
msg.row2 = "";
msg.row3 = "";
msg.row4 = "";
return msg;
XML NODE
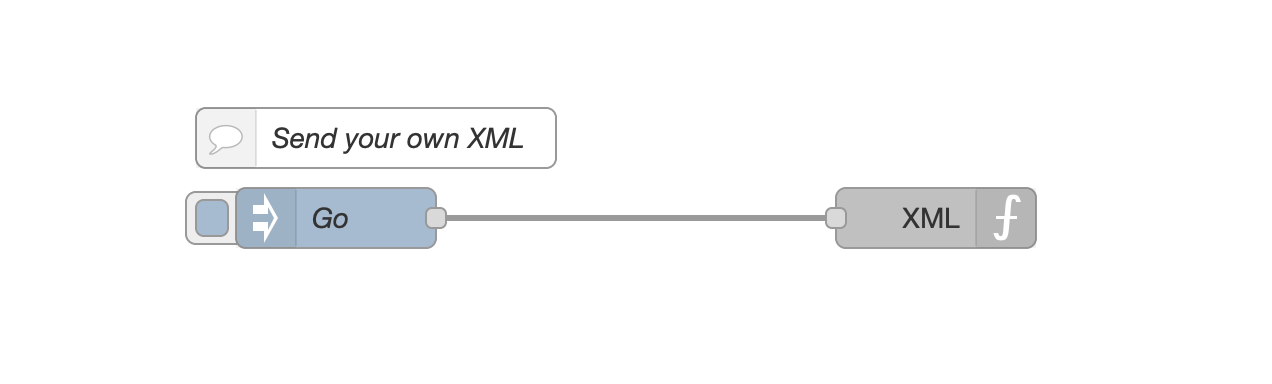
This node allow you to send any XML you want to your devices.
Every device has own firmware, capabilities etc. so i decided to allow you to cover all your needs by adding this universal node.
Please read the ISAPI Hikvision documentation or dig into the Internet to learn what XML you can send. The limit is only your fantasy.
Flow Messages
You can override all properties configured in the node, by passing some msg inputs. See samples below
Input
// Send your own XML to the device
// You can override the default config, with all these optional properties
// msg.method must be PUT, POST or GET (all uppercase)

msg.XML = ``; // Here goes your XML. These strange chars after the = allow you to do multiline text
msg.path = ""; // For example /ISAPI/System/Video/inputs/channels/1/overlays
msg.method = "PUT"; // This must be PUT, POST or GET (uppercase)

return msg;
As an example, you can set a text overlay via XML
// Set an overlay text (if the camera supports overlaying text)

msg.XML = `<?xml version="1.0" encoding="UTF-8" ?>
<VideoOverlay version="1.0" xmlns="http://www.hikvision.com/ver20/XMLSchema\">
<fontSize>1</fontSize>
<TextOverlayList size="6">
    <TextOverlay version="1.0" xmlns="http://www.hikvision.com/ver20/XMLSchema\">
    <id>1</id>
    <enabled>true</enabled>
    <positionX>464</positionX>
    <positionY>96</positionY>
    <displayText>HELLO WORLD</displayText>
    </TextOverlay>
</TextOverlayList>
</VideoOverlay>`; // Here goes your XML. These strange chars after the = allow you to do multiline text
msg.path = "/ISAPI/System/Video/inputs/channels/1/overlays/text"; // For example /ISAPI/System/Video/inputs/channels/1/overlays
msg.method = "PUT"; // This must be PUT, POST or GET (uppercase)

return msg;
Output
The node will return the response from the camera.
For example, if you wish to know if your camera has motion detect enable, just pass this to the node
// Ask the camera if it supports motion detect
msg.path = "/ISAPI/System/Video/inputs/channels/1/motionDetection";
msg.method = "GET";
return msg;
The response will be something like this
{
   "topic":"Camera Sud",
   "payload":{
      "MotionDetection":{
         "$":{
            "version":"2.0",
            "xmlns":"http://www.hikvision.com/ver20/XMLSchema"
         },
         "enabled":"false",
         "enableHighlight":"true",
         "samplingInterval":"2",
         "startTriggerTime":"500",
         "endTriggerTime":"500",
         "regionType":"grid",
         "Grid":{
            "rowGranularity":"18",
            "columnGranularity":"22"
         },
         "MotionDetectionLayout":{
            "$":{
               "version":"2.0",
               "xmlns":"http://www.hikvision.com/ver20/XMLSchema"
            },
            "sensitivityLevel":"80",
            "layout":{
               "gridMap":"000000000000000000000000000000000000000000000000000000000000000000000000000000000000000000000000000000000000"
            }
         },
         "enableWithMoving":"false"
      }
   },
   "_msgid":"fa45ddc3240240cf"
}
If an error occurs, the XML node will output a msg with the error
{
   "topic":"XML Node",
   "errorDescription":"network timeout at: http://192.168.1.211:80/ISAPI/System/Video/inputs/channels/1/motionDetection",
   "_msgid":"8289d3fbf2919d2b"
}
RAW CAMERA Event NODE
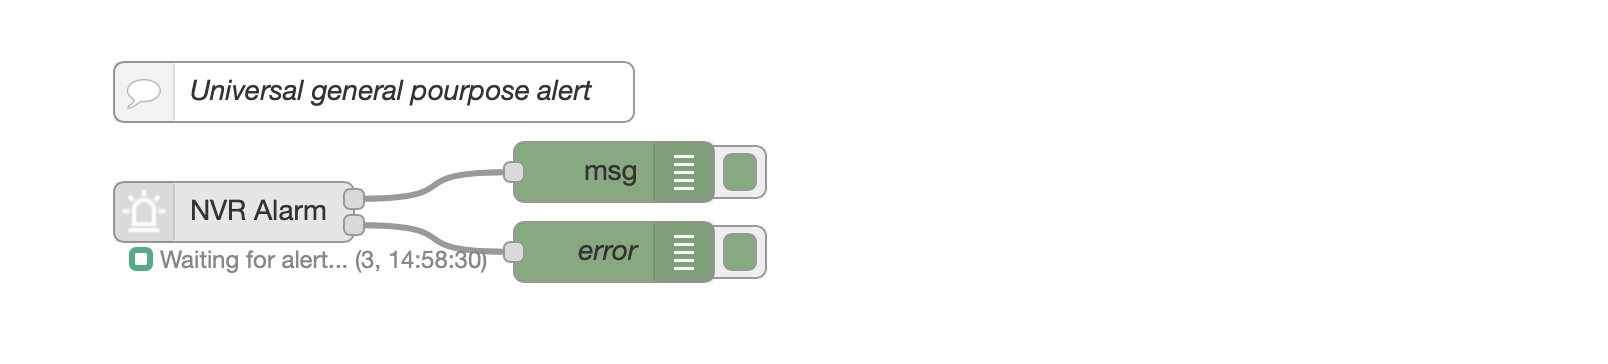
The RAW CAMERA Event node reacts to every message sent by the device. You can use this node when the other nodes doesn't fit your needs. It connects to NVR, Camera, Radars etc... and outputs the event received.
On the third pin, the node will output the event's picture (if any). You can save it directly to disk or user where you want.
Some video intercom/doorbell models do not expose /ISAPI/Event/notification/alertStream for regular users and may return 401 Unauthorized on this node.
Flow Messages
The node outputs a payload on PIN 1 that can vary, depending on the alarm type sent by the connected device.
The node outputs a payload on PIN 2, representing a connection error. TRUE if error, otherwise FALSE
This below is an example of msg output (in this case, a movement detected from a radar)
Output PIN 1
msg = {
  topic: "",
  type: "event",
  payload: {
    ipAddress: "192.168.1.25",
    ipv6Address: "",
    portNo: 80,
    protocol: "HTTP",
    macAddress: "banana",
    channelID: 1,
    dateTime: "2012-01-13T04:32:47+01:00",
    activePostCount: 1,
    eventType: "MultiRadarTargetEvent",
    eventState: "active",
    eventDescription: "MultiRadar Target Event",
    MultiRadarTargetEventList: [
      {
        targetID: 25,
        isTargetDisappear: false,
        targetType: "people",
        Coordinate: {
          angle: 101.49,
          distance: 24.59,
        },
        speed: -0.2,
        signalStrength: "strong",
        TrackedInfoList: [],
        trackedByIPC: false,
      },
    ],
  },
};
Output PIN 2 (connection error)
msg = {
  topic: "",
  errorDescription: "", // This will contain the error rescription, in case of errors.
  payload: false, // Or TRUE if error
};
Output PIN 3 (Image)
msg = {
  topic: "",
  type: "img",
  payload: image,
  extension: "jpg", // Can be "jpg" or "png"
};
DOORBELL NODE
The doorbell node allow you to receive ring/call progress events, open the doors, hangup calls and other things from hikvision and hik compatible doorbells.
Everytime ad intercom sends a message to the node, this message is validated using the filters you selected in the configuration window. In case of a match, it emits a msg to the flow.
There are many filters you can apply (ringStatus (ring or on call), floor number, unit number, building number and so on.).
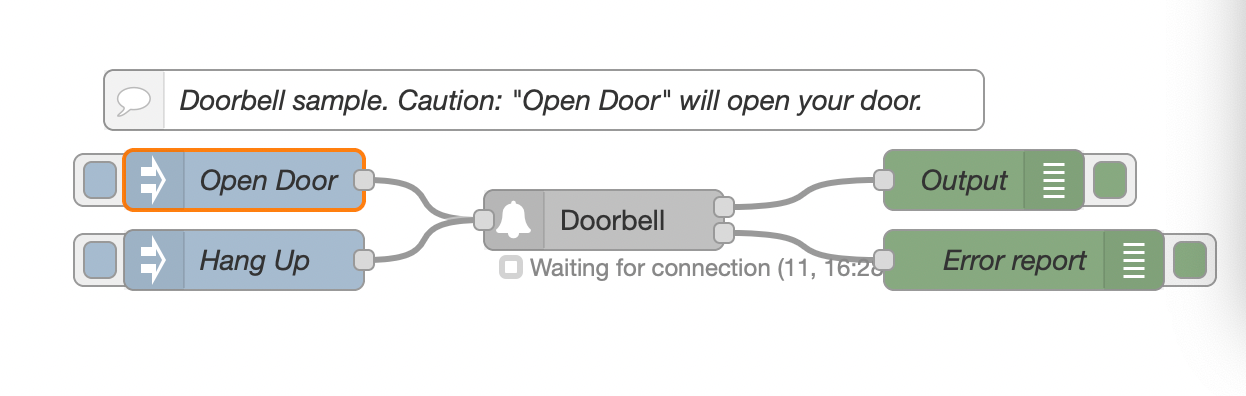
Copy this code and paste it into your flow
View code
Adjust the nodes according to your setup
[
  {
    id: "22420ca523840eef",
    type: "hikvisionUltimateDoorbell",
    z: "48095c5671f0ab16",
    name: "",
    topic: "",
    server: "085ef798e6c04064",
    ringStatus: "all",
    floorNo: "all",
    unitNo: "all",
    zoneNo: "all",
    buildingNo: "all",
    x: 360,
    y: 180,
    wires: [["5d1eddc07a46bd2c"], ["7b5813c6cd794885"]],
  },
  {
    id: "5d1eddc07a46bd2c",
    type: "debug",
    z: "48095c5671f0ab16",
    name: "Output",
    active: true,
    tosidebar: true,
    console: false,
    tostatus: false,
    complete: "true",
    targetType: "full",
    statusVal: "",
    statusType: "auto",
    x: 550,
    y: 160,
    wires: [],
  },
  {
    id: "7b5813c6cd794885",
    type: "debug",
    z: "48095c5671f0ab16",
    name: "Error report",
    active: true,
    tosidebar: true,
    console: false,
    tostatus: false,
    complete: "payload",
    targetType: "msg",
    statusVal: "",
    statusType: "auto",
    x: 570,
    y: 200,
    wires: [],
  },
  {
    id: "a1032b3b72cf9db6",
    type: "inject",
    z: "48095c5671f0ab16",
    name: "Open Door",
    props: [
      { p: "openDoor", v: "1", vt: "num" },
      { p: "topic", vt: "str" },
    ],
    repeat: "",
    crontab: "",
    once: false,
    onceDelay: 0.1,
    topic: "",
    x: 180,
    y: 160,
    wires: [["22420ca523840eef"]],
  },
  {
    id: "54590a36f409ce0f",
    type: "inject",
    z: "48095c5671f0ab16",
    name: "Hang Up",
    props: [
      { p: "hangUp", v: "true", vt: "bool" },
      { p: "topic", vt: "str" },
    ],
    repeat: "",
    crontab: "",
    once: false,
    onceDelay: "8",
    topic: "",
    x: 180,
    y: 200,
    wires: [["22420ca523840eef"]],
  },
  {
    id: "2388a3941360bd3c",
    type: "comment",
    z: "48095c5671f0ab16",
    name: 'Doorbell sample. Caution: "Open Door" will open your door.',
    info: "",
    x: 330,
    y: 120,
    wires: [],
  },
  {
    id: "085ef798e6c04064",
    type: "Doorbell-config",
    host: "192.168.1.5",
    port: "80",
    name: "OUTDOOR STATION",
    authentication: "digest",
    protocol: "http",
    heartbeattimerdisconnectionlimit: "1",
    deviceinfo:
      '{"DeviceInfo":{"$":{"version":"2.0","xmlns":"http://www.isapi.org/ver20/XMLSchema"},"deviceName":"OUTDOOR STATION","deviceID":"7d49925b-4fc7-406b-a0ec-2ca59cc25838","deviceDescription":"\\tVis","deviceLocation":"STD-CGI","systemContact":"STD-CGI","model":"DS-KV6113-WPE1(B)","serialNumber":"DS-KV6113-WPE1(B)0120210416RRF86332026","macAddress":"24:18:c6:39:42:29","firmwareVersion":"V2.2.50","firmwareReleasedDate":"build 210630","bootVersion":"33685554","bootReleasedDate":"1377822","hardwareVersion":"0x0","encoderVersion":"V4.0","encoderReleasedDate":"build 181206","deviceType":"\\tVis","telecontrolID":"88","supportBeep":"true","supportVideoLoss":"true","alarmOutNum":"2","alarmInNum":"4","RS485Num":"1","customizedInfo":""}}',
  },
];
Flow Messages
Input
The node accepts messages from the flow.
See these messages you can pass to it:
OPEN THE DOOR LATCHES
// Open the door.
msg.openDoor = 1; // Pass the door number to open as value, in this case, 1.
return msg;
HANG UP THE CURRENT CALL AND STOP RINGING
// Hangup the current call and stop ringing
msg.hangUp = true;
return msg;
Output
The node outputs a payload on PIN 1 that can vary, depending on the event type sent by the connected intercom.
Anyway, it emits always a payload = *true as soon as an intercom message matching filters you configured in the configuration window, arrives. You can use that payload to trigger events.
The node outputs a payload on PIN 2, representing a connection error. TRUE if error, otherwise FALSE
This below is an example of msg output
Output PIN 1
msg = {
  CallerInfo: {
    buildingNo: 1,
    floorNo: 1,
    zoneNo: 1,
    unitNo: 1,
    devNo: 88,
    devType: 1,
    lockNum: 1,
    status: "idle",
  },
  callerInfo: { ...same as CallerInfo... }, // lowercase alias
  ringStatus: "ring", // lowercase normalized status
  pressedButton: 88, // when available (buttonNo/devNo/keyNo/callButtonNo)
  topic: "",
  payload: true,
};
For multi-button door stations, msg.pressedButton is the easiest field to use in automations.
Output PIN 2 (connection error)
msg = {
  topic: "",
  errorDescription: "", // This will contain the error rescription, in case of errors.
  payload: false, // Or TRUE if error
};
AX PRO Alarm node (Ax Pro and AX Pro Hybrid)
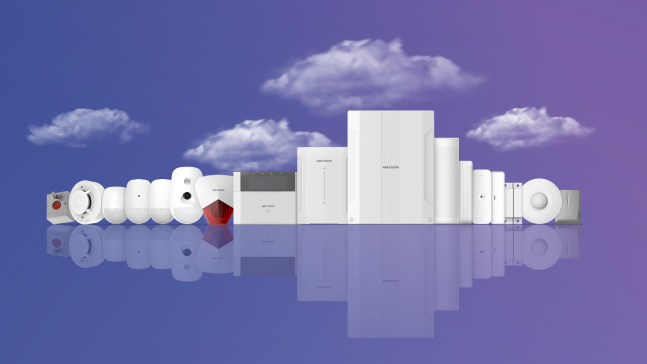
This node receives all events sent by your AX Pro alarm.
You will receive not only Alarms etc, but also zone status, even if the AX Pro is disarmed.
You can also arm, disarm, silence alarm etc...
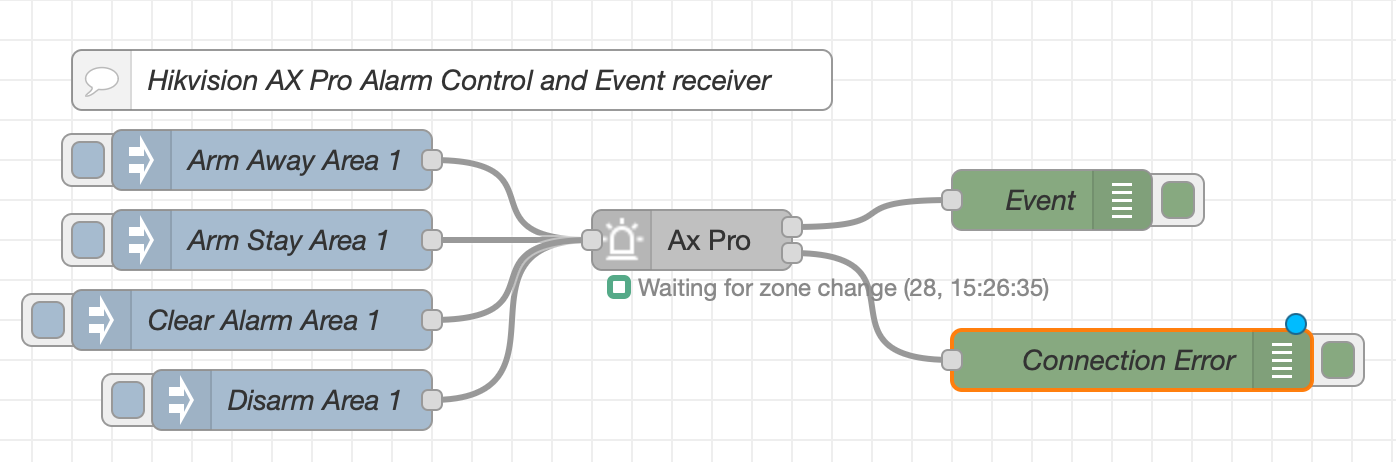
Inputs
: armAwayArea (number): Area number (for example 1). Arm Away the selected area. : armStayArea (number): Area number (for example 1). Arm Stay the selected area. : armAwayAllAreas (boolean): true to Arm Away all areas at once. : armStayAllAreas (boolean): true to Arm Stay all areas at once. : disarmArea (number): Area number (for example 1). Disarm the selected area. : disarmAllAreas (boolean): true to disarm all areas at once. : clearAlarmArea (number): Area number (for example 1). Clear alarm of the selected area. : clearAllAlarmAreas (boolean): true to clear the alarm of all areas at once.
Examples:
msg.armAwayArea = 1; // To Arm Away Area 1
msg.armStayArea = 1; // To Arm Stay Area 1
msg.armAwayAllAreas = true; // To Arm Away all areas at once
msg.armStayAllAreas = true; // To Arm Stay all areas at once
msg.disarmArea = 1; // To Disarm Area 1
msg.disarmAllAreas = true; // To disarm all areas at once
msg.clearAlarmArea = 1; // To clear alarm on Area 1
msg.clearAllAlarmAreas = true; // To clear alarm of all areas at once
return msg;
Copy this code and paste it into your flow
View code
Adjust the nodes according to your setup
[
  {
    id: "7c370c1cabe6fd89",
    type: "hikvisionUltimateAxPro",
    z: "e9a7cd97842ffa10",
    name: "Ax Pro",
    topic: "",
    server: "2dfc48091d46ead3",
    outputtype: "0",
    x: 350,
    y: 200,
    wires: [["893818dce1fc2c20"], ["01e634bd9098e528"]],
  },
  {
    id: "893818dce1fc2c20",
    type: "debug",
    z: "e9a7cd97842ffa10",
    name: "Event",
    active: true,
    tosidebar: true,
    console: false,
    tostatus: false,
    complete: "payload",
    targetType: "msg",
    statusVal: "",
    statusType: "auto",
    x: 530,
    y: 180,
    wires: [],
  },
  {
    id: "01e634bd9098e528",
    type: "debug",
    z: "e9a7cd97842ffa10",
    name: "Connection Error",
    active: true,
    tosidebar: true,
    console: false,
    tostatus: false,
    complete: "true",
    targetType: "full",
    statusVal: "",
    statusType: "auto",
    x: 570,
    y: 260,
    wires: [],
  },
  {
    id: "ddc2d752e0c13937",
    type: "inject",
    z: "e9a7cd97842ffa10",
    name: "Disarm Area 1",
    props: [{ p: "disarmArea", v: "1", vt: "num" }],
    repeat: "",
    crontab: "",
    once: false,
    onceDelay: 0.1,
    topic: "",
    x: 150,
    y: 280,
    wires: [["7c370c1cabe6fd89"]],
  },
  {
    id: "b33ec376180a53bc",
    type: "inject",
    z: "e9a7cd97842ffa10",
    name: "Arm Away Area 1",
    props: [{ p: "armAwayArea", v: "1", vt: "num" }],
    repeat: "",
    crontab: "",
    once: false,
    onceDelay: 0.1,
    topic: "",
    x: 140,
    y: 160,
    wires: [["7c370c1cabe6fd89"]],
  },
  {
    id: "6145bfa8991c1831",
    type: "inject",
    z: "e9a7cd97842ffa10",
    name: "Arm Stay Area 1",
    props: [{ p: "armStayArea", v: "1", vt: "num" }],
    repeat: "",
    crontab: "",
    once: false,
    onceDelay: 0.1,
    topic: "",
    x: 140,
    y: 200,
    wires: [["7c370c1cabe6fd89"]],
  },
  {
    id: "189b2eb17cb67a52",
    type: "inject",
    z: "e9a7cd97842ffa10",
    name: "Clear Alarm Area 1",
    props: [{ p: "clearAlarmArea", v: "1", vt: "num" }],
    repeat: "",
    crontab: "",
    once: false,
    onceDelay: 0.1,
    topic: "",
    x: 130,
    y: 240,
    wires: [["7c370c1cabe6fd89"]],
  },
  {
    id: "40ce4b0d34bedf21",
    type: "comment",
    z: "e9a7cd97842ffa10",
    name: "Hikvision AX Pro Alarm Control and Event receiver",
    info: "",
    x: 230,
    y: 120,
    wires: [],
  },
  {
    id: "2dfc48091d46ead3",
    type: "AXPro-config",
    host: "192.168.1.10",
    port: "80",
    name: "AX Pro",
    authentication: "sha256-salted",
    protocol: "http",
    heartbeattimerdisconnectionlimit: "2",
    deviceinfo: "[object Object]",
  },
];
// FOR CID EVENTS
CIDEvent: {
   "code":1401, // This is the reference code of the event. Please see the ISAPI docs or try by yourself, by watching the output while playing with your alarm
   "name":"Supergiovane",
   "type":"armAndDisarm",
   "trigger":"2022-12-22T17:33:56+01:00",
   "upload":"2022-12-22T17:33:56+01:00",
   "system":1,
   "subSystemName":"Casa"
}
// FOR ZONE UPDATE EVENT
zoneStatus: {
   "id":1,
   "name":"Zona cablata 2",
   "status":"trigger",
   "sensorStatus":"normal",
   "magnetOpenStatus":true,
   "tamperEvident":false,
   "shielded":false,
   "bypassed":false,
   "armed":false,
   "isArming":false,
   "alarm":false,
   "reason":"break",
   "subSystemNo":1,
   "linkageSubSystem":[
      1
   ],
   "detectorType":"magneticContact",
   "stayAway":false,
   "zoneType":"Instant",
   "accessModuleType":"localTransmitter",
   "moduleChannel":2,
   "zoneAttrib":"wired",
   "deviceNo":3,
   "abnormalOrNot":false
}
CID Events common codes
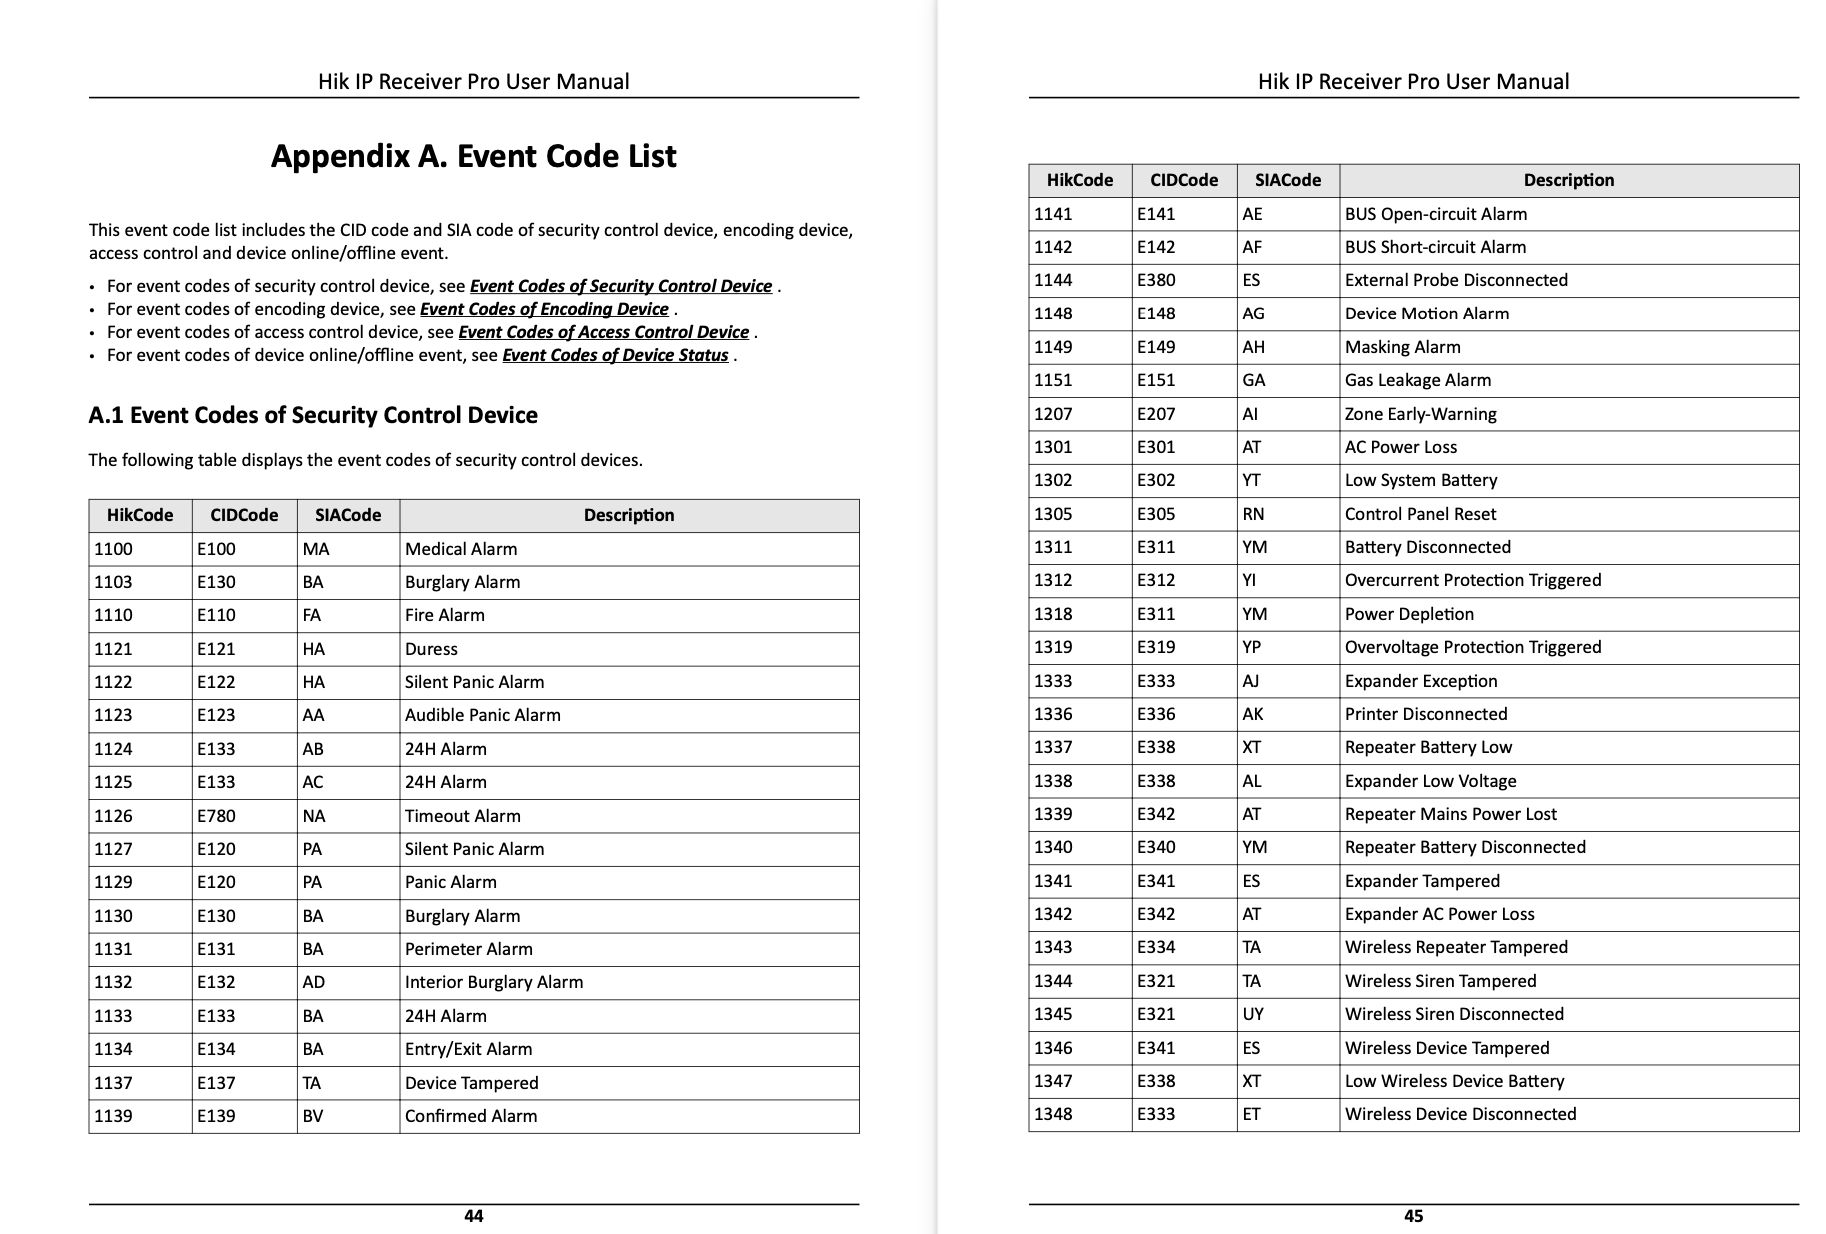
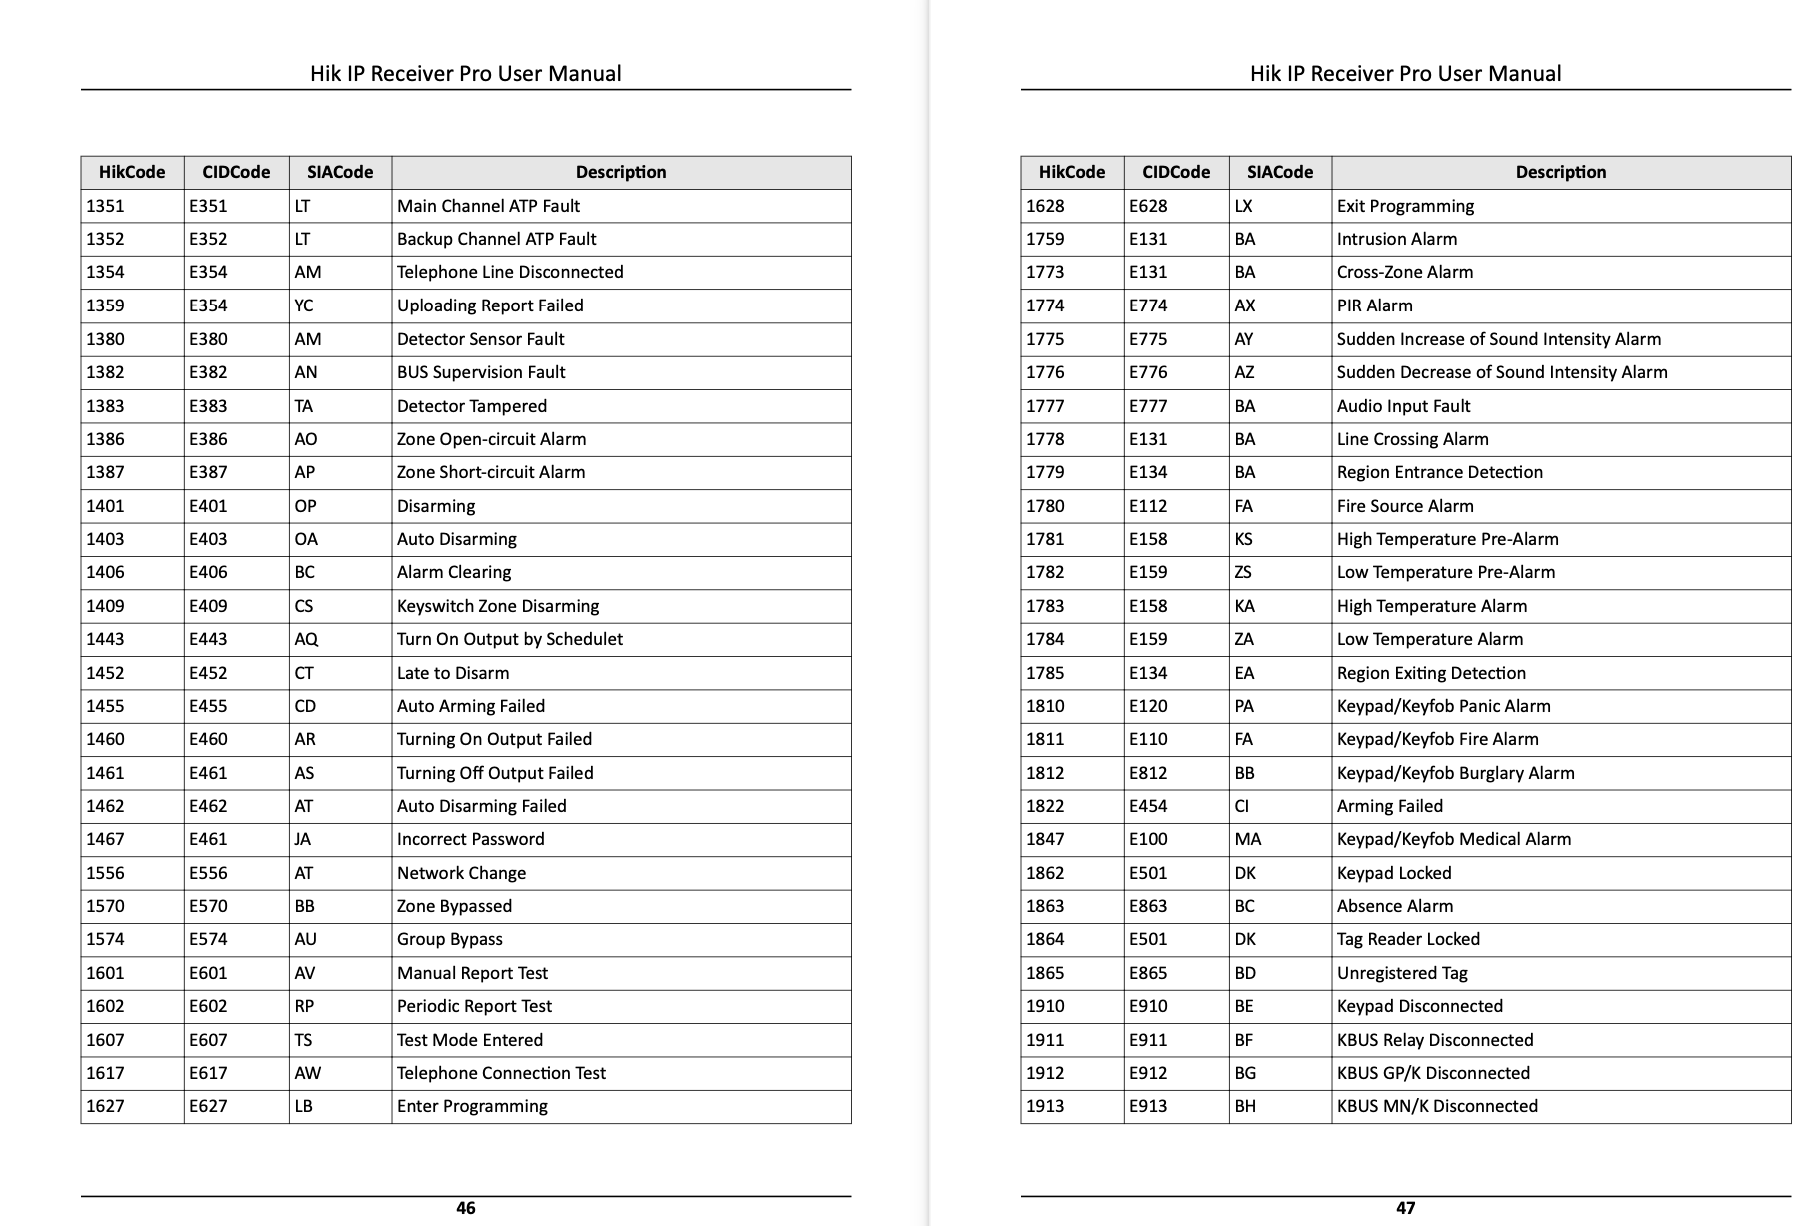
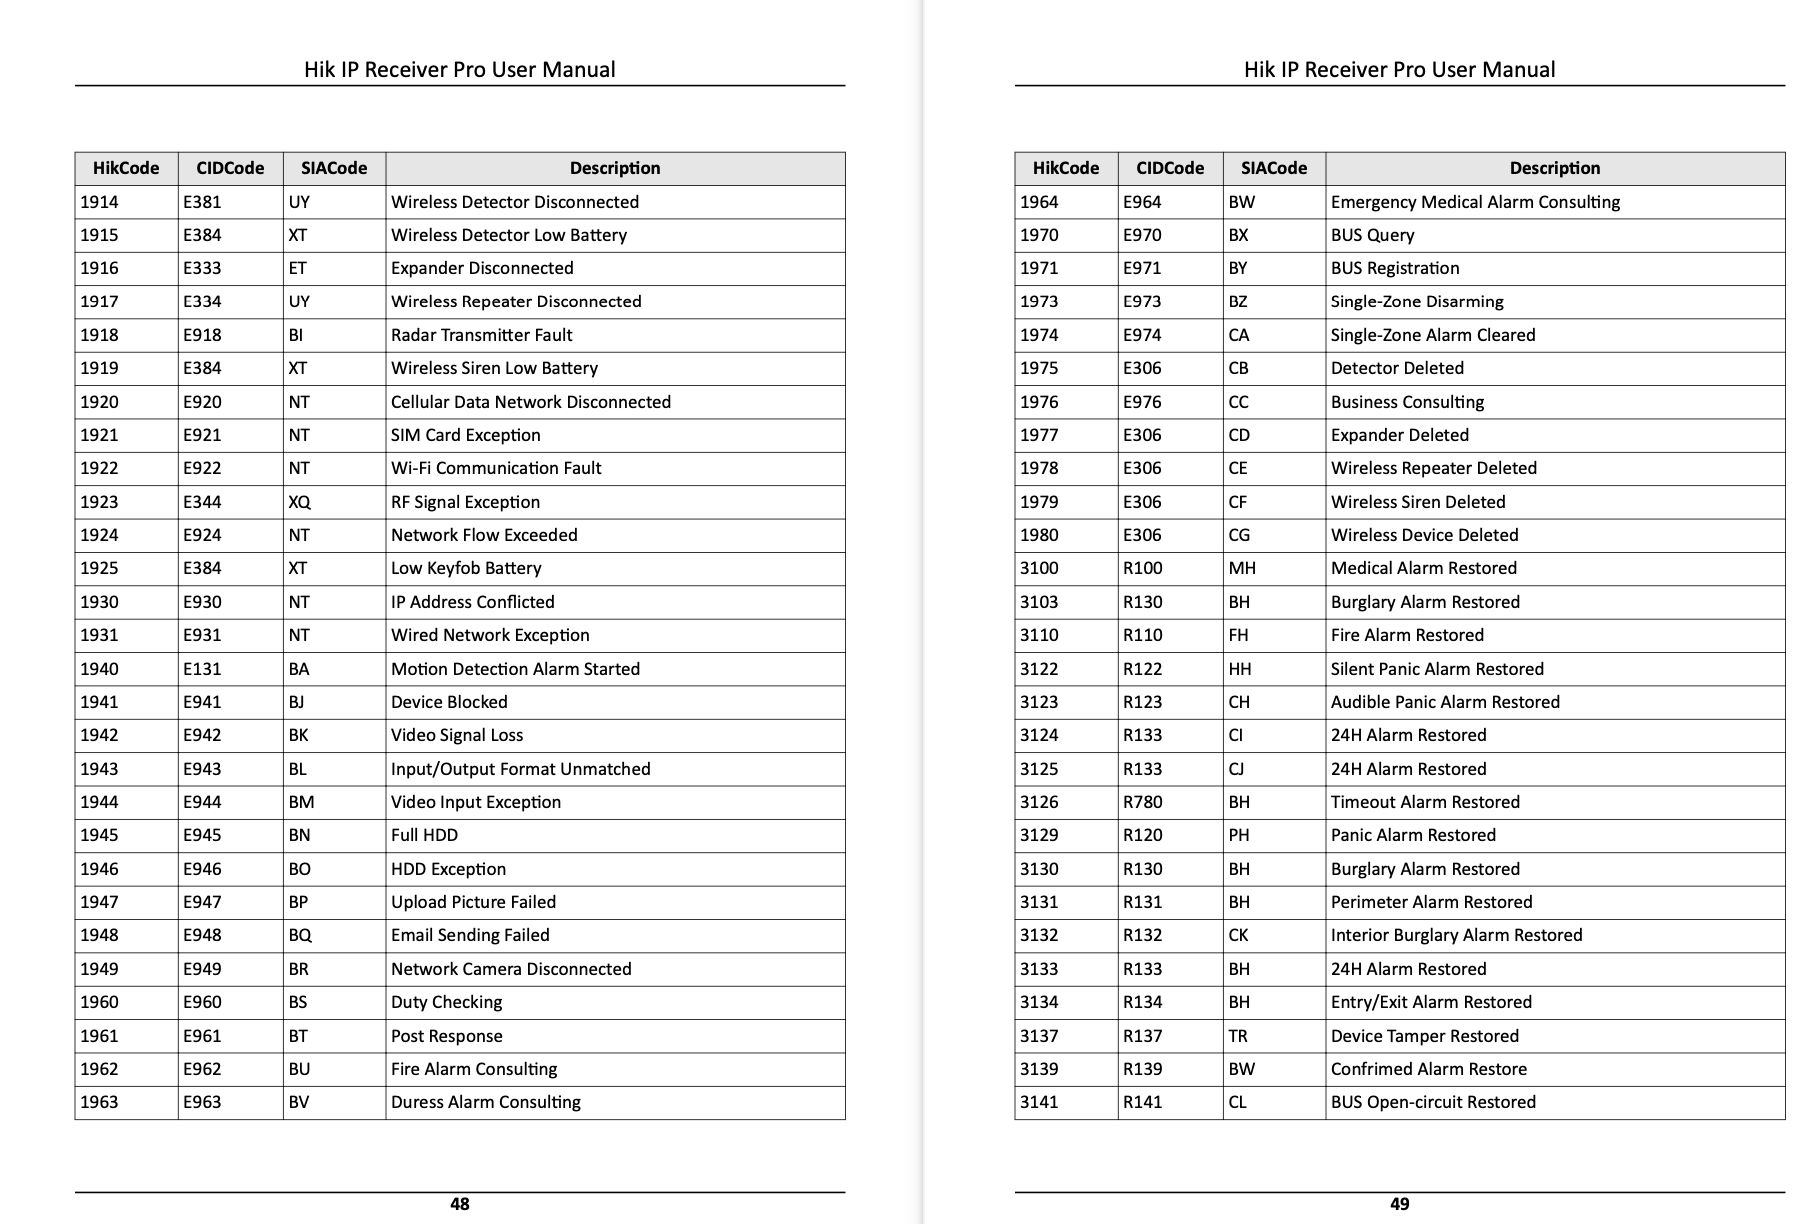
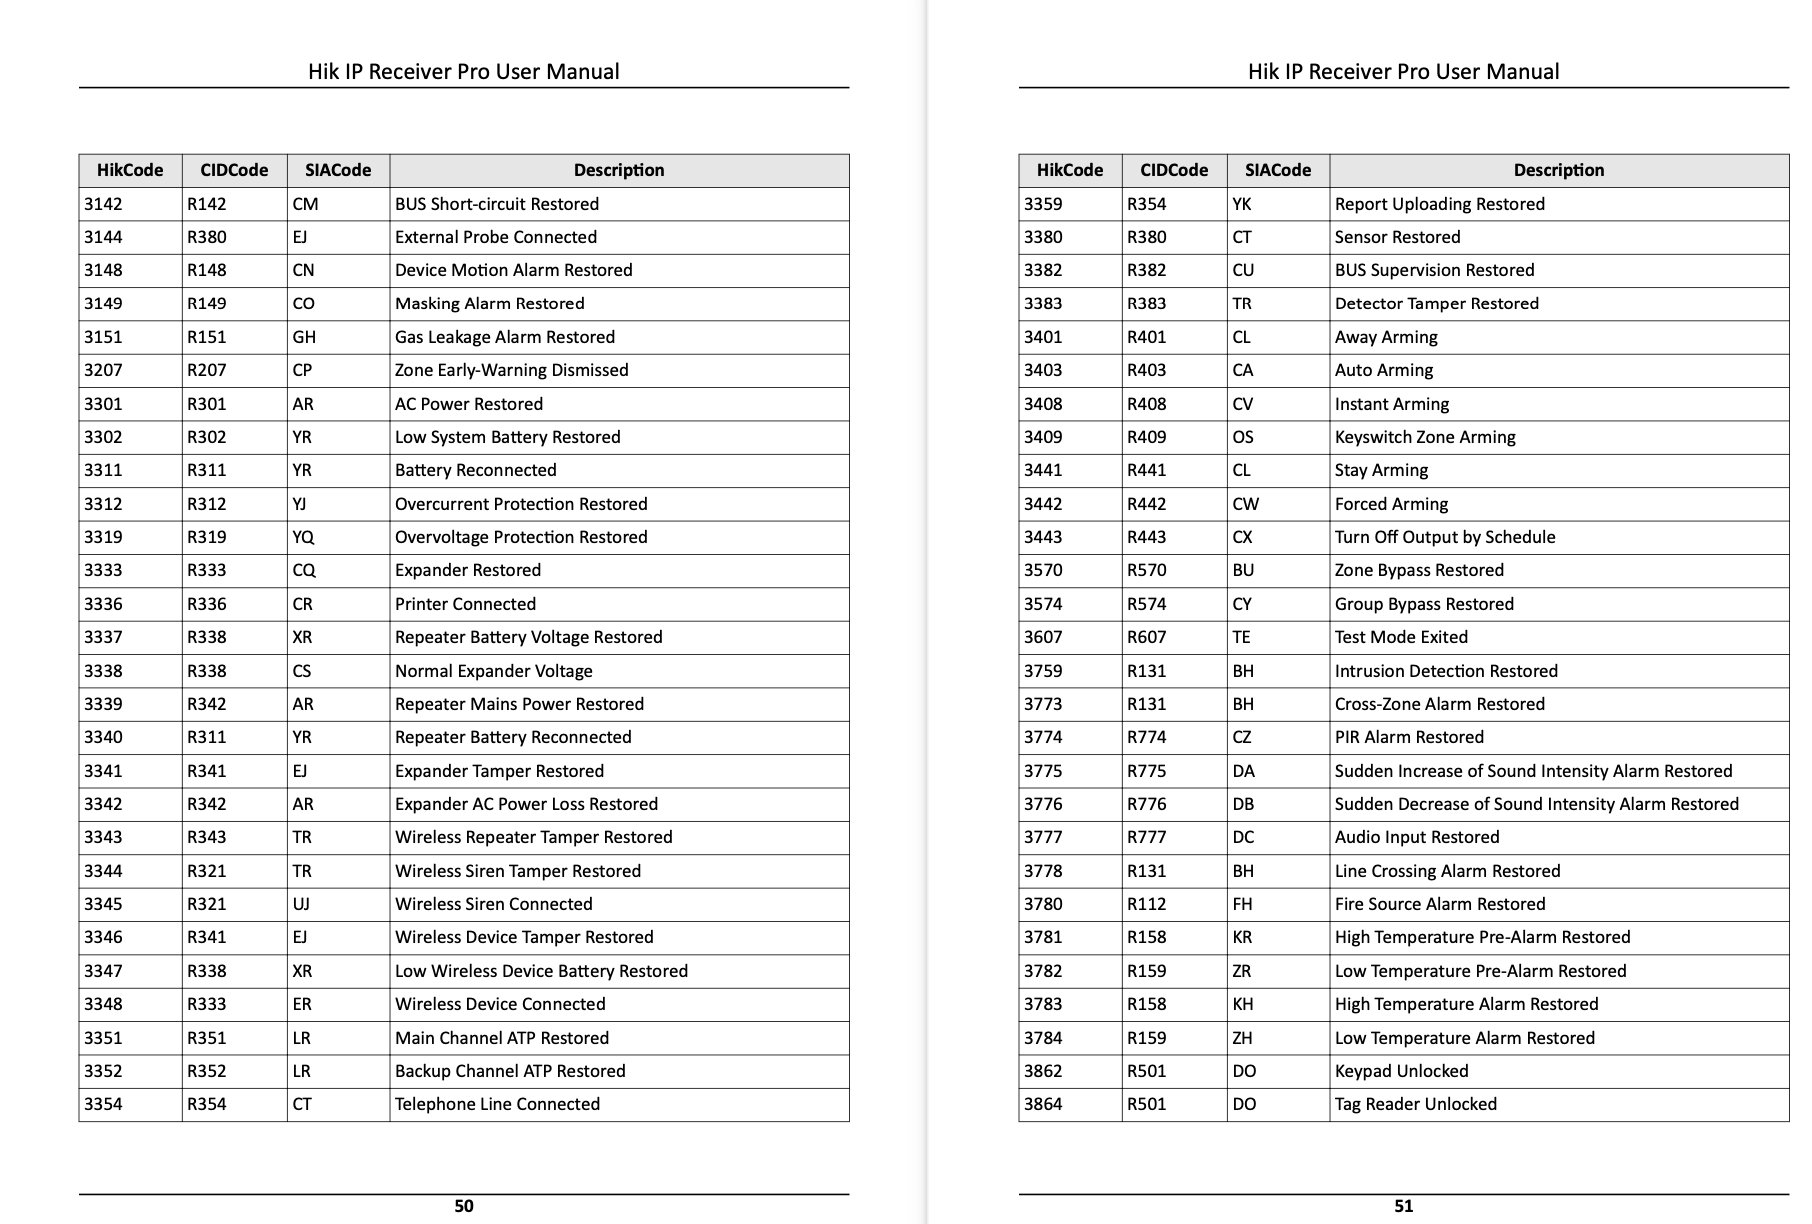
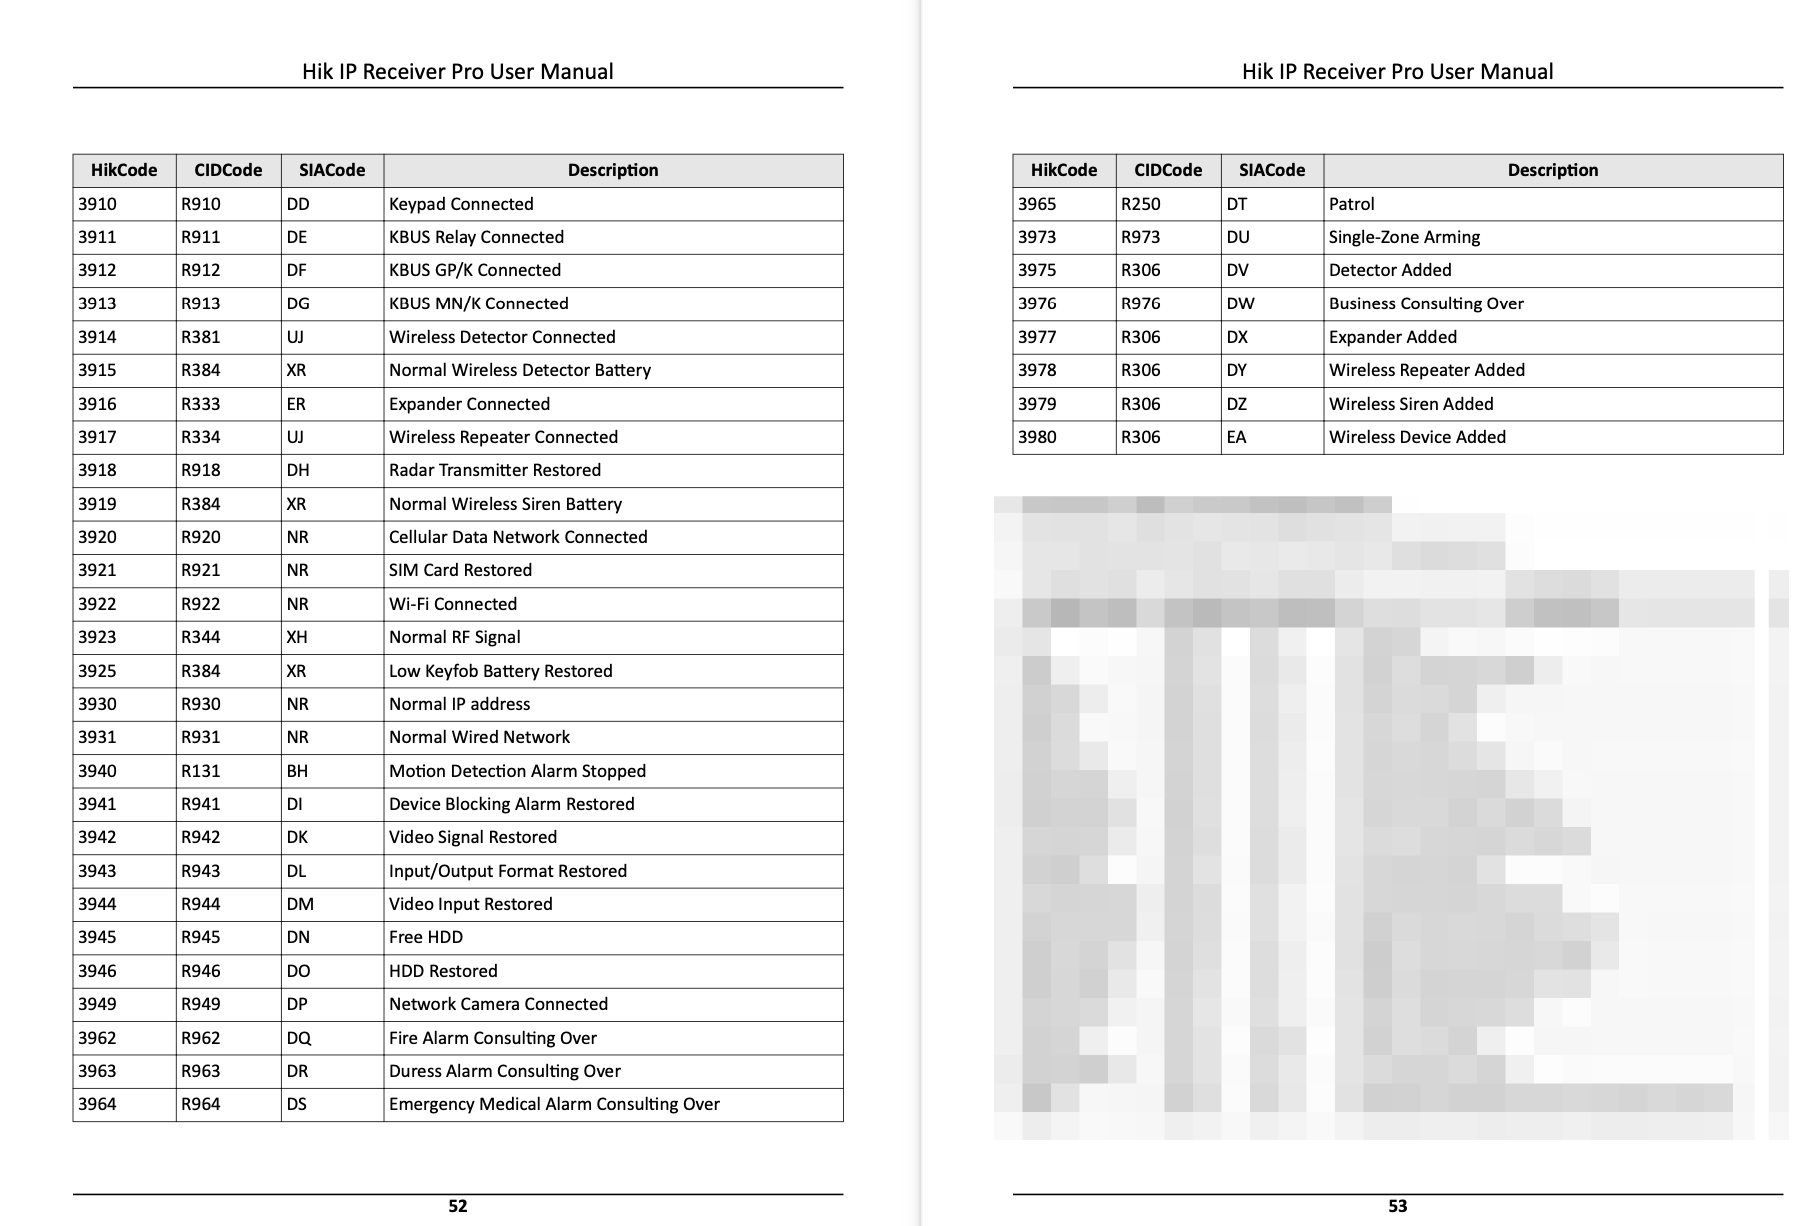
CID Events refers to a field "code" in the Alarm event output
The most common event codes are: 3401 (Arm Away), 3441 (Arm Stay), 1401 (Disarmed), 1759 (Intrusion Alarm)
For other codes, please see the list below. You can find it here as well
 >
>
 >
>
 >
>
 >
>
 >
>
Access Control Terminal node
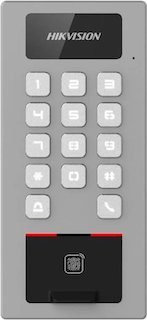
This node receives all events sent by your access control terminal, like, for example the DS-K1T502DBFWX-C.
The node emits the payload as soon as it receives the event.
You can filter by any type of event, alarm, exception, etc, or you can accept all incoming events
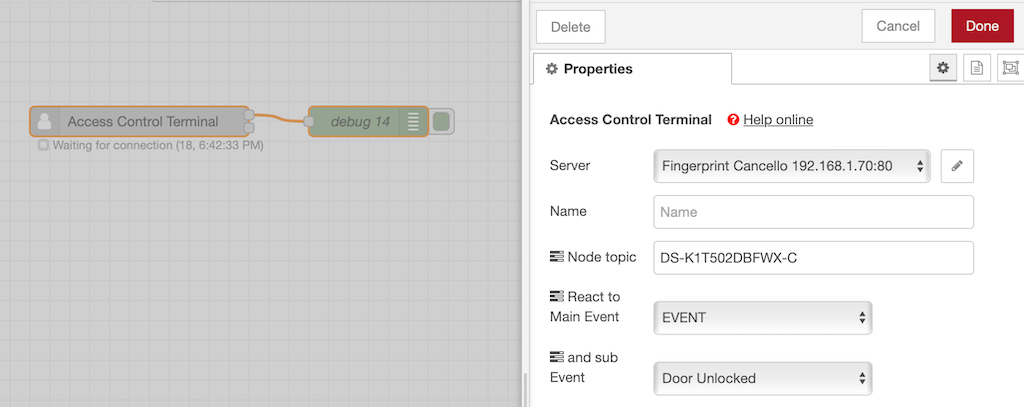
Flow Messages
This is an example of payload.
Output
{
  "topic": "",
  "payload": {
    "major": 5,
    "minor": 21,
    "time": "2023-03-18T18:37:54+01:00",
    "netUser": "",
    "doorNo": 1,
    "type": 0,
    "serialNo": 735,
    "eventDescription": "(EVENT) Door Ulock",
    "currentVerifyMode": "faceOrFpOrCardOrPw"
  },
  "connected": true
}
Speaker node
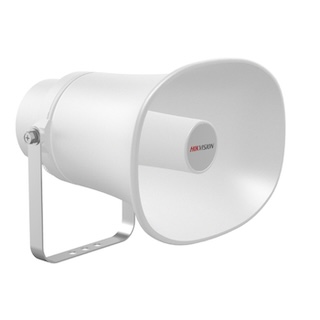
This node connects to your Hikvision Speaker and broadcast a selected audio file, that must be already been uploaded to the speaker.
Please see the help into the Node-Red help tab for further infos.