node-red-contrib-github-plus 0.3.1
Node-RED nodes to talk to GitHub
GitHub Nodes
Node-RED nodes to interact with GitHub.
Install
Run the following command in the root directory of your Node-RED instance:
npm install --save node-red-contrib-github-plus
Usage
This set provides 2 nodes:
github-rest-api- a GitHub REST API client node. It makes REST API requests by sendingmsg.payloaddata to the specified API endpoint and outputs the response data asmsg.payload.github-webhook- a GitHub Webhook listener node. It listens to GitHub webhooks and outputs the event name as themsg.topicand the event payload object as themsg.payload.
Configuration
Setting Up GitHub API Client
Before making any API requests, you have to create a GitHub App. To do that follow the steps as per Creating a GitHub App guide:
- create app and enter the basic info (steps 1 - 7)
- skip the User authorization steps (8 - 11). The app is private and will be used to do automated things on its own. It doesn't need any user auth logic.
- skip the Webhook steps (12 - 13) - will set it up later
- specify permissions (step 14)
- skip the events subscription (step 15) - will set it up later with the webhook
- for "Where can this integration be installed?" set Only on this account (step 16)
- push Create GitHub App
- once created, you will be redirected to the App Settings page. There is the App ID number in the About section. You will need this number later.
Then you need to generate a private key:
- In the App settings scroll down to Private keys
- Click Generate a private key
- You should see a private key in
.PEMformat downloaded to your computer
Now you need to install the app on your repository(-ies). To do that follow the Installing your private GitHub App on your repository guide:
- once installed, you will be redirected to the configuration options for the app installation. The url of the installation config page should look like
https://github.com/.../settings/installations/<InstID>. You will need the<InstID>number later.
And finally configure your GitHub API client:
- Open your Node-RED instance
- Drag & drop the
github-rest apinode from the palette to the workspace and double-click on it, to open the node editor - In the
Clientdropdown menu pick theAdd New github-api-configoption and press the pencil button at the right to add a new API configuration - Copy-paste
App IDfrom the App Settings page on GitHub to the node editor - In the
Private Keyopen the.PEMkey file you downloaded from GitHub - Copy-paste
Inst IDfrom the app installation config page url to the node editor - In then
User-Agententer your username or the name of your GitHub Application. Empty value defaults tonode-red-contrib-github-plus. Read more why it is required. - Push
Update
Setting Up GitHub Webhooks
To listen for GitHub events, you first need to start a webhook listener on your server:
- Open your Node-RED instance
- Drag & drop the
github-webhooknode from the palette to the workspace and double-click on it, to open the node editor - In the
Pathfield set the url path the webhook listener will listen to notifications on. - Push
Generate Secret- you'll need the secret later - Push
Update Deploy
Now you need to setup a webhook on GitHub to send event notifications to your server. Follow the steps from Creating webhooks guide. Here are some tips:
- if the app will be doing the same things for all repos it installed on, then setup a webhook in your GitHub App or Organization settings
- if the app will have different logic from repo to repo, then setup a webhook in Repository settings
- content type should be
application/json- this is the content type used bygithub-webhooknode - webhook url should be the url to the webhook listener on your server
- webhook secret should be the
Secretvalue you generated above
Making REST API Requests
To make REST API requests using the github-rest-api node, select API client you added and set the API endpoint the node will call. The API endpoint can be either specified in the node settings, or provided in msg.endpoint (if the endpoint is empty in the node settings). The request parameters are set via the msg.payload.
After executing a request the node outputs a message with the response data set to msg.payload.
If an API endpoint is in Preview mode and requires a Media Type to be set in the Accept header, then specify it in the Media Type node setting or via msg.mediaType (if the node setting is empty).
Handling Incoming Webhook Payloads
When GitHub sends an event notification to the url where you setup a webhook node to listen on, it will trigger the node output with the following properties:
msg.guid- GUID to identify the delivery. Value ofX-GitHub-Deliveryheader.msg.topic- Name of the event that triggered the delivery. Value ofX-GitHub-Eventheader.msg.payload- Webhook event payload.
Example
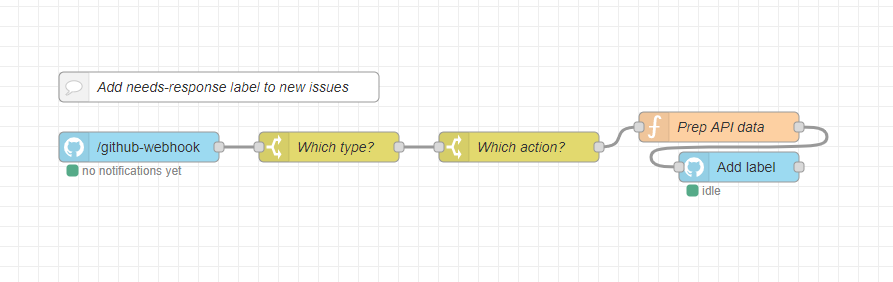
Adding Label To New Issues
This example flow adds a needs-response label to all new issues opened in the repository where the app is installed.
Flow json for Node-RED: github-adding-label-to-new-issues.json
References
- REST API Reference: https://docs.github.com/en/free-pro-team@latest/rest/reference
- REST API Endpoints available for GitHub Apps: https://docs.github.com/en/free-pro-team@latest/rest/overview/endpoints-available-for-github-apps
- REST API Media Types: https://docs.github.com/en/free-pro-team@latest/rest/overview/media-types
- Webhook events and payloads: https://docs.github.com/en/free-pro-team@latest/developers/webhooks-and-events/webhook-events-and-payloads
Backers 💝


[Donate] Thank you for your support! 🙌
Developing Nodes
Build & Test in Watch mode:
yarn dev
Testing Node Set in Node-RED
Read Node-RED docs on how to install the node set into your Node-RED runtime.
License
MIT © Alex Kaul