How to read and write data to a Google sheet in node-red
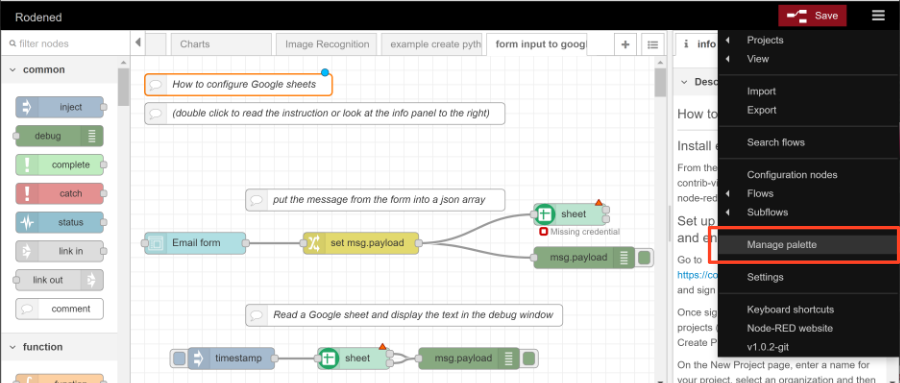
# Install extra nodesFirst, install the following nodes from the manage palette:
node-red-contrib-viseo-google-authentication and node-red-contrib-viseo-google-spreadsheet.

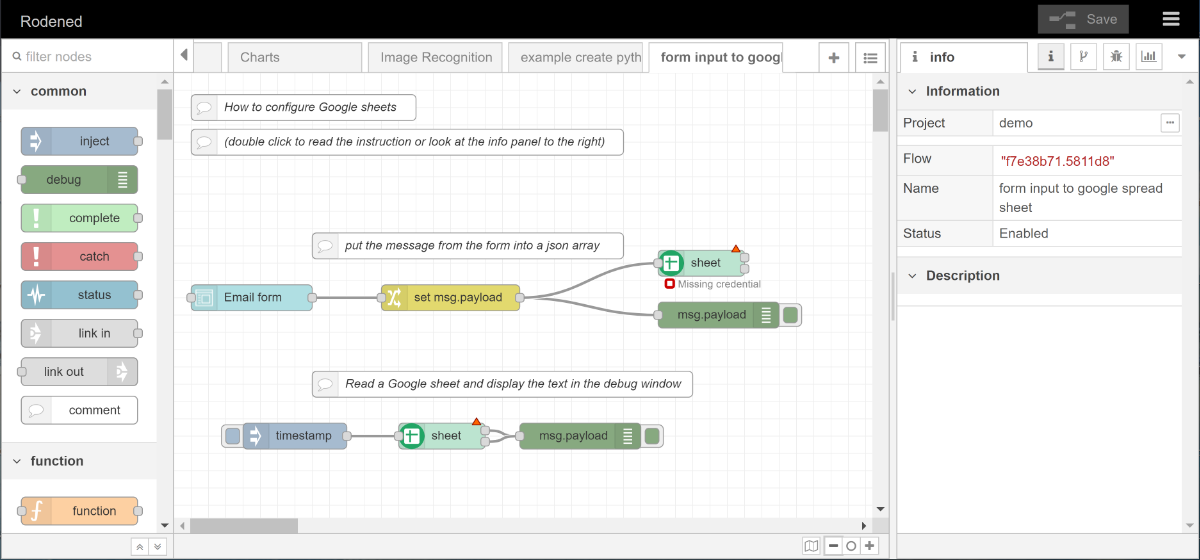
Import the flow to the node-red editor
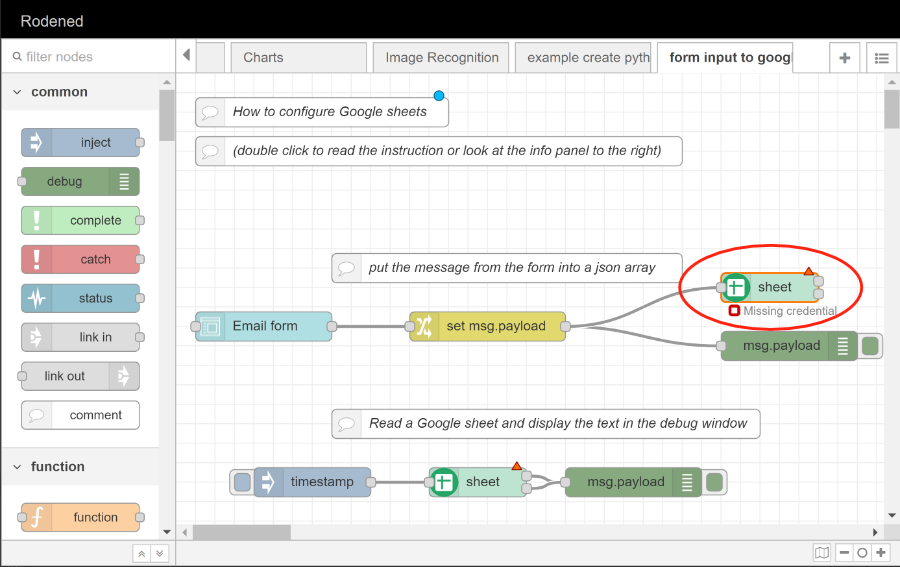
Import the flow example below that shows how to submit an email address with a dashboard form to a google sheet and read it back into a debug node.
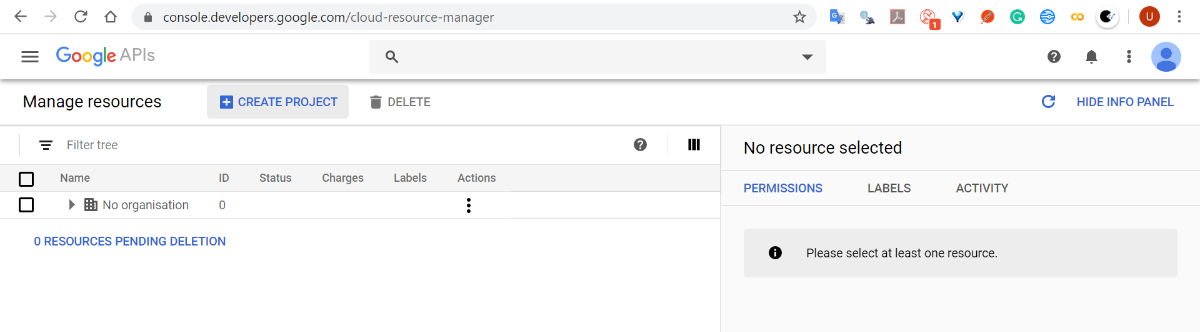
Set up a Google service account
Go to https://console.developers.google.com/project and sign in to your Google/Gmail account.
Once signed in, you'll see a list of existing projects (if there are any) or you can click Create Project to create a new one.
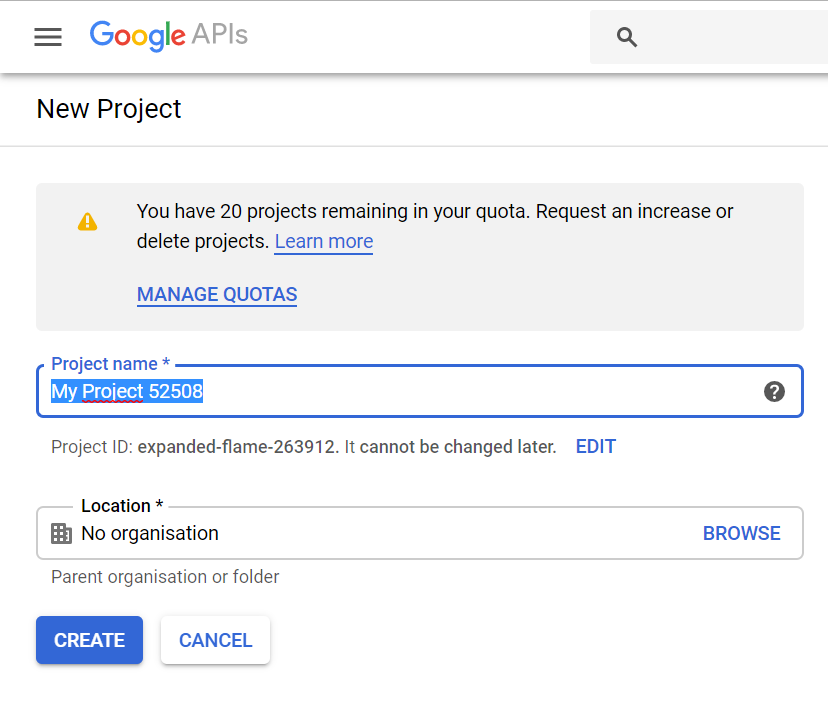
On the New Project page, enter a name for your project, select an organization and then click Create. On the New Project page, enter a name for your project, select an organization and then click Create.
On the New Project page, enter a name for your project, select an organization and then click Create. On the New Project page, enter a name for your project, select an organization and then click Create.
Enable the Sheets API
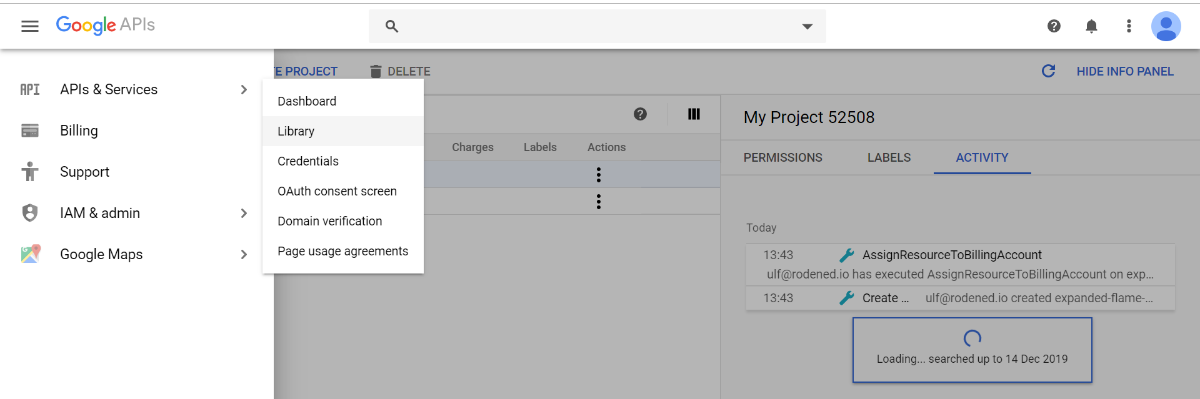
Make sure your project is still selected as the current project.
From the navigation menu, hover over APIs and Services and select Library.
Search for and click the Google Sheets API tile.
Search for and click the Google Sheets API tile.

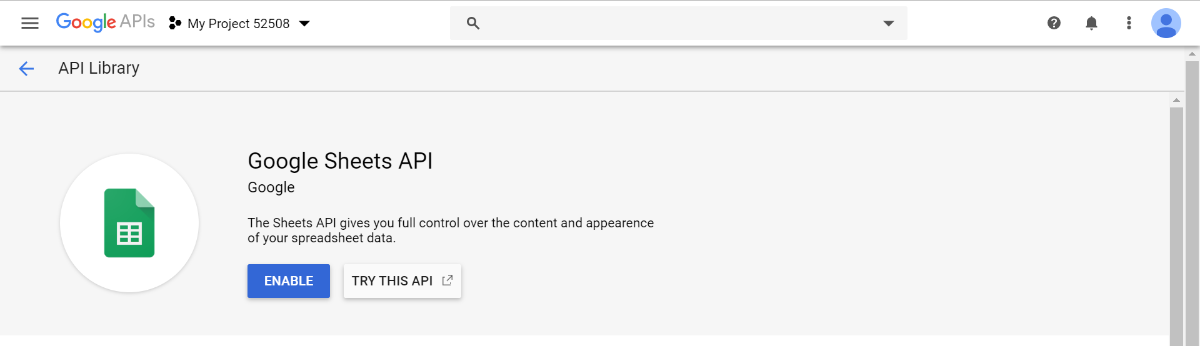
Click Enable.
Click Enable.
Enable the Drive API
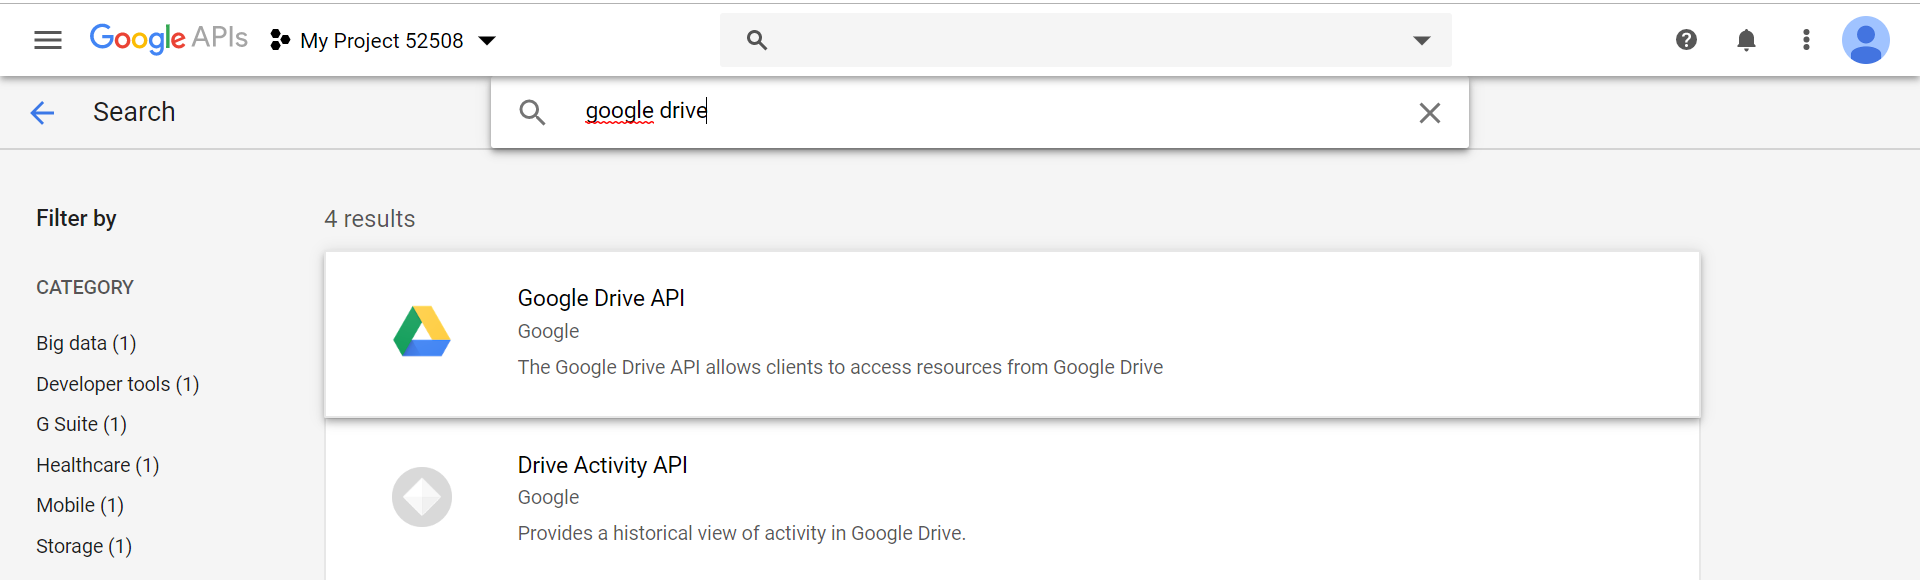
Do the same thing to enable the Google Drive API.
Search for and click the Google Drive API tile.
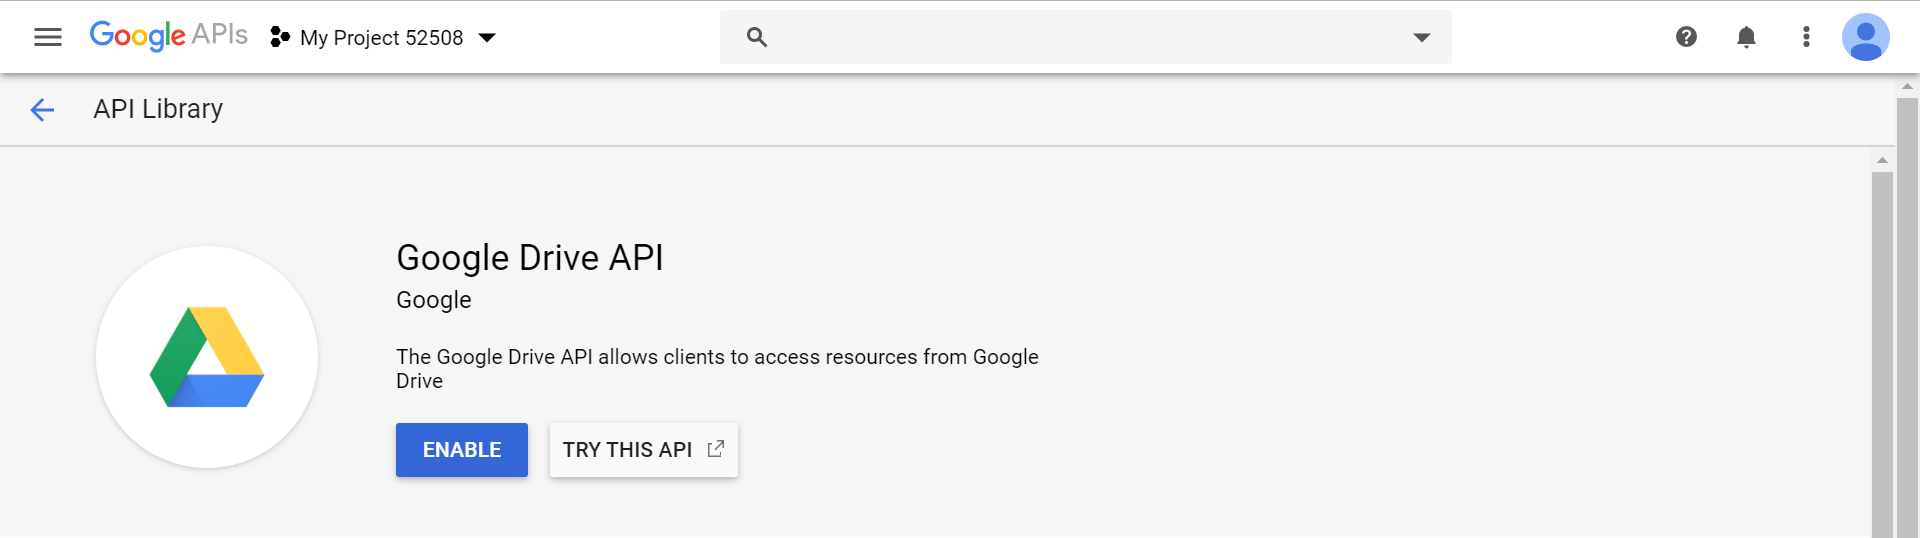
Click enable.
Click enable.
Download Service Account Credentials
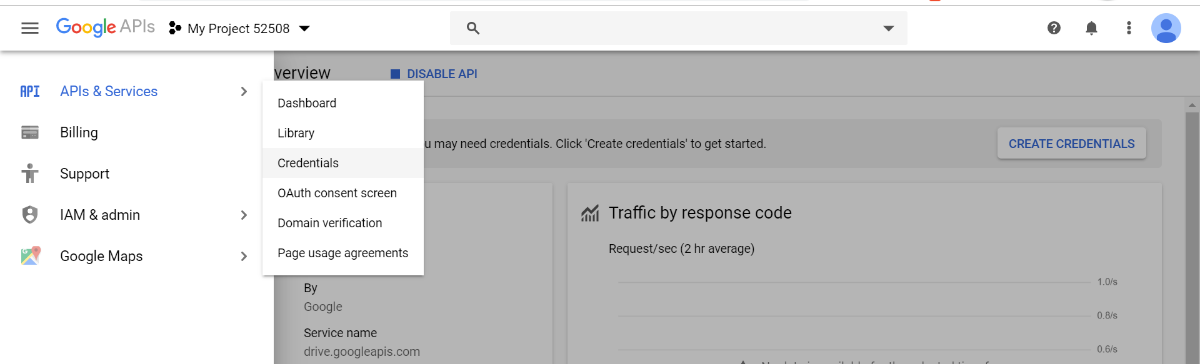
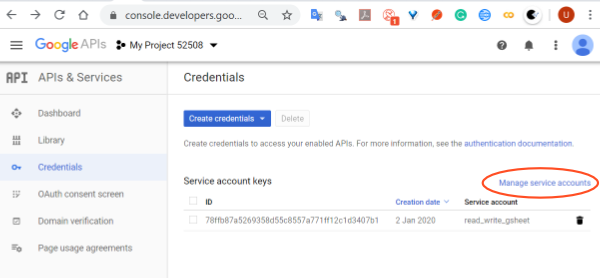
Now we will create credentials that we download as a JSON file and later add to the Google sheets node to configure it. To create credentials, from the navigation menu, hover over APIs and Services and select Credentials.
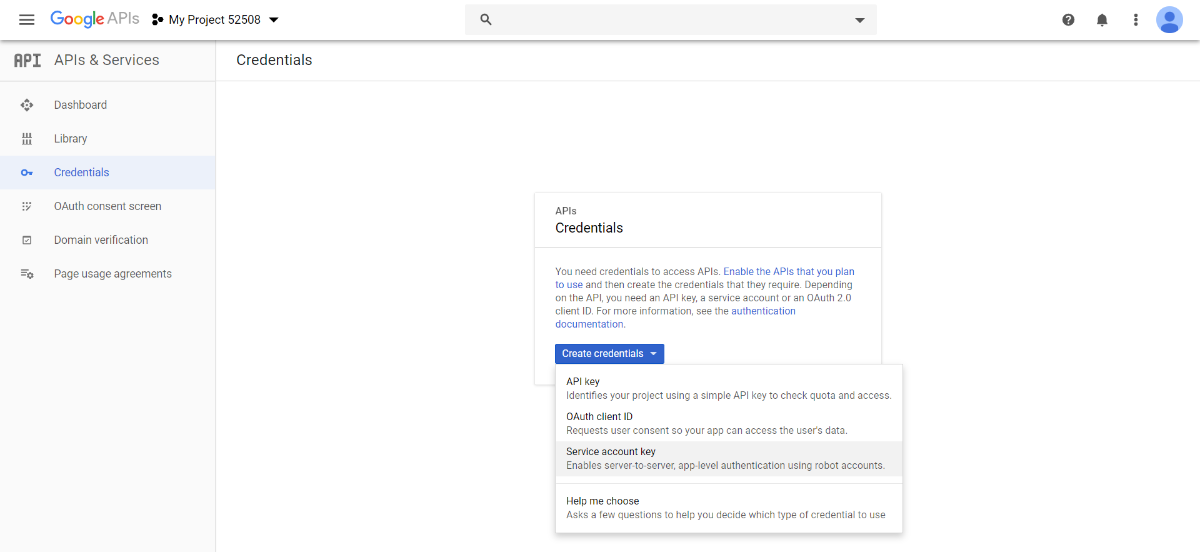
On the Credentials page, click Create credentials and select the Service account key option.
Set the Service account dropdown to New service account.
On the Credentials page, click Create credentials and select the Service account key option.
Set the Service account dropdown to New service account.
Then enter the Name and select a Role for your service account.
Click Create to generate a certificate file and download it as JSON.
Then enter the Name and select a Role for your service account.
Click Create to generate a certificate file and download it as JSON.

Now open the downloaded JSON file and copy all information from the file.
Keep the Google API console open in a tab in the browser.
Go to the node-red editor and open the Google sheets node by double-clicking on it.
Now open the downloaded JSON file and copy all information from the file.
Keep the Google API console open in a tab in the browser.
Go to the node-red editor and open the Google sheets node by double-clicking on it.
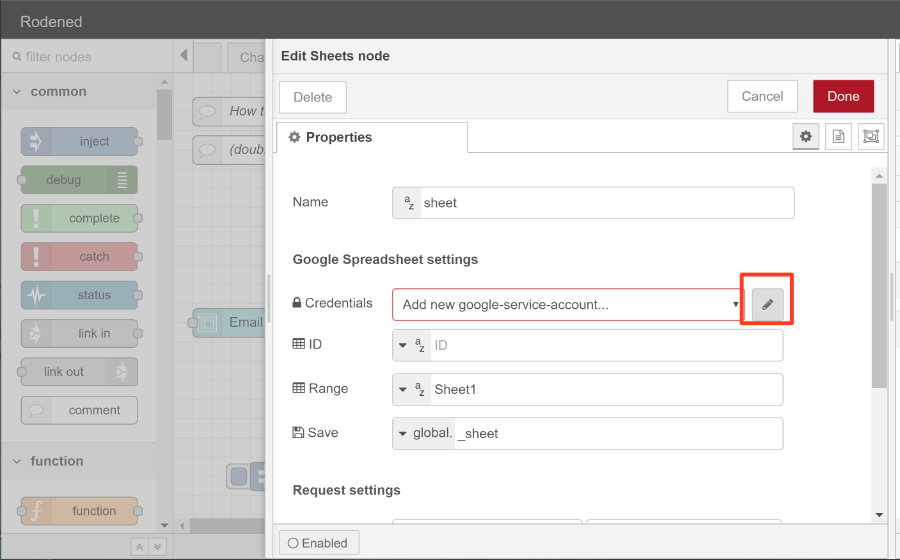
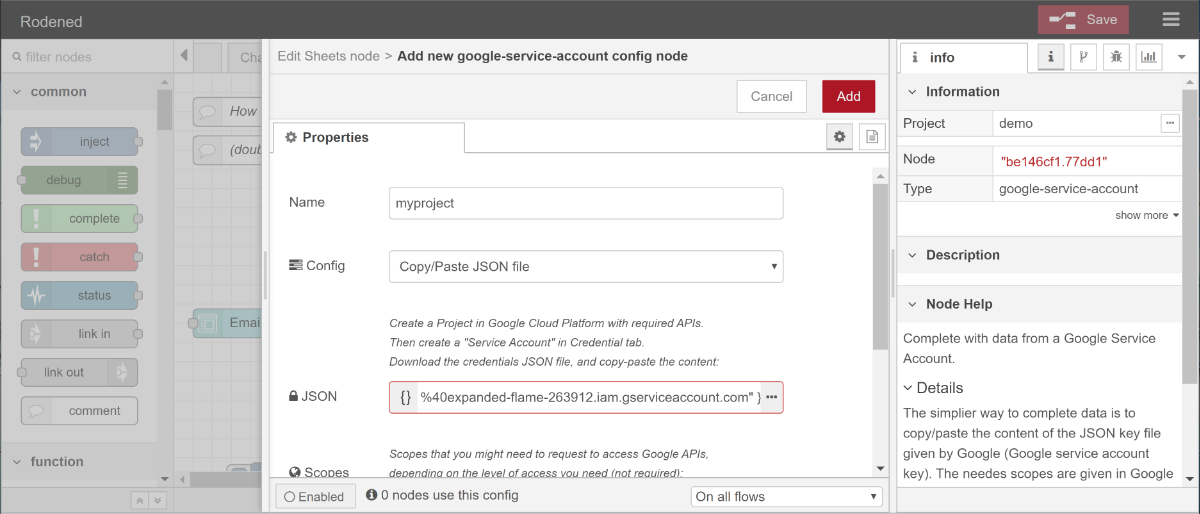
Give the configuration a name ( myproject), select Copy/Paste JSON file and in the JSON field paste the information from the downloaded credentials file.
Give the configuration a name ( myproject), select Copy/Paste JSON file and in the JSON field paste the information from the downloaded credentials file.
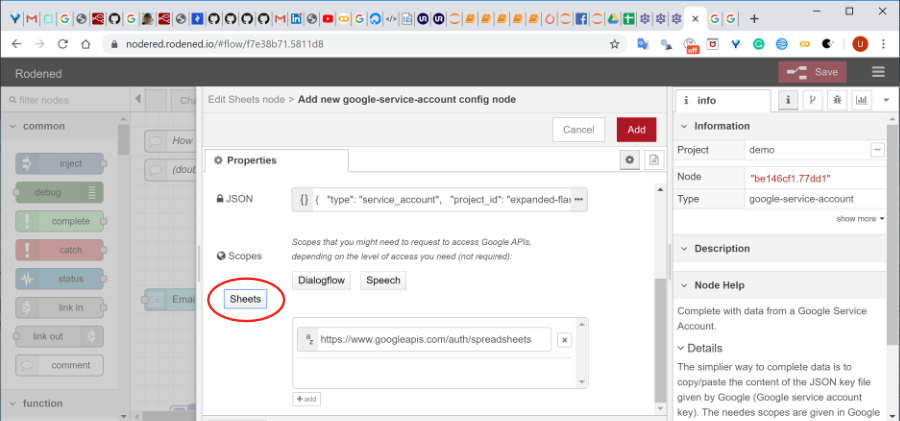
Click on the Sheets button under the Scopes further down in the configuration window.
Now click on the red Add button and close the node.
Click on the Sheets button under the Scopes further down in the configuration window.
Now click on the red Add button and close the node.
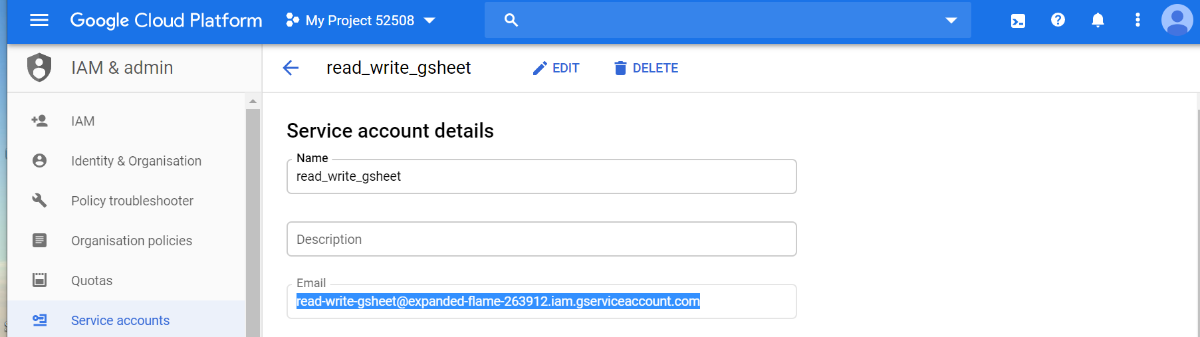
Copy the service account email address
Go back to the Google API console tab in the browser and Click on Manage service account to the right.
Click on the email link.
Click on the email link.
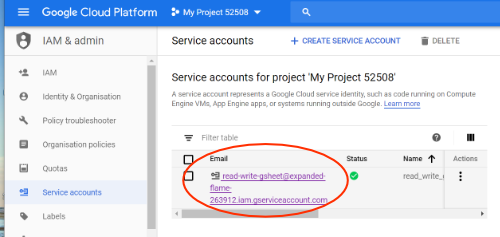
And copy the email address
And copy the email address
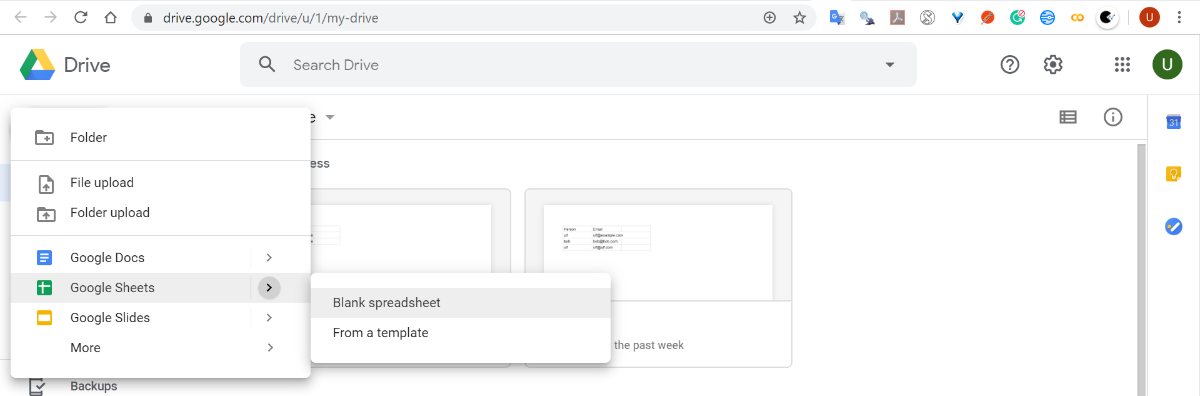
Create a new Google spreadsheet from Google Drive.
Start with creating a blank google sheet.
Take the ID part from the https link of the spreadsheet.
Take the ID part from the https link of the spreadsheet.
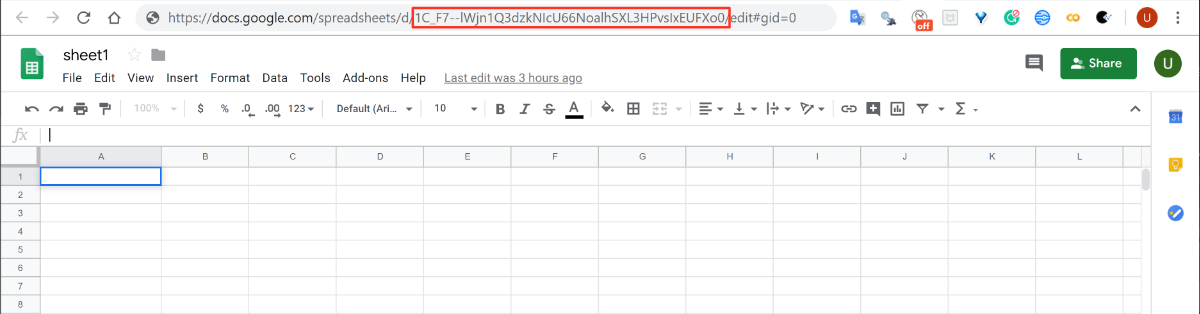
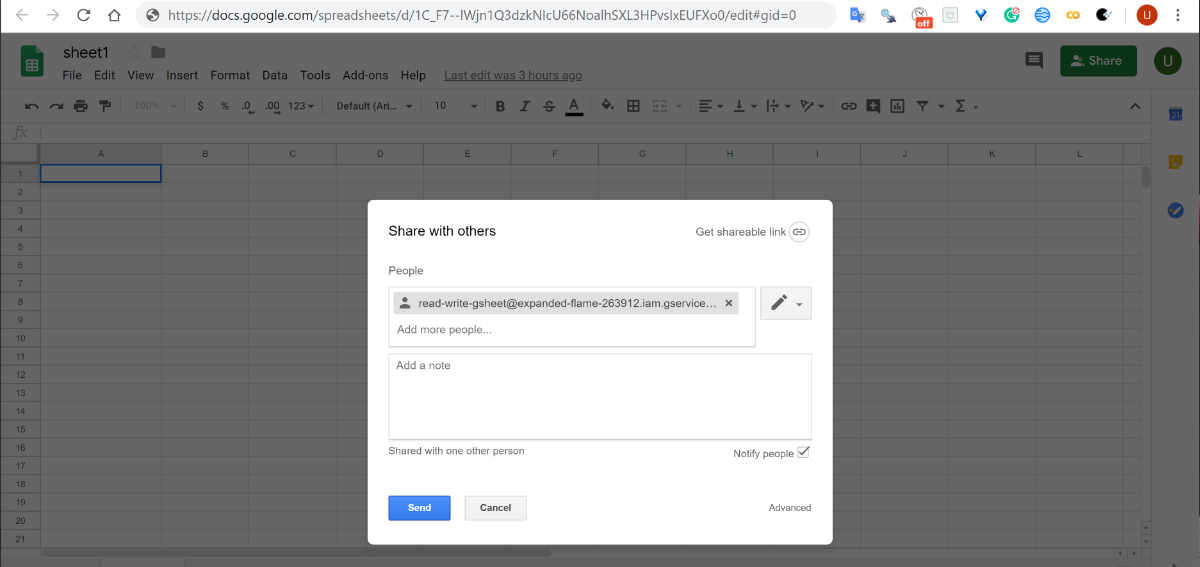
The link looks similar to this: https://docs.google.com/spreadsheets/d/1C_F7--lWjn1Q3dzkNIcU66NoalhSXL3HPvsIxEUFXo0/edit#gid=0
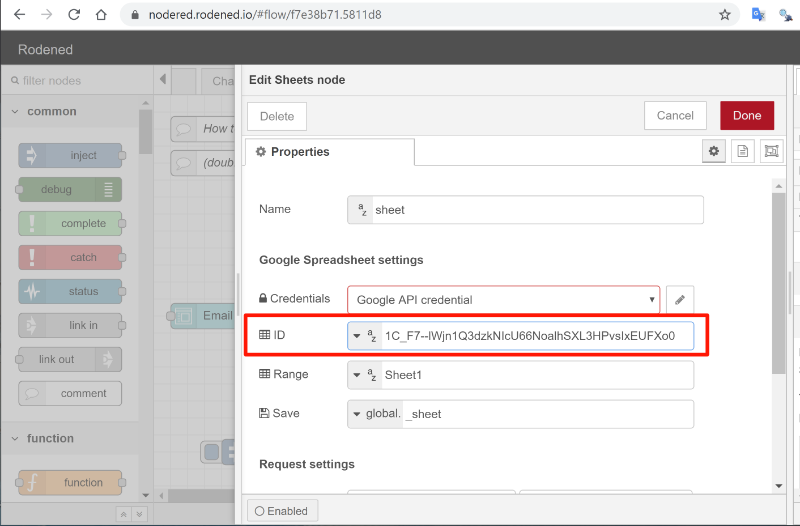
Here the ID is 1C_F7--lWjn1Q3dzkNIcU66NoalhSXL3HPvsIxEUFXo0 which should be copied to the ID field in the node configuration in the node-red editor.
The link looks similar to this: https://docs.google.com/spreadsheets/d/1C_F7--lWjn1Q3dzkNIcU66NoalhSXL3HPvsIxEUFXo0/edit#gid=0
Here the ID is 1C_F7--lWjn1Q3dzkNIcU66NoalhSXL3HPvsIxEUFXo0 which should be copied to the ID field in the node configuration in the node-red editor.
When you have the Google sheet open click on the share button in the upper right corner. In the people field put in the email address that you copied from Service account details and click ready.
When you have the Google sheet open click on the share button in the upper right corner. In the people field put in the email address that you copied from Service account details and click ready.
Now you should be able to read and write to the google sheet.
In the node-red editor, there is an error message: "Missing VISEO Bot Maker key - Read the documentation.". This will not stop the flow from working.
A key can be created at the VISEO GitHub and activated in the editor. This is only used for collecting user statistics so they understand how the plugin is used. I haven't figured out yet how to set this key as the documentation doesn't mention how to do it.
[{"id":"f7e38b71.5811d8","type":"tab","label":"form input to google spread sheet","disabled":false,"info":""},{"id":"f6f4bb9f.05a518","type":"google-spreadsheet","z":"f7e38b71.5811d8","name":"sheet","auth":"","sheet":"","range":"Sheet1","method":"new","direction":"line","action":"set","clear":false,"line":true,"column":true,"fields":"all","save":"_sheet","selfields":[""],"cell_l":"","cell_c":"","input":"payload","output":"payload","saveType":"global","inputType":"msg","outputType":"msg","sheetType":"str","rangeType":"str","cell_lType":"str","cell_cType":"str","x":610,"y":220,"wires":[[],[]]},{"id":"a0f615f7.5e71f8","type":"ui_form","z":"f7e38b71.5811d8","name":"","label":"Email form","group":"19dc9349.57f72d","order":1,"width":0,"height":0,"options":[{"label":"Email","value":"email","type":"text","required":true,"rows":null}],"formValue":{"email":""},"payload":"","submit":"submit","cancel":"cancel","topic":"","x":90,"y":260,"wires":[["ab8b37f9.38c1d8"]]},{"id":"f70f2f42.2444d","type":"debug","z":"f7e38b71.5811d8","name":"","active":true,"tosidebar":true,"console":false,"tostatus":false,"complete":"false","x":630,"y":280,"wires":[]},{"id":"ab8b37f9.38c1d8","type":"change","z":"f7e38b71.5811d8","name":"","rules":[{"t":"set","p":"payload","pt":"msg","to":"[{\"Email\":$.msg.payload.email}]","tot":"jsonata"}],"action":"","property":"","from":"","to":"","reg":false,"x":320,"y":260,"wires":[["f70f2f42.2444d","f6f4bb9f.05a518"]]},{"id":"4dc8e823.4bf4f8","type":"comment","z":"f7e38b71.5811d8","name":"How to configure Google sheets ","info":"# Install extra nodes\n\nFrom the manage palette, install node-red-contrib-viseo-google-authentication and\nnode-red-contrib-viseo-google-spreadsheet.\n\n# Set up a Google service account and enable Google sheets API\nGo to [https://console.developers.google.com/project](https://console.developers.google.com/project) and sign in to your Google/Gmail account.\n\nOnce signed in, you'll see a list of existing projects (if there are any) or you can click Create Project to create a new one.\n\nOn the New Project page, enter a name for your project, select an organization and then click Create.\n\n# Enable the Drive API\n\nMake sure you are logged into the Developers Console and your project is selected as the current project.\n\nFrom the navigation menu, hover over APIs and Services and select Library.\n\nSearch for and click the Google Drive API tile.\n\nClick enable.\n\n# Enable the Sheets API\n\nMake sure your project is still selected as the current project.\n\nFrom the navigation menu, hover over APIs and Services and select Library.\nSearch for and click the Google Sheets API tile.\n\nClick Enable.\n\n# Download Service Account Credentials\n\nTo create credentials, from the navigation menu, hover over APIs and Services and select click Credentials. On the Credentials page, click Create credentials and select the Service account key option.\n\nSet the Service account dropdown to New service account. Then enter the Name and select a Role for your service account.\n\nCopy the Service account ID which is an email address starting with your service account name.\n\nClick Create to generate a certificate file and download it as json.\n\nClick on the pen to the right of the Credentials in the node, copy and paste the information in the json file in the field for JSON.\n\n# Create a new Google spread sheet from Google Drive. \n\nTake the ID part from the https link to the spread sheet.\n\nThe link looks similar to this: https://docs.google.com/spreadsheets/d/1C_F7--lWjn1Q3dzkNIcU66NoalhSXL3HPvsIxEUFXo0/edit#gid=0\n\nHere the ID is 1C_F7--lWjn1Q3dzkNIcU66NoalhSXL3HPvsIxEUFXo0 which should be copied to the ID field in the node configuration.\n\nWhen you have the Google sheet open click on the share button in the upper right corner. In the people field put in the email address that you copied from Service account ID and click ready.\n\nNow you should be able to read and write to the Google sheet.\n\nThere is an ERROR message \"Missing VISEO Bot Maker key - Read the documentation.\". \nThis will not stop the flow from working.","x":150,"y":40,"wires":[]},{"id":"35db33a7.fb635c","type":"comment","z":"f7e38b71.5811d8","name":"(double click to read the instruction or look at the info panel to the right)","info":"","x":270,"y":80,"wires":[]},{"id":"d75aaf0e.2ec6e","type":"comment","z":"f7e38b71.5811d8","name":"put the message from the form into a json array","info":"","x":340,"y":200,"wires":[]},{"id":"f87a683d.b590e8","type":"debug","z":"f7e38b71.5811d8","name":"","active":true,"tosidebar":true,"console":false,"tostatus":false,"complete":"false","x":470,"y":420,"wires":[]},{"id":"399e0e50.282692","type":"inject","z":"f7e38b71.5811d8","name":"","topic":"","payload":"","payloadType":"date","repeat":"","crontab":"","once":false,"onceDelay":0.1,"x":140,"y":420,"wires":[["48cd8313.0a3dac"]]},{"id":"48cd8313.0a3dac","type":"google-spreadsheet","z":"f7e38b71.5811d8","name":"sheet","auth":"e6548b0f.6183a8","sheet":"","range":"Sheet1","method":"append","direction":"line","action":"get","clear":false,"line":false,"column":false,"fields":"all","save":"_sheet","selfields":[""],"cell_l":"","cell_c":"","input":"payload","output":"payload","saveType":"global","inputType":"msg","outputType":"msg","sheetType":"str","rangeType":"str","cell_lType":"str","cell_cType":"str","x":310,"y":420,"wires":[["f87a683d.b590e8"],["f87a683d.b590e8"]]},{"id":"4f243661.7f4e18","type":"comment","z":"f7e38b71.5811d8","name":"Read a Google sheet and display the text in the debug window","info":"","x":380,"y":360,"wires":[]},{"id":"19dc9349.57f72d","type":"ui_group","z":"","name":"Google sheets","tab":"5423d9a1.87d8b8","disp":true,"width":"6","collapse":false},{"id":"e6548b0f.6183a8","type":"google-service-account","z":"","name":"","scope":["https://www.googleapis.com/auth/spreadsheets"],"way":"json","check_dialogflow":"","check_speech":""},{"id":"5423d9a1.87d8b8","type":"ui_tab","z":"","name":"Submit form to google sheets","icon":"dashboard","disabled":false,"hidden":false}]