node-red-contrib-sprinkler 1.0.0
Powerful sprinkler controls for Node-RED
Looking for more flexibility than your dumb sprinkler controller provides? Use Node-RED flows to:
:crystal_ball: Use custom sensors and weather data to adjust watering based on rain levels, humidity, and forecasts
:sunny: Set different schedules for summer and winter, or May and June
:bell: Send notifications when a zone turns on or when a program runs
:desktop_computer: Use your own UI or customize one of the examples
:robot: Connect to OpenSprinkler, MQTT, or GPIO pins. Hardware independent!
:brain: Use machine learning to optimize your watering schedule (example not included)
:exploding_head: Connect Node-RED nodes to accomplish whatever your imagination desires
Getting started

Note: All of these screenshots are from examples within the library. In Node-RED, click the menu on the top-right, then Import -> Examples -> node-red-contrib-sprinkler.
Create a sequence of zone timer nodes. Here, each timer duration is set to 3s.
To create the sequence, you'll need to define a program configuration. Programs here are very similar to the concept of "program" traditionally used in irrigation systems: A program is a sequence of zones turned on for different durations. There are some more things to know about programs, but these will be explained later.
For debugging, connect an inject node to the beginning so you can trigger the program. In a real flow, you likely set the inject node to repeat at a certain time and on certain days. For more control, you may wan to use an advanced timer node like eztimer or bigtimer. More advanced timers allow you to trigger only during certain months/seasons, randomize start times, make exceptions for certain dates, and much more! Note that for eztimer you'll want to set "Timer Type" to trigger only and for bigtimer you'll have to put a switch node after to ignore the off events, otherwise your program will run twice per day!
After you assemble your schedule, you'll likely want to actually control your irrigation hardware. A zone in node will send messages whenever a zone turns on or off. You can connect it to:
- a debug node for debugging
- the built-in opensprinkler node if your device runs OpenSprinkler
- a template node to transform the zone name into an MQTT topic and then an MQTT node
- an http request node, GPIO control node, or anything else you can imagine
Note: While you can in theory have node-red running on one machine and control hardware an another machine over the network, it is best to run node-red directly on the hardware controlling your sprinklers. If your network fails, your sprinklers can keep running!
Timer control
Sometimes you may wish to temporarily pause your sprinkler program if there's a lot of rain. You may also wish to temporarily increase or decrease the amount of time a zone is set to run. You can use a timerctl out node to accomplish both these tasks. These actions don't have to be manual. You could connect a weather-detecting node to the timerctl out to automatically pause when it is raining! But be sure to uncheck the "Pause only when program is running" so that your program doesn't run when paused!
Gates
What happens if you trigger your program as its already running? You likeley don't want this to happen. Putting a run-gate node in front of your zone-timer nodes will drop any incoming messages if they are sent while the program is running.
Note: You definitely don't want a program to be triggered while it is already running, as each program has only one timer and that timer cannot be timing multiple things at once. If sent a message while the program is running, zone-timer nodes will throw an error and drop the message. However, to avoid error messages and enable you to put other node-red nodes at the beginning of your program, it is best to put a run-gate at the very beginning.
Advanced flow
In the examples here with two programs, it has been assumed each program is for a different system, each with its own water source. For example, you may have a systems of sprinklers for the lawn and drips for the plants. However, programs will typically share the same water source, and you'll want to ensure no two programs run at the same time.
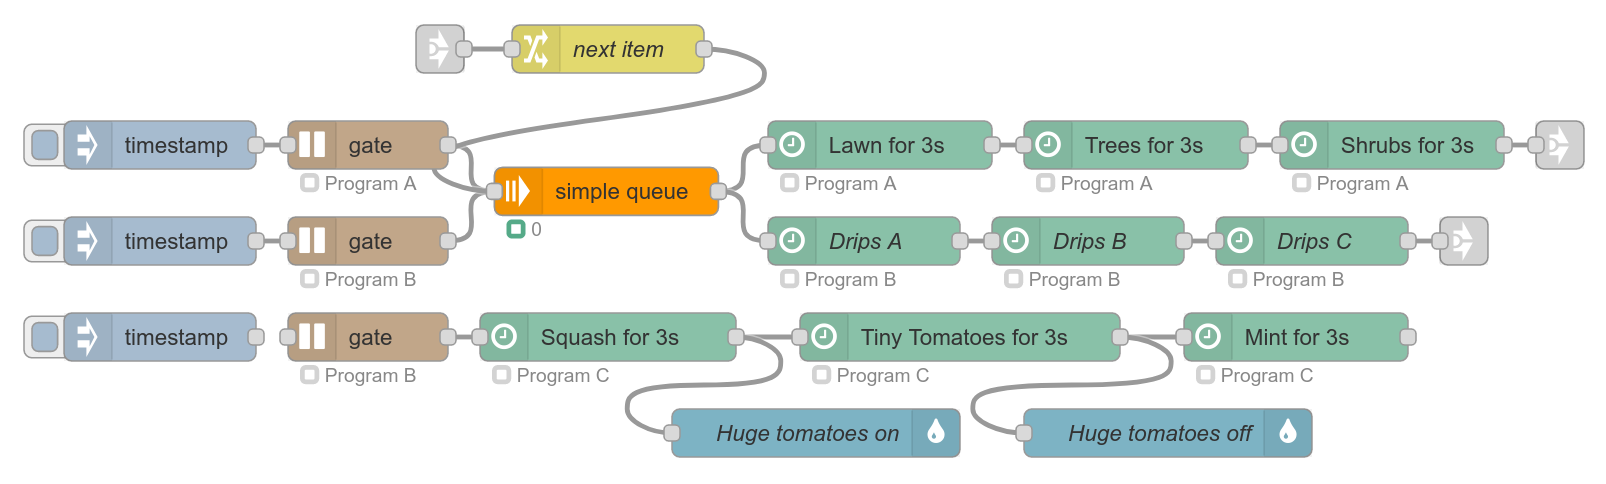
Queue
To ensure no two programs run at once, you can route incoming messages through a queue. Simple-message-queue has a good queue node for this purpose. At the beginning of the program, the triggers will enter the queue. One will pass through (make sure you turn on "bypass first message" for this!), and the rest will wait in line. After each program finishes, route the message into a change node, set msg.reset, and pass the message into the queue node to release the next trigger waiting in line.
You may be rightly concerned that the queue node is connected to two different nodes. When the message is released from the queue, it will be sent to both nodes! Why don't they both turn on? The run-gate node sets msg.program to the program's name. zone-timer nodes will check this property and drop the incoming message if it is meant for a different program. If instead of a zone-timer you put a different node after the queue, make sure to put a switch node or simply add another run-gate between the queue and your node to drop messages meant for other programs.
Multiple zones per timer
In most cases, you probably want zones to turn on one by one. But what if you'd like two zones to be on while a timer is running? The zone-out node acts as a simple switch to immediately turn a node on or off, without doing any timing. You can add one node before and one node after your timer, as shown in the above example, to run a second zone concurrently with the timer. In the example, both the "Tiny tomatoes" and "Huge tomatoes" zones will be on at the same time.
Dashboards
You may be curious what your sprinkler setup is doing behind your back. Perhaps you'd like to know which zones are on or how much more time a zone will be on for. You can use both the zone in and timerctl in nodes to connect to dashboard labels.
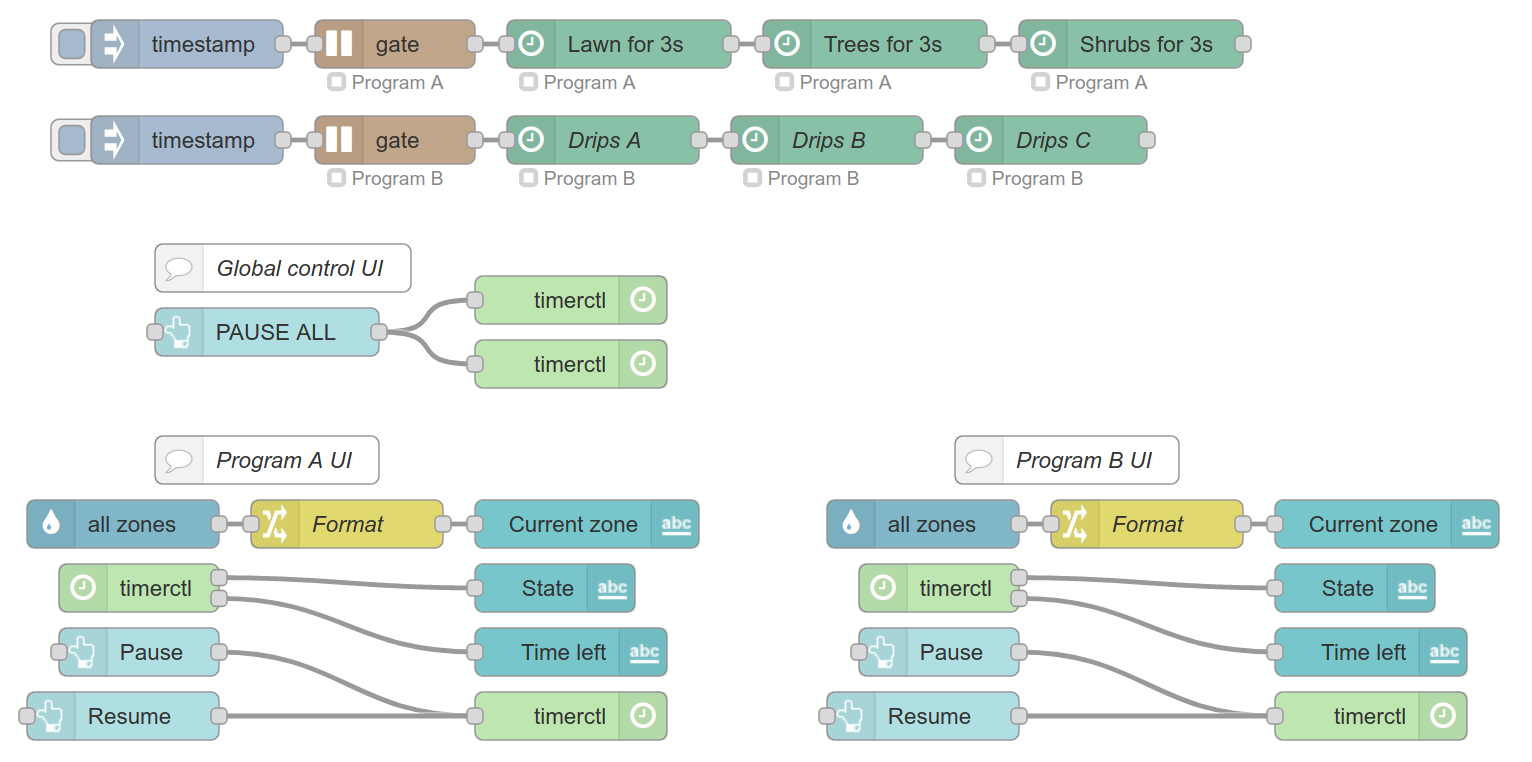
This example uses the node-red-dashboard module. You can make a much more complex dashboard than this example, so make sure to check out the module documentation!
Node Documentation
There's a lot of it, so it's best to just install the extension then view the docs insine Node-RED's Help pane.
Duration format
This library uses the same duration format as eztimer. Here are some examples of valid formats:
45(number or string) - 45 seconds5h 4m 45s(string) - 5 hours, 4 minutes, 45 seconds5:04:45(string) - 5 hours, 4 minutes, 45 seconds5:04(string) - 5 hours, 4 minutes
The code for durations is shamelessly copied form eztimer, so huge thanks to that project.
More examples
Like the other examples, you can find these in the import menu!
Advanced dashboard
A full-fledged dashboard you can use for your sprinkler control. It uses a subflow for drawing each program's UI, so supporting many programs is quite easy.
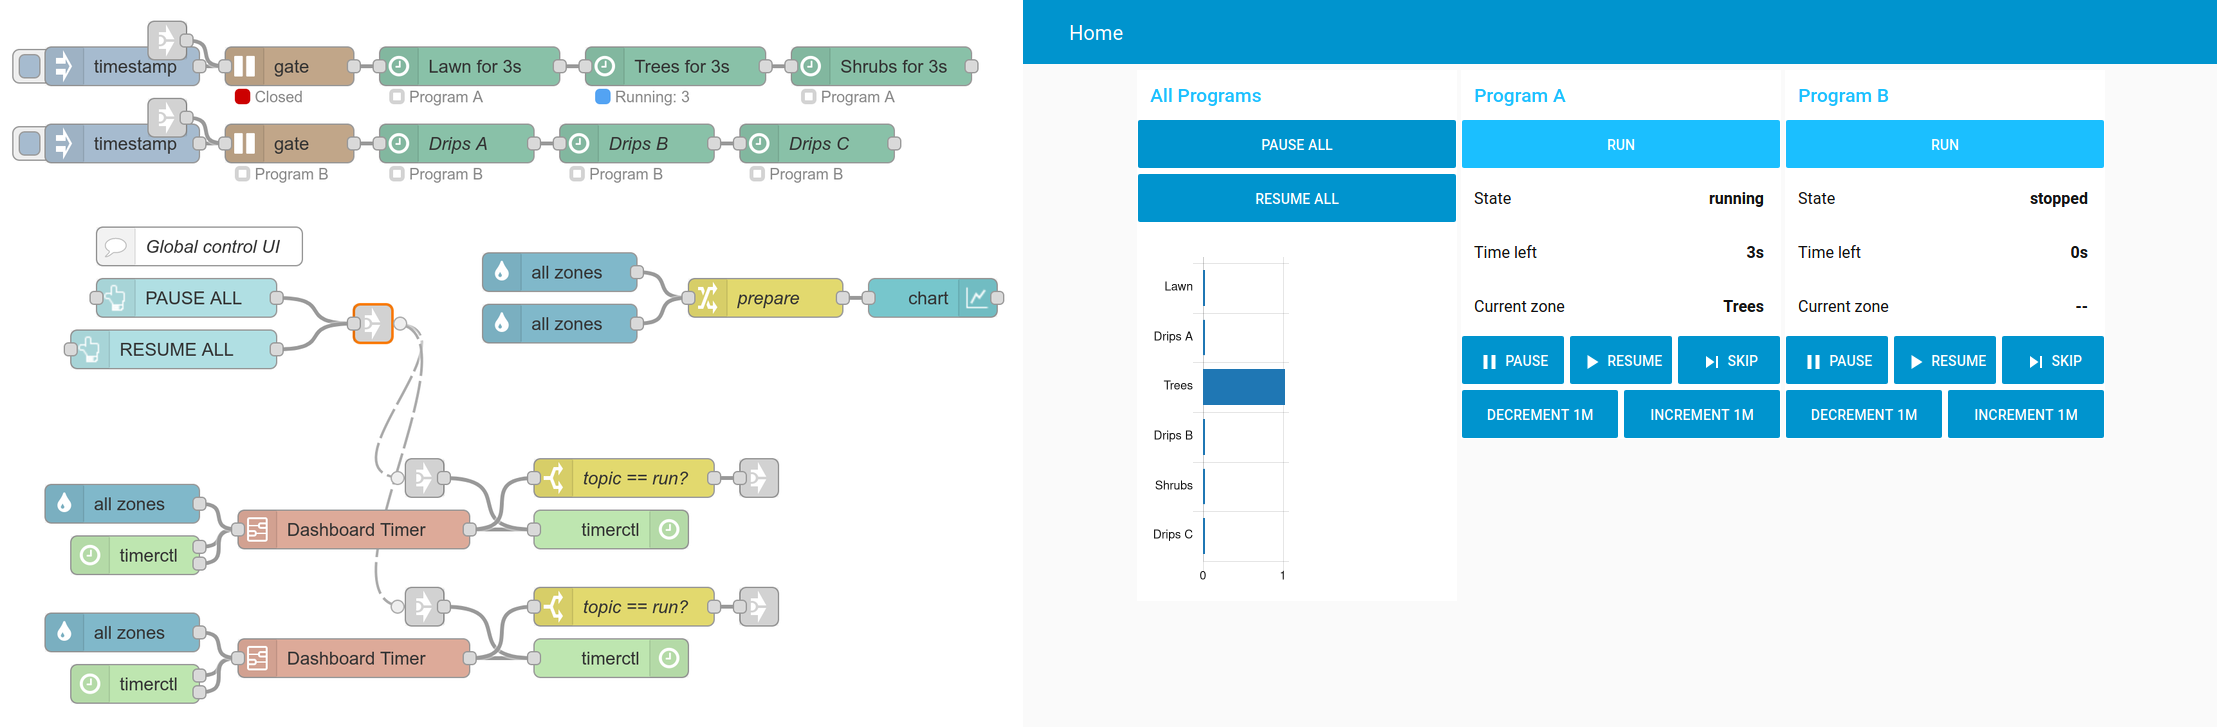
The bar chart is for showing which zones are on. There are better third-party components for this type of thing; this example strives to include only core components and those in the dashboard library.
Rain adjustment
The example uses the Zimmerman method, named for Richard Zimmerman's weather adjustments built into sprinklers_pi, to adjust the duration scaling based on the amount of rain. Weather data is retrieved from OpenWeatherMap, so you'll need to register an API key with them. The algorithm uses several factors to set the scale:
- Humidity measurements from the previous day (1% humidity = 1% change in scale)
- Temperature measurements from the previous day (1°F temp = 4% change in scale)
- Precipitation levels from both yesterday and today (0.01 in = 2% change in scale)
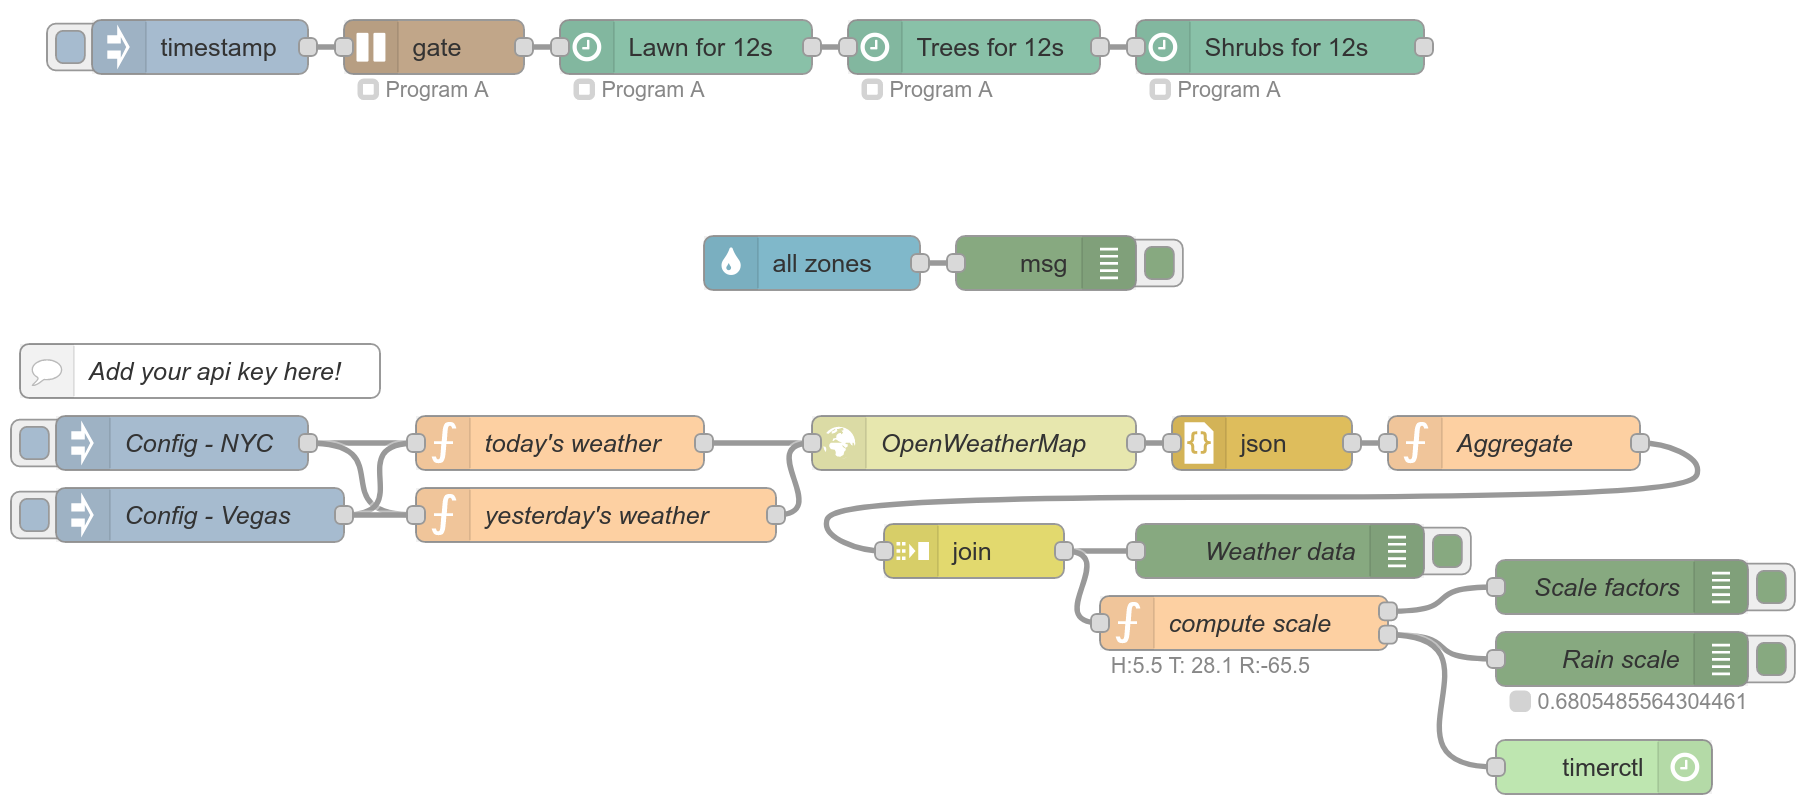
The example has two inputs to set the adjustments: One loads weather data from New York City while the other loads data from Las Vegas. The former should yield low adjustments (which would decrease your weathering as NYC can get wet), while Vegas should have high adjustments (it's in a desert!). In fact, adjustments might be so high that they do not proceed past 2x, which is defined as the maximum limit for adjustments.
To adapt the flow to your local area, you should adjust the base temperature, humidity, and precipitation inside the "compute scale" function node. These measurements should correspond to your average annual temperature, humdity, etc. That is, they are the weather conditions in wich the durations you enter for each zone work best. See the comments inside the node for more details.
For more accurate rain adjustment, you can use your own temperature and humidity sensors rather than the OpenWeatherMap API! Cobbling together a temperature/humidity sensor with an ESPHome device can be very affordable. And then you have one fewer cloud service to rely on. :grin:
How it works
From a technical standpoint, each node (zone-timer, zone-in, zone-out, etc) is merely a simple interface to its connected program configuration node. The program node serves as a combination of a state machine and message bus.
Program state machine

Each program runs a timer. A visual representation of the various states of the timer are shown above. Both zone-timer and timerctl out nodes cause the state machine to transition. A zone-timer will issue the "start" transition, upon which the timer will start ticking and move itself back to the "stopped" state when the timer reaches zero. The timerctl out issues the "resume" and "pause" transitions, and if the "Block program from running when paused" option is checked, messages with pause & reset topics will cause "block" and "unblock" transitions as well.
Program message bus
Another important function of the program is to act as a message bus, which simplifies wiring inside node-red. Whenever a zone is turned on or off, the zone-timer or zone-out node will send a message to change the zone over the program's message bus. The zone-in node will listen for these messages and send the appropriate message to connected nodes.

Above is a depiction of the messages sent to and from the program node internally. The tick connection to zone-timer is in dashed style as tick messages are not used for operation, but rather for updating the node's status displayed in the Node-RED editor.